The next level of Wappler extensibility - App Connect for our front-end framework is here!
Building custom App Connect custom components with their own dynamic attributes, events and data sources is now possible. You can write your own custom components and also provide a UI definition of your extensions so they integrate directly visually in Wappler!
You also build custom Server Connect extensions now for the backend. Both type of extensions are described here.
Your extensions can be published on Github and NPM, so they can be easily installed in Wappler as versioned packages and also use their own dependencies.
Writing Wappler Extensions
Extension Folder Structure
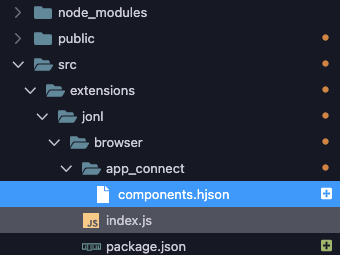
You can choose fully your own folder structure for the extensions, with just a few requirements:
-
it has to be a subfolder of your project, like for example
/src/your-extension-name -
it has to have package.json as any other node module, declaring the package general name, version and dependencies
-
for App Connect components, it has to have a folder with the UI definition file in it:
/app_connect/components.hjson -
for Server Connect extensions, it has to have a folder with the UI definition file in it:
/server_connect/modules/xxx.hjson
Creating New Extension
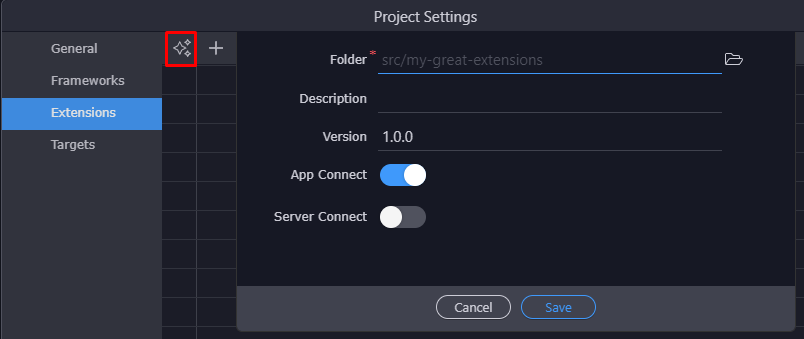
We have simplified greatly the initial setup of an extension folder, so just go to your project settings, choose Extensions and choose to Create New Extension. Then just pick a new folder to place your extension in and all the above requirements will be created automatically for you.
You can specify your own scope name (organization) if you will be creating multiple extensions. To do so create first a subfolder starting with @ and your organization name and then extension name as sub folder like src/@my_company/wappler-my-first-extension
It is also important to start your extension name with wappler- for more easier recognition
Writing Custom Server Connect modules and formatters
Writing Custom App Connect components and formatters
Publishing your extension to NPM
You can decide to publish your extension to NPM, so that other people can use it directly.
Make sure you check your package.json in the extension folder so that all correct name, info and dependencies are in there.
First make sure you visit NPM, register for account there and read the contribution rules
Then you can easily publish to NPM by:
- Open a terminal in Wappler

- Change to the folder where your extension is like:
cd src/your-extension-name
- Login to NPM by entering
npm login
- test your package publishing by running
npm publish ./ --access=public --dry-run
- if all ok, then publish the package
npm publish ./ --access=public
That is all! Your package is now officially available as Wappler extension!
Using a published extension in Wappler
Using an extension in your project that is already published to NPM is pretty easy.
Just open the project settings, go to Extensions, click on the [ + ] to add extension and enter the NPM name for your extension.
You can try to install our example extension:
@wappler/wappler-example-component
After saving the project settings, the extension will be installed directly and ready for use.


