Part 1: Firebase project setup
Part 2: Mobile project and receiving notifications
Part 3: Server project and sending notifications
→ Extra: Navigation and parameters
First, a friendly note (Because, why not?):
I knew the existance of Wappler on 2018, but I wasn’t able to get a licence due bank system and economy things.
I really noticed a difference to all software out there.
So when I started an “official” job, I remember sending a message to @Max_Saravia and he said: “You will not regret buying a license”
After that, my bank (and my country system) allow me buying an international licence, I didn’t hesitate.
From then, I started to see that mobile was growing, but I never imagine the capabilites of Wappler (and a little js thing).
I hope this tutorials can help those who find difficult to create a mobile project on Wappler.
If I could, you can.
And I hope you don’t find them boring, or annoying (please let me know if you do).
This is only a little return to all the help not only from the team, but this community too.
Introduction:
This is an extra tutorial for the push notification capacitor plugin implementation.
I recommend you see all 3 parts first.
When a notification is open, app is initialized so we will see index.html and that’s all.
But we can handle it so users can open pages, or do some complex logic depending on parameters.
For example, if we have a blog, it would be nice that a user can open that specific article on the app by opening the notification.
And here’s a way to do it:
Blog page:
I’ll create a blog page that will contain articles on it.
So I go to my backend project (remember that we need two separate projects for comunicate server connect and app connect as mobile is pure html) and create a new single query (as we need one record only) with a $_GET parameter called article_id:
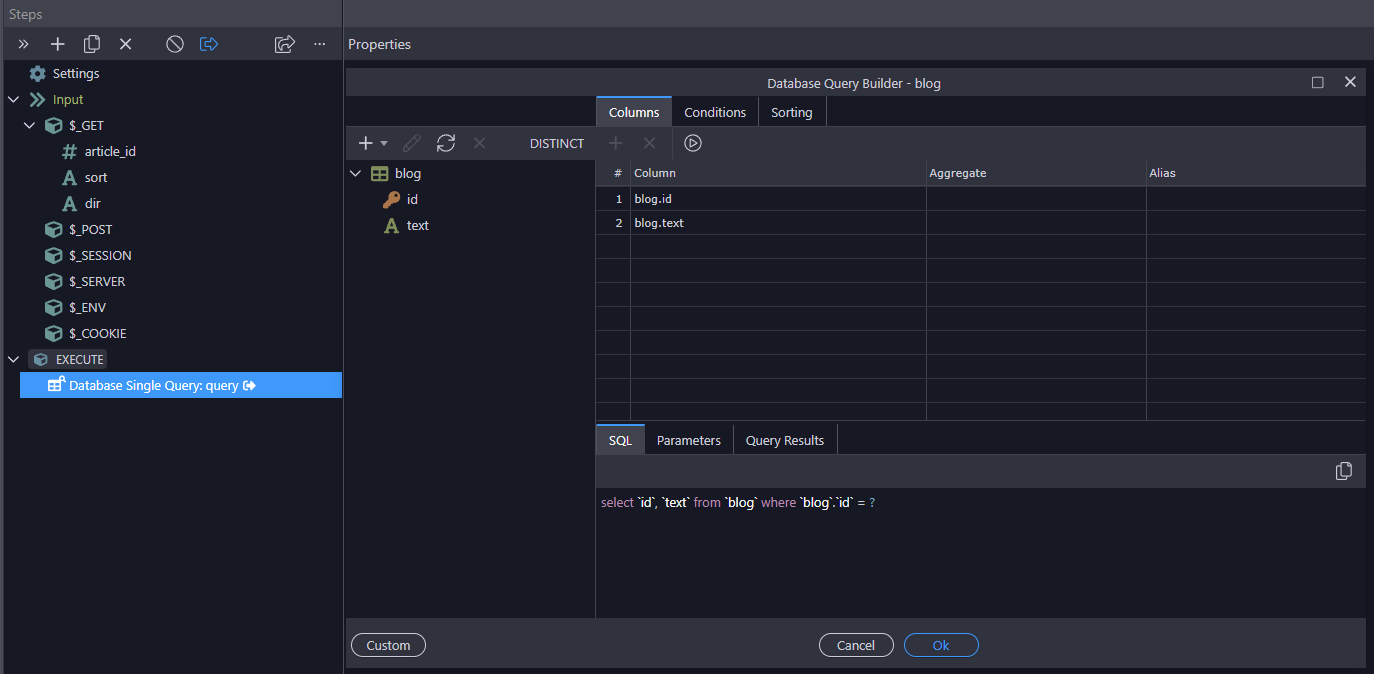
With this condition:

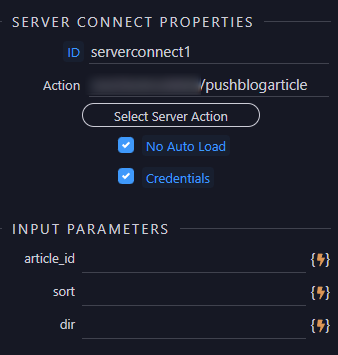
Now on my mobile project, under index.html I create a server connect component and select that API:

Don’t enter any parameter there, select no auto load and credentials if you need it.
On the blog page, we insert those query values:
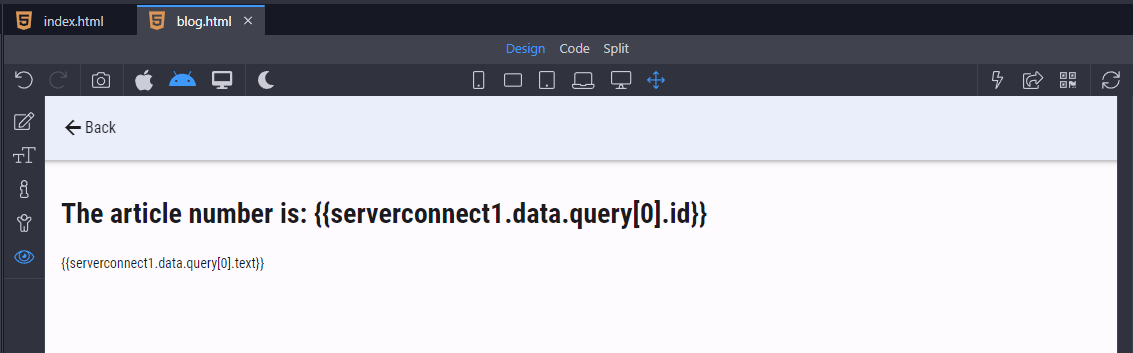
I also have a dmx hide when the server connect is executing:
    <div class="block" dmx-hide="serverconnect1.state.executing">
      <h1>The article number is: {{serverconnect1.data.query[0].id}}</h1>
      <p>{{serverconnect1.data.query[0].text}}</p>

    </div>
Now we need to get the article_id, show the blog page and load the server connect
Sending data:
Following Part 3: Server project and sending notifications :
We can send data items inside the message. Like:
    "data": {
      "item1": "value",
      "item2": "value",
      "item3": "value"
    }
And then handle it on the client-side. You can send as many data item as you want.
In the example of the blog article, I’ll send a page and an id parameter.
Receiving data:
If you check Point Nº 23 from Part 2: Mobile project and receiving notifications, you’ll see that somewhere on the code there’s a specific line:
//Here you can handle the "open" action
So if we send this:
    "data": {
      "page": "blog",
      "id": "717"
    }
And we replace //Here you can handle the "open" action
To this:
      const data = notification.notification.data;
      if (data) {
        const page = data.page;
        const id = data.id;
        console.log('The page is: '+page);
        console.log('The article is: '+id);
      }
That will print on console both values, in this case:

Now we need to do three more things.
- Link the
dataso we can use it on AppConnect. - Create the flow so we can load server connect, and navigate to
blog - Run the flow when we open the notification.
1.- Using data on App connect:
We are going to declare those values, we are going to use dmx.app.set function:
dmx.app.set('FCMPage', page);
dmx.app.set('FCMID', id);
Then we can use {{FCMPage}} and {{FCMID}} on any component.
2.- Creating a flow:
We create the flow:
- First load server connect with the article:
- After that, navigate to dynamic
blogpage:
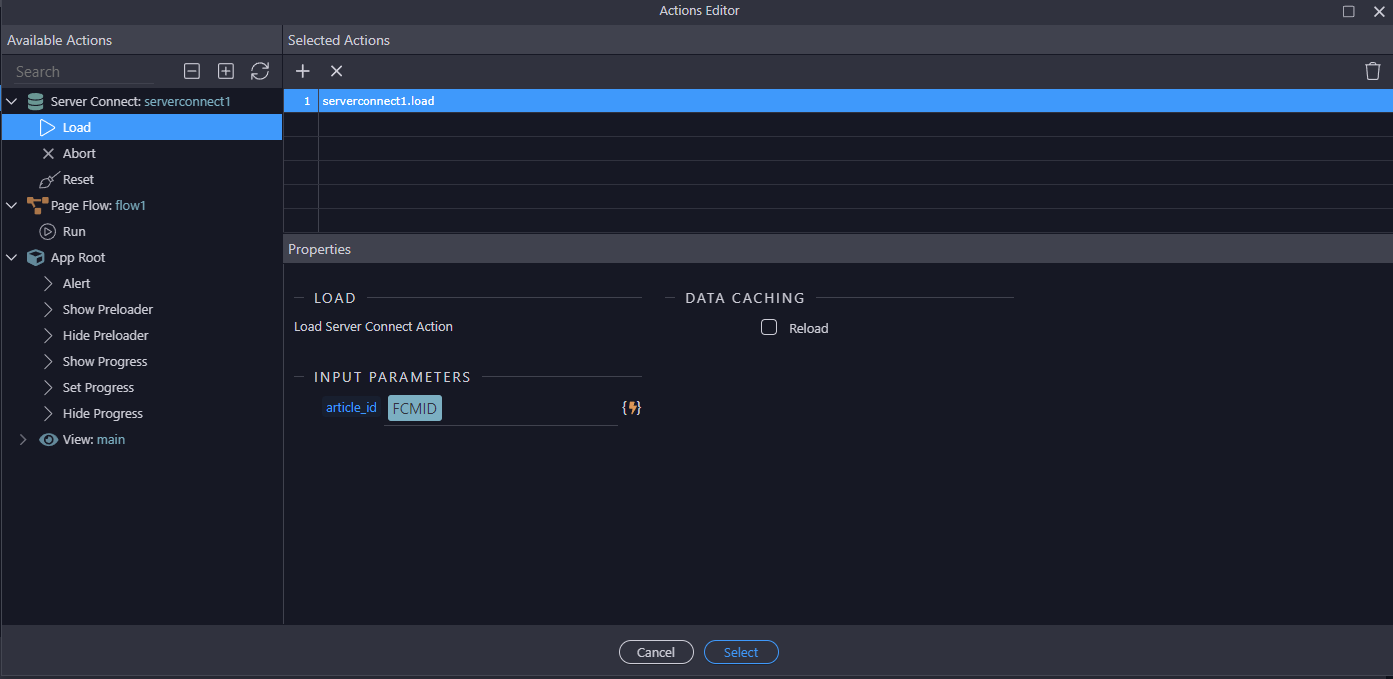
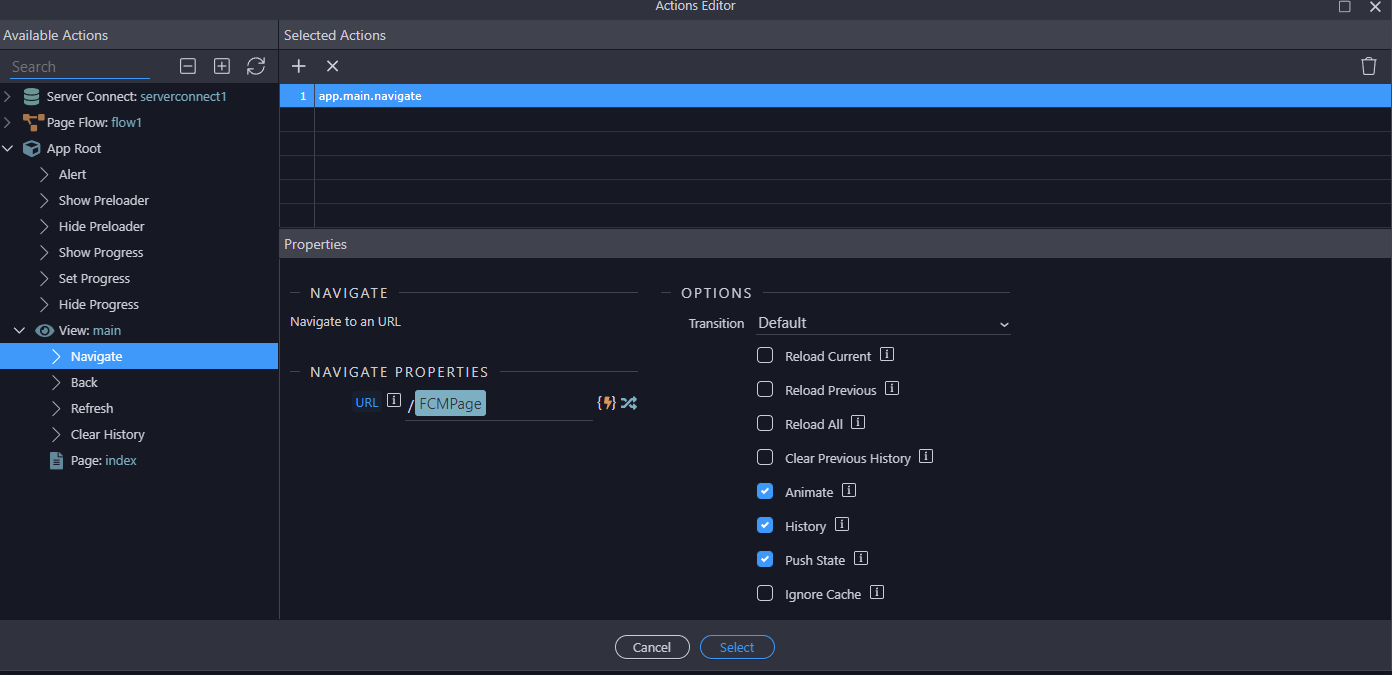
The app.main.navigate works on both frameworks (Framework7 and Bootstrap)
The code of the flow in case you need it:
  <script is="dmx-flow" id="flow1" type="text/dmx-flow">[
  {
    run: {
      outputType: "text",
      action: "{{serverconnect1.load({article_id: FCMID})}}"
    }
  },
  {
    run: {outputType: "text", action: "{{app.main.navigate('/'+FCMPage,{})}}"}
  }
]</script>
3.- Running the flow:
With this js code we can call the flow:
dmx.parse("flow1.run()");
Now all the code looks like:
    Capacitor.Plugins.PushNotifications.addListener('pushNotificationActionPerformed', function(notification) {
      console.log('Open push notification:', notification);
      // Here we run the logic when we open the notification
      const data = notification.notification.data;
      if (data) {
        const page = data.page;
        const id = data.id;
        console.log('The page is: '+page);
        console.log('The article is: '+id);
        dmx.app.set('FCMPage', page);
        dmx.app.set('FCMID', id);
        dmx.parse("flow1.run()");
      }
    });
You can also have a routing where the article is:
/blog/:idand a query manager, so the navigate url will be: /{{FCMPage}}/{{FCMID}} and the server connect will load the id from query manageridparameter.
Now, like a said before, I want users can open directly the blog page with article 717 only by clicking the notification.
So I send:
{
  "message": {
    "token": "Fcm token",
    "notification": {
      "title": "Hello",
      "body": "Check the new blog article"
    },
    "data": {
      "page": "blog",
      "id": "717"
    }
  }
}
And here we got the result:
The localhost page (left) connects to the FCM server using an API that we saw here and send the notification, I wasn’t expecting results too fast
This is only an example of what you can do using Wappler + Capacitor
The javascript part is from the official docs and a patrick’s advice of adding Capacitor.Plugins. before the plugin name (thanks once again).
So there’s nothing crazy or out of the limits.
As always, thanks for reading and just let me know anything you need ![]()