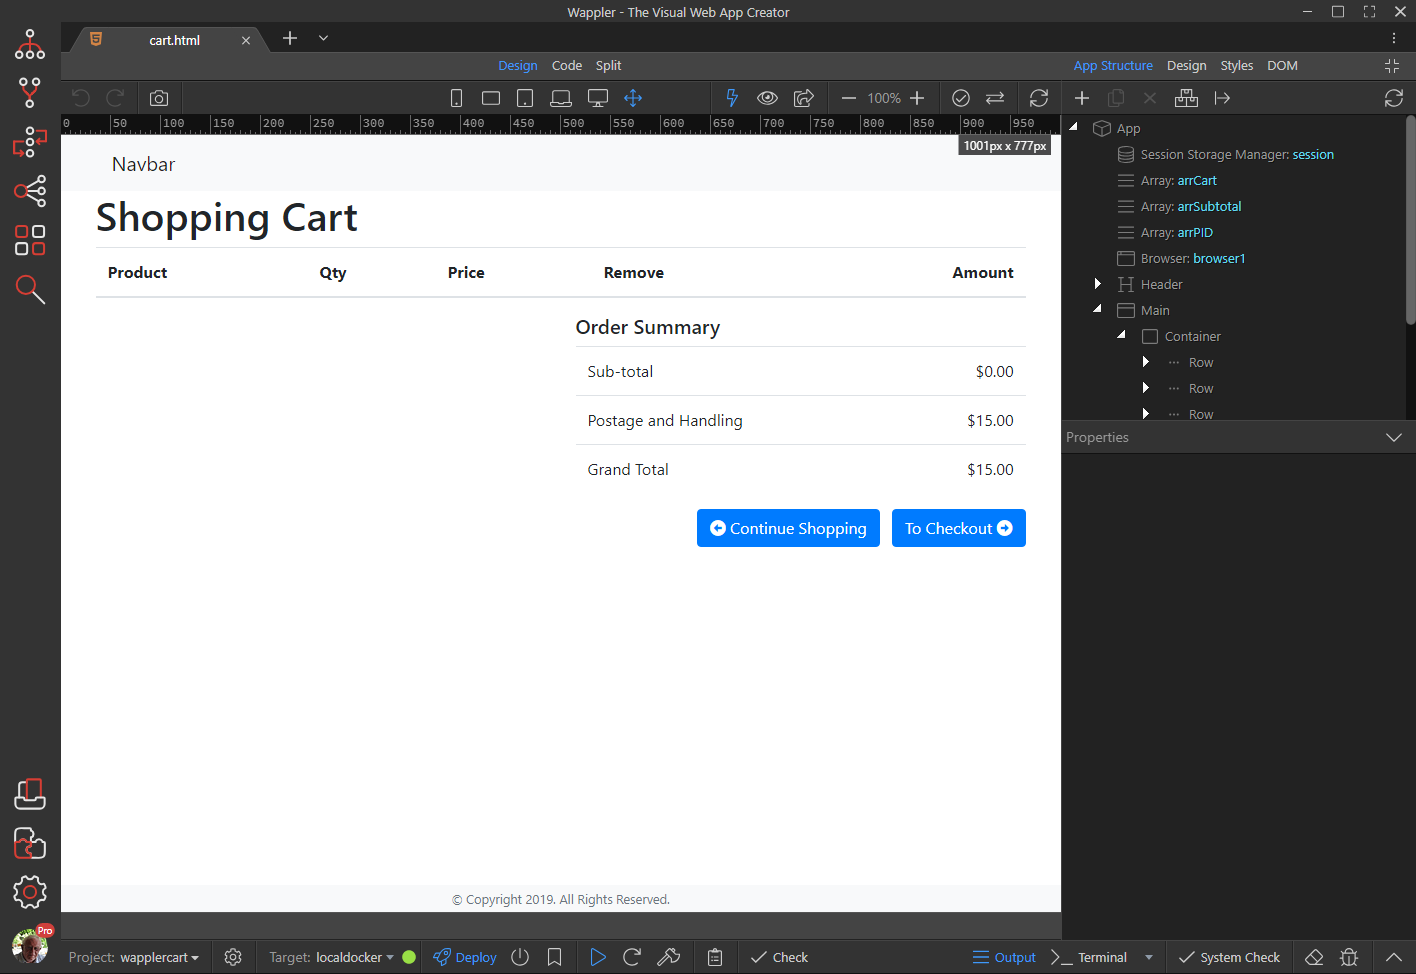
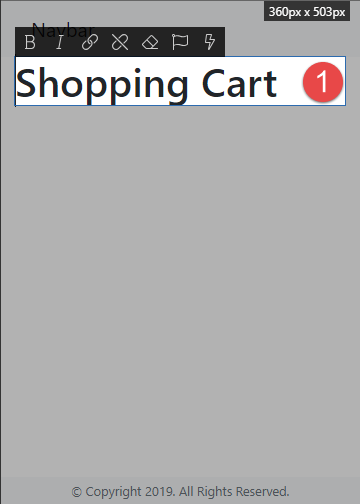
This is what our page will look like when we have finished:
-
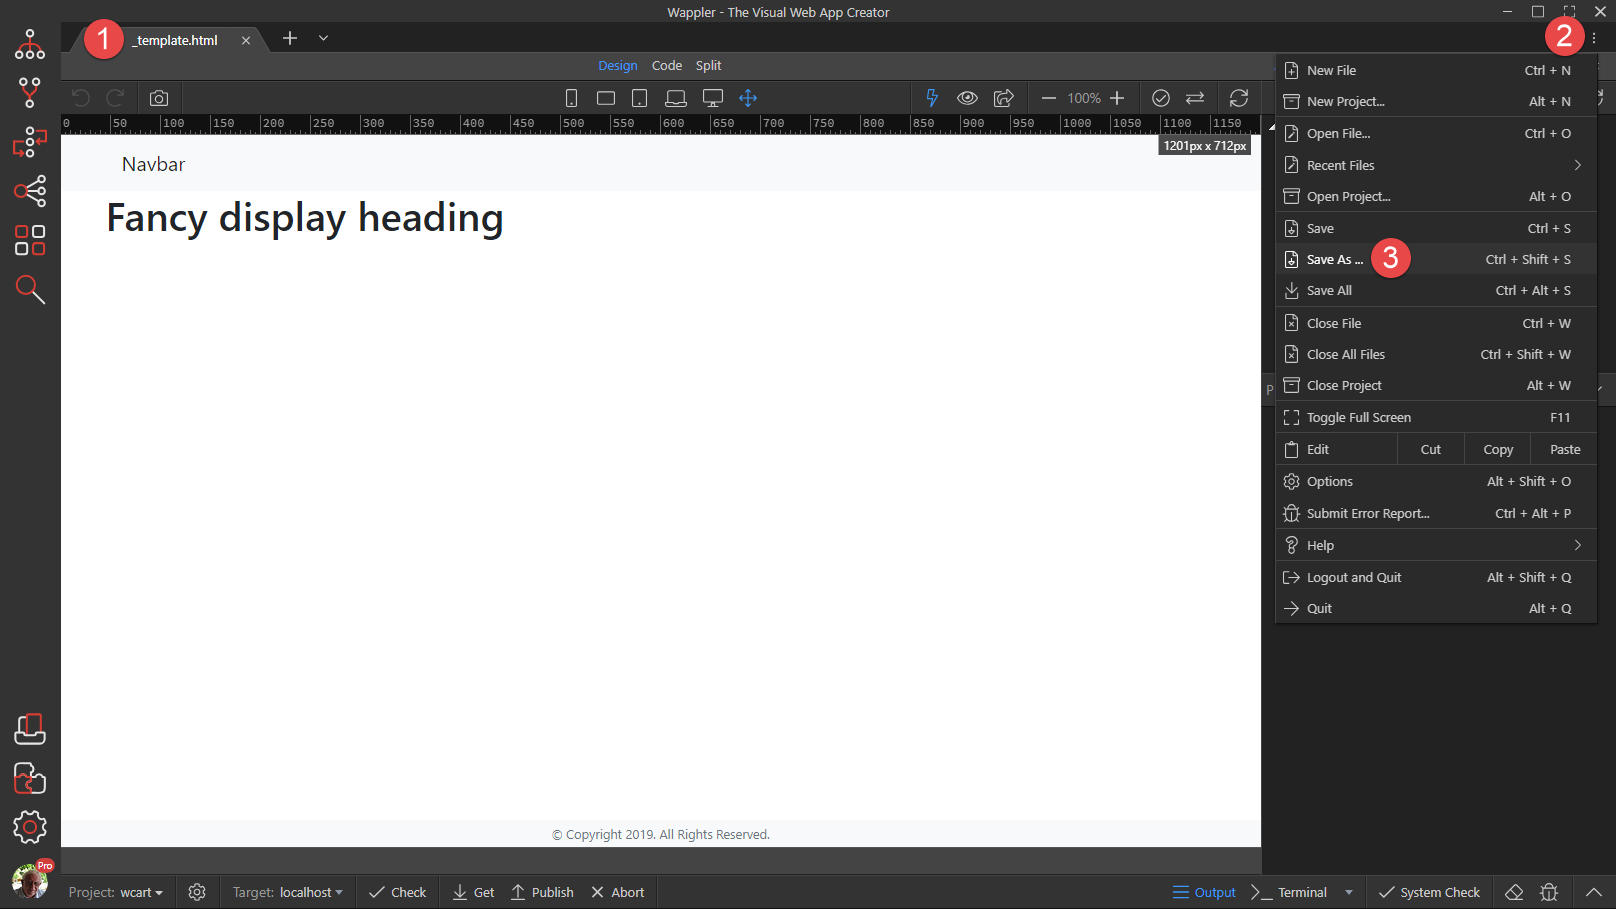
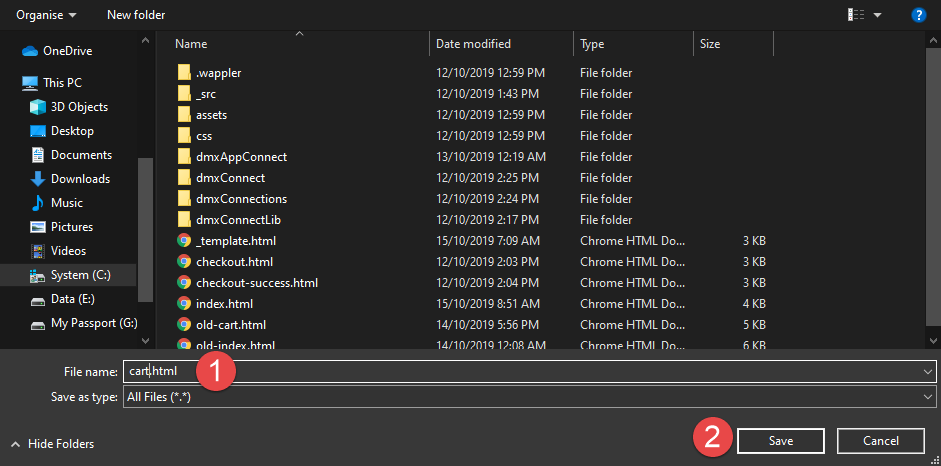
Load the _template.html page (1), click the Menu button (2) and select Save As (3)
-
In the pop-up, give the new file a name (1), we have called it cart.html, and click Save (2)
-
Double click the title and change the text to suit (1)
-
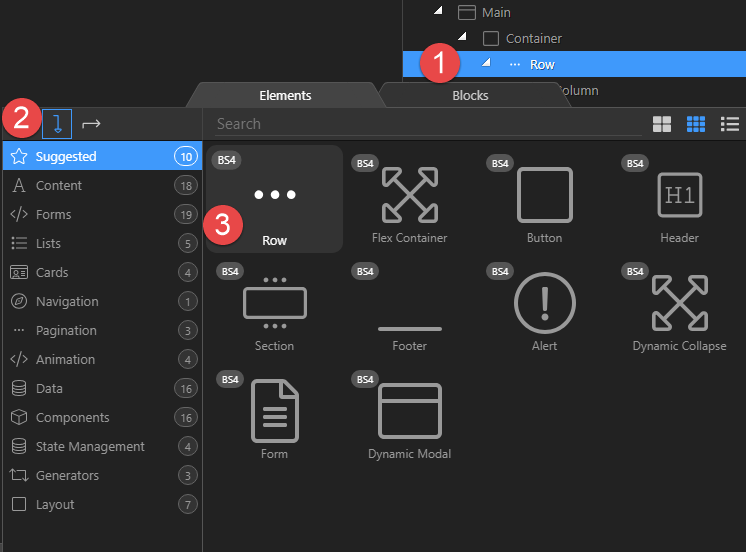
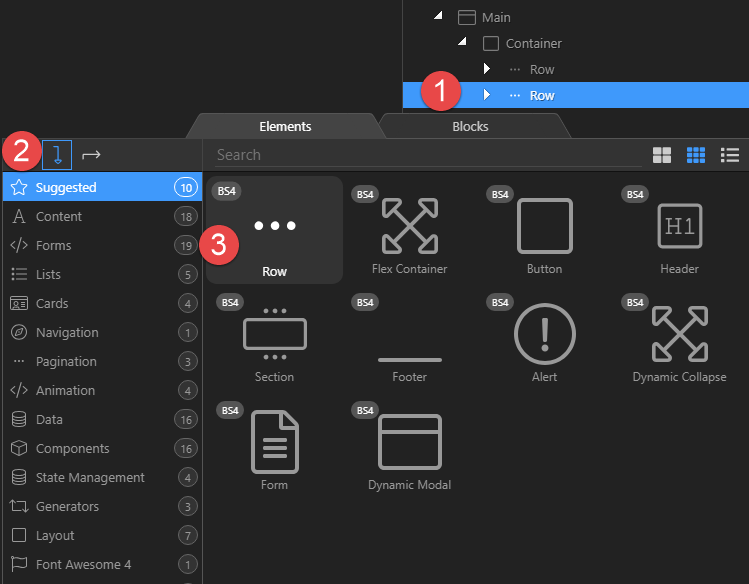
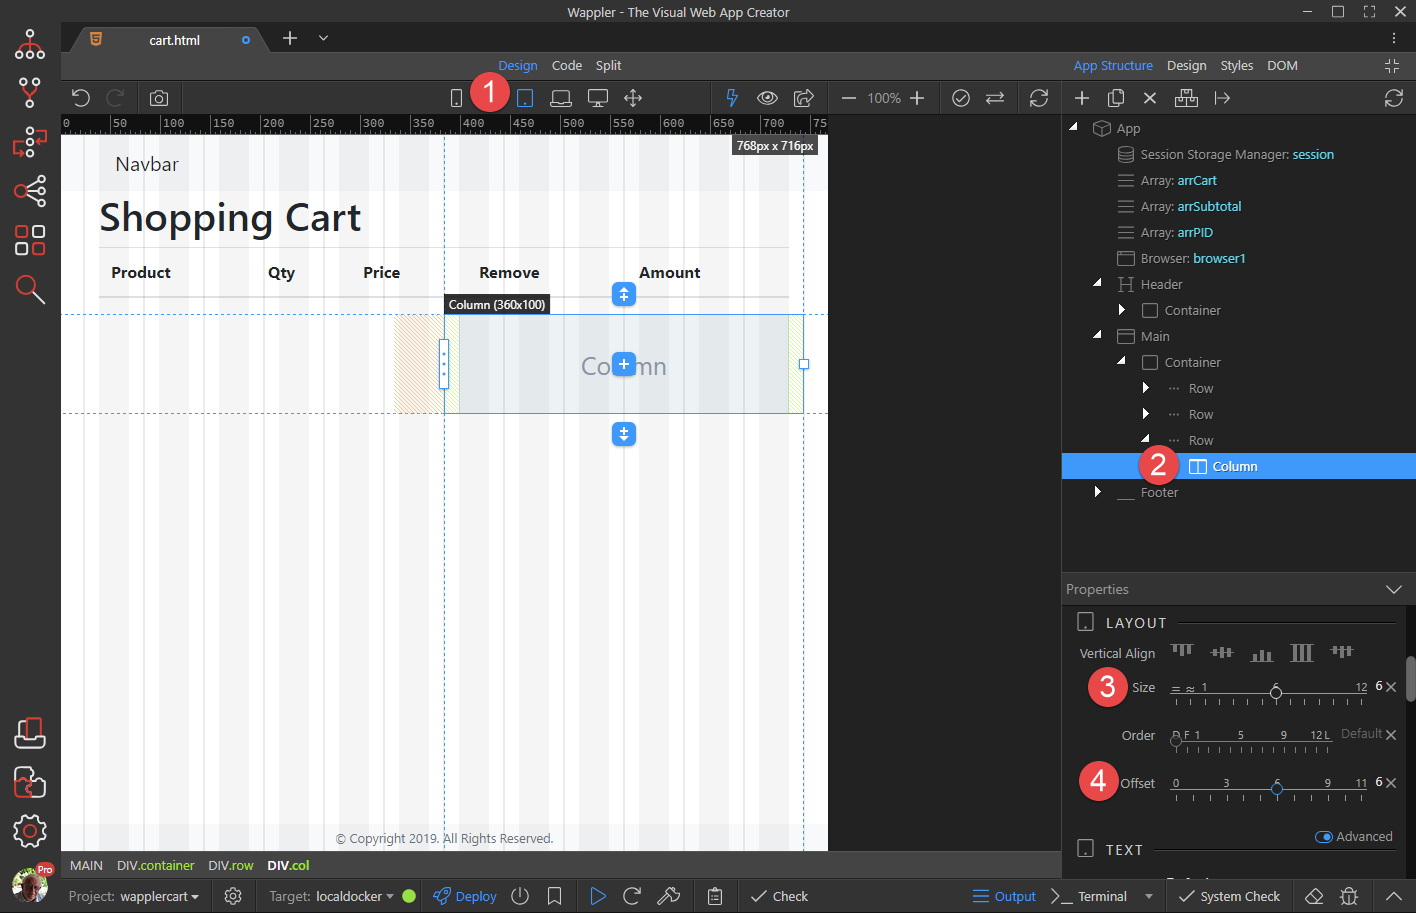
Right click Row (1) under Container, choose to add after (2) and click on Row (3). This will add another row to show the contents of our Cart.
-
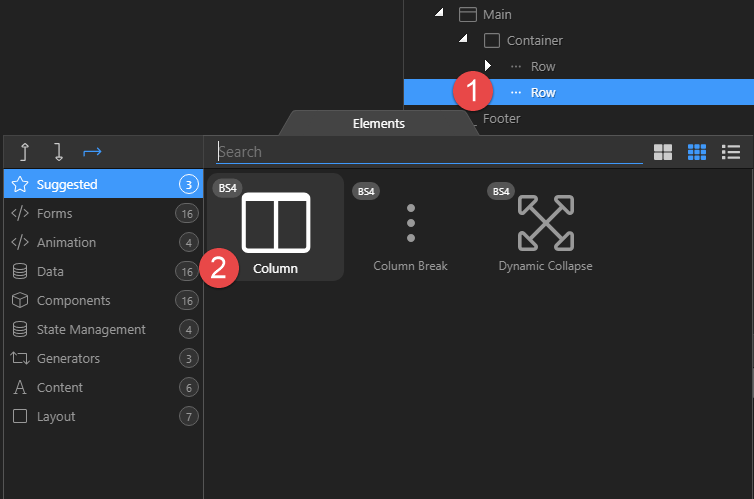
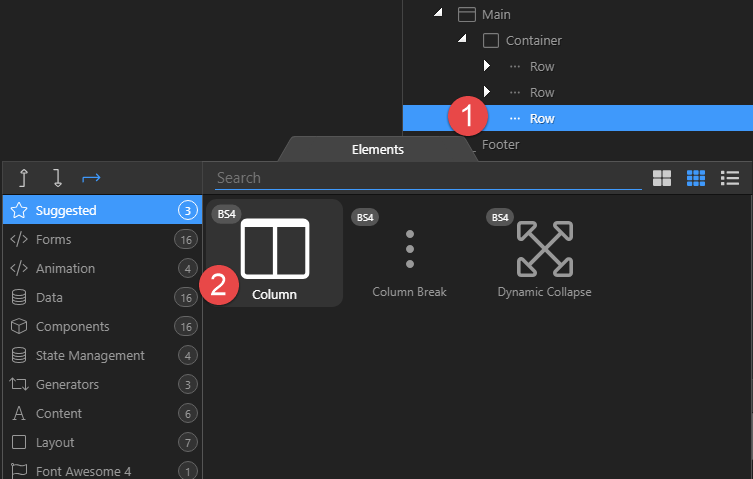
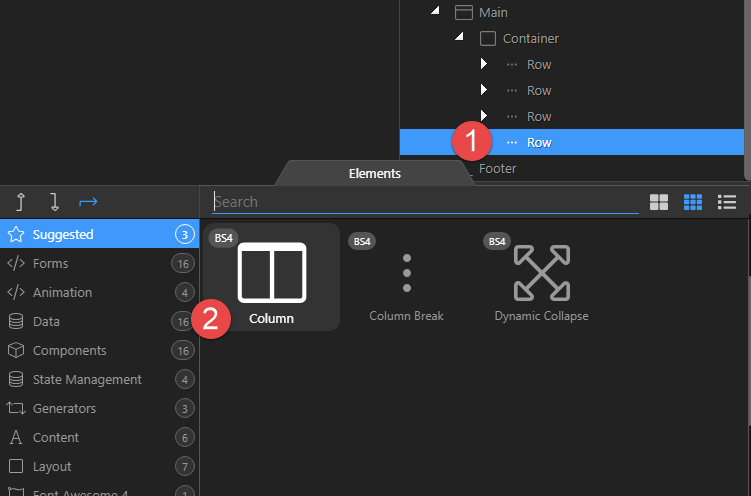
Right click the new Row (1) and click on Column (2) to add a column
-
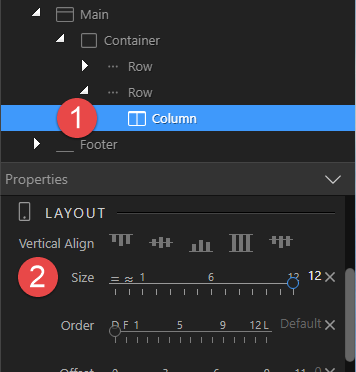
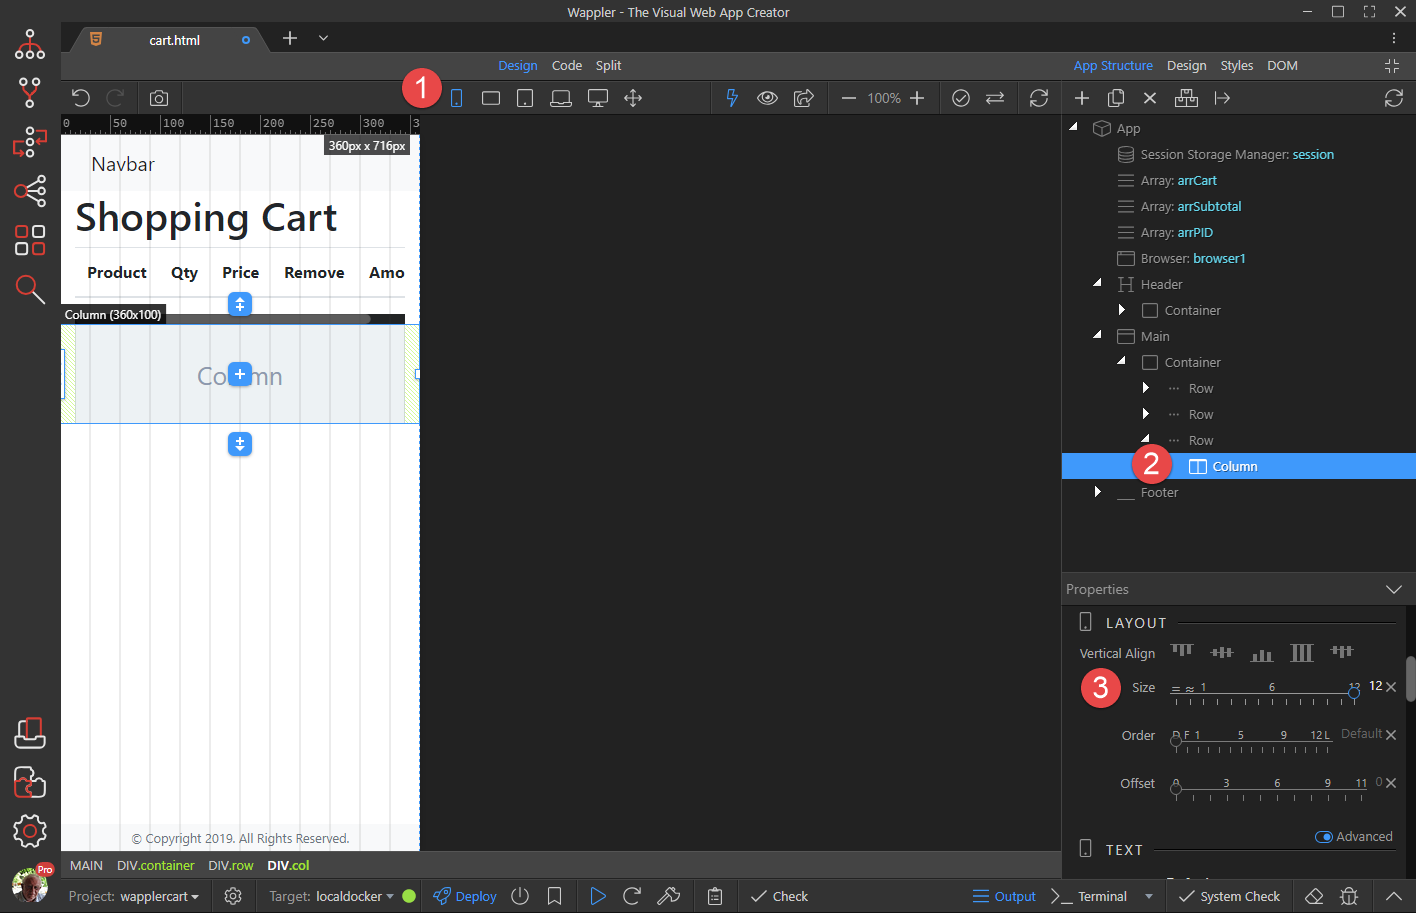
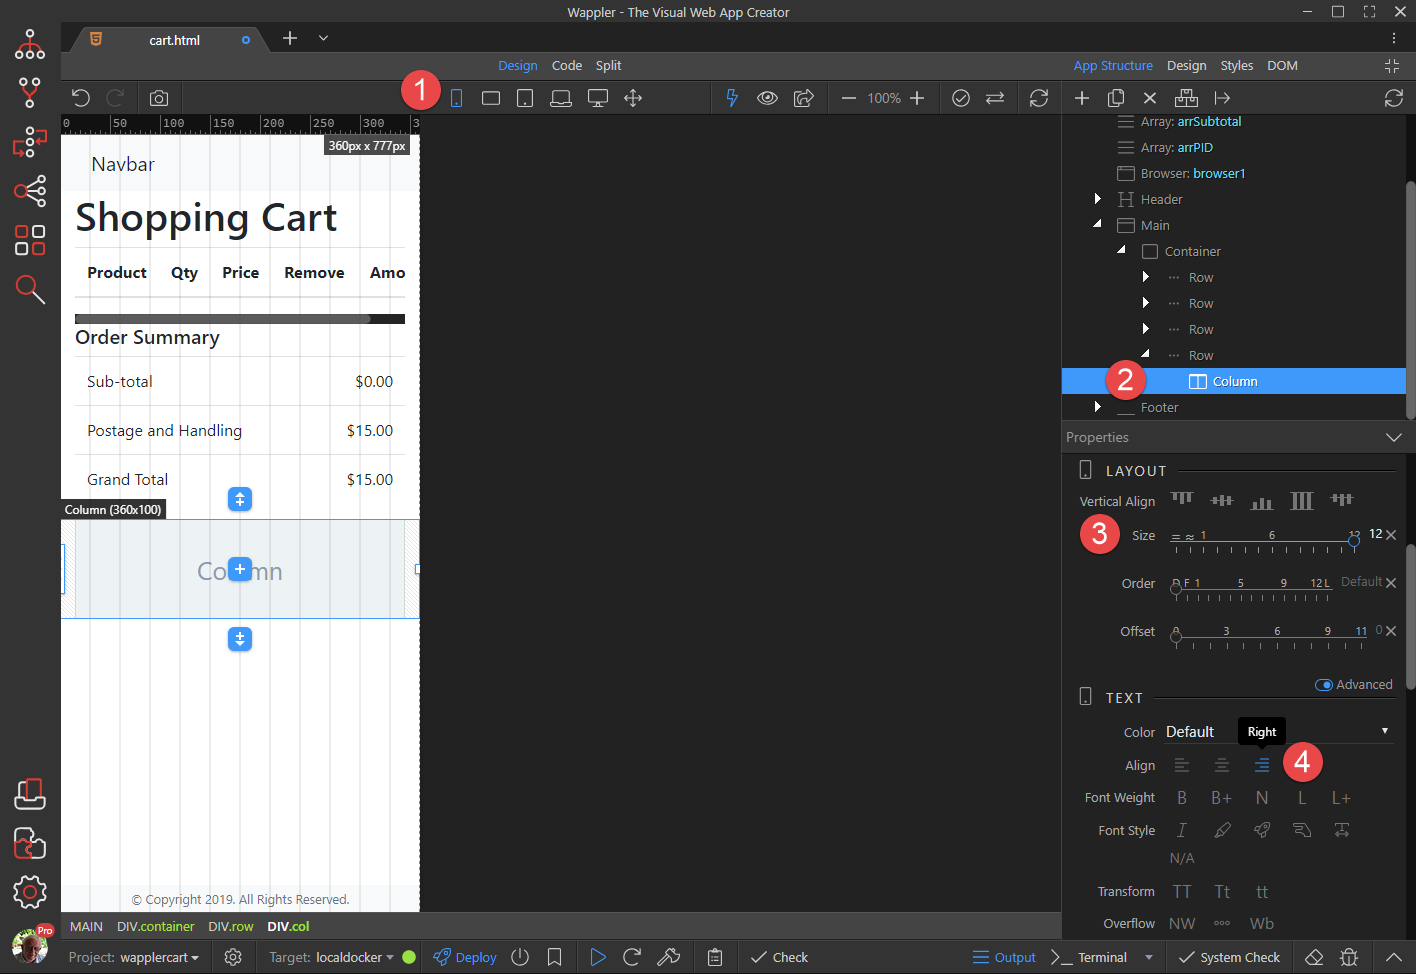
With the Column (1) still selected, give the Column a size of 12
-
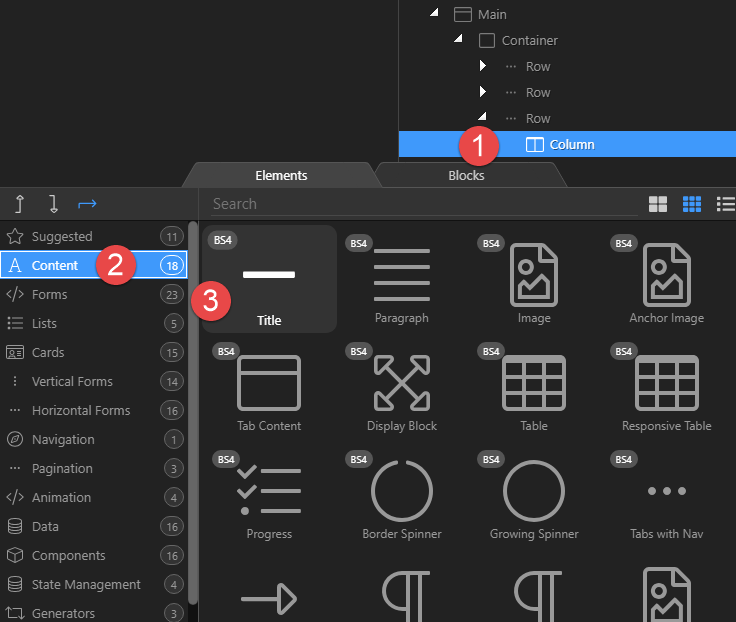
Right click the Column (1) and in the pop-up choose Content (2) and Responsive Table (3)
-
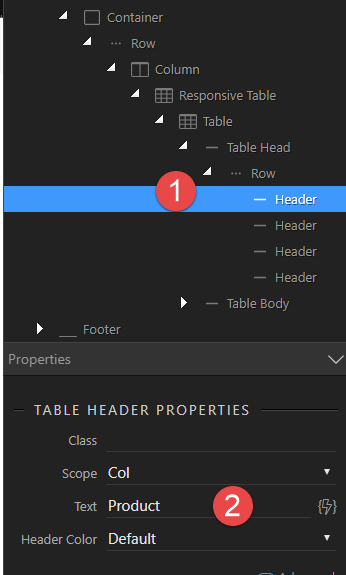
Choose the Header of the first column (1) and rename it to Product (2)
-
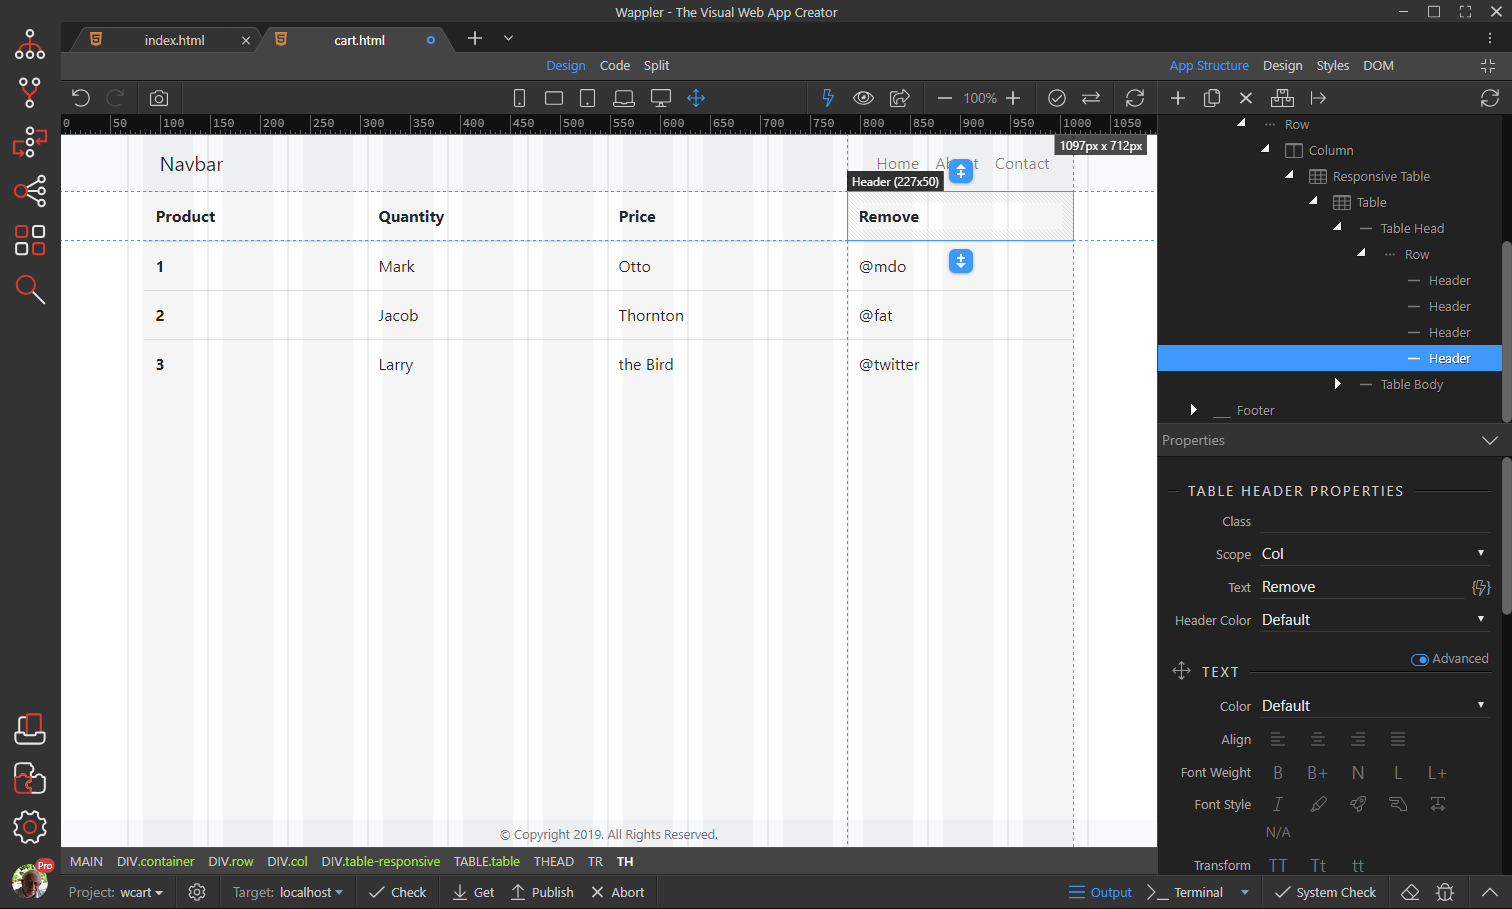
Do the same for the remaining 3 Headers, naming them Quantity, Price and Remove. The end result will look like
-
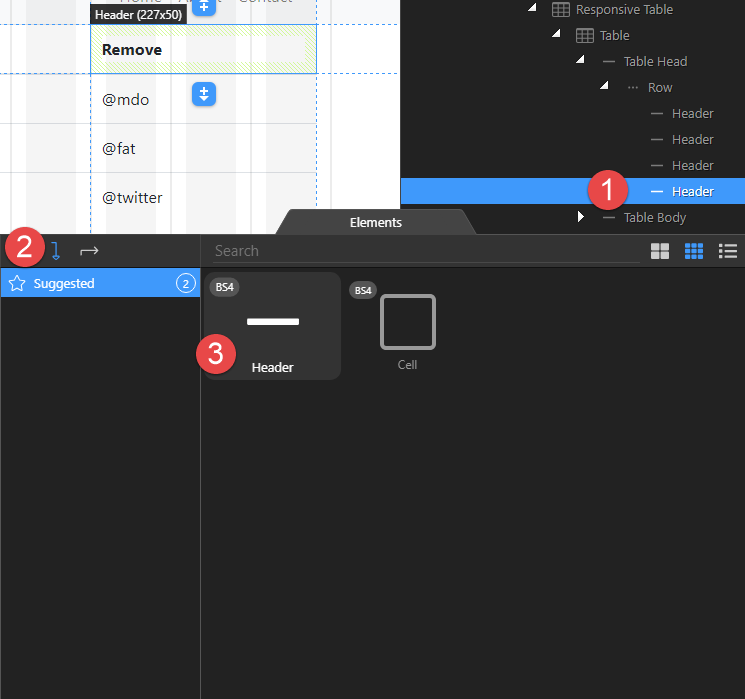
We need one more column called Amount. To do that, right click the last Header (1), choose to insert after (2) and select Header
-
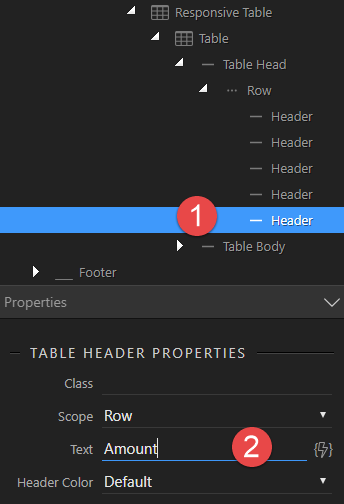
Change the text of the header (1) to Amount (2)
-
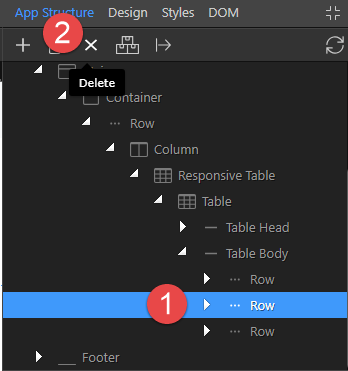
We have 3 table rows but we only want 1. Remove the remaining 2 rows by selecting each (1) and clicking the Delete button (2)
-
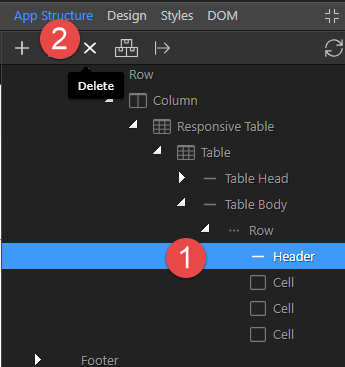
When we view the remaining row, we see that the first cell is a Header. We want this to be a normal Cell so let’s remove it. Select the Header (1)and click the Delete button (2)
-
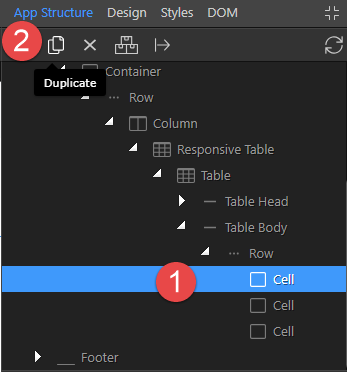
We are left with 3 Cells; but we require 5 (one for each of our Headings). To add the 2 Cells, select a Cell (1) and hit the Duplicate button twice (2)
-
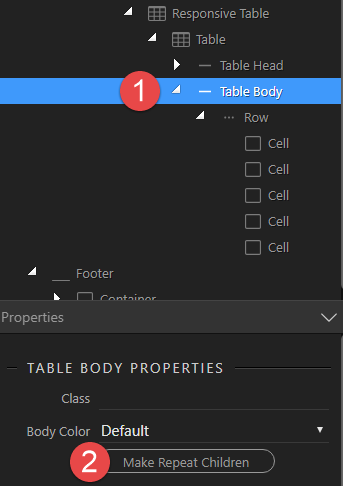
We are now ready to liven things up. Select the Table Body (1) and click on Make Repeat Children (2)
-
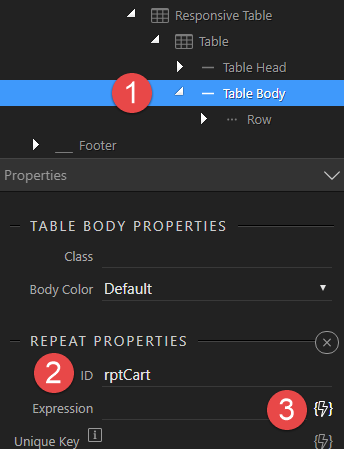
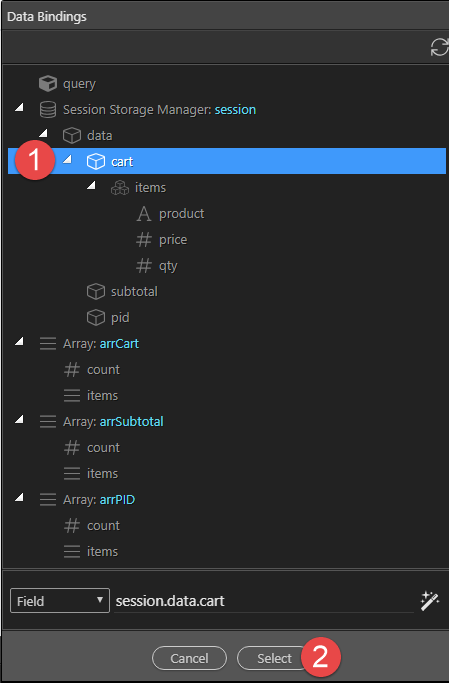
With the Table Body still selected (1), give it a meaningful ID (rptCart) (2) and hit the lightning bolt for the Expression (3)
-
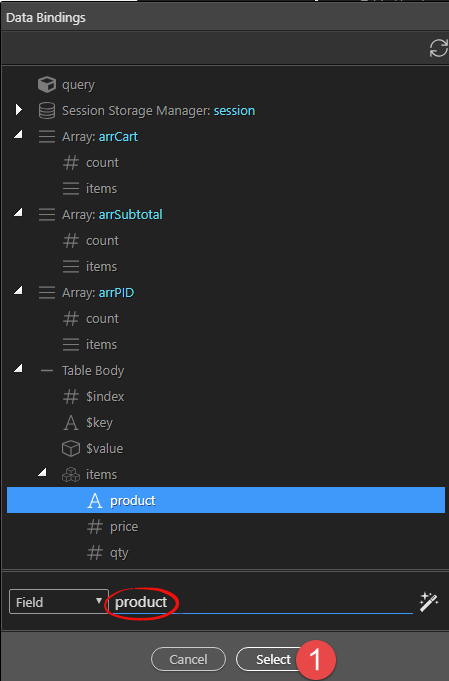
In the pop-up, select cart (1) and Select (2) to apply the binding.
-
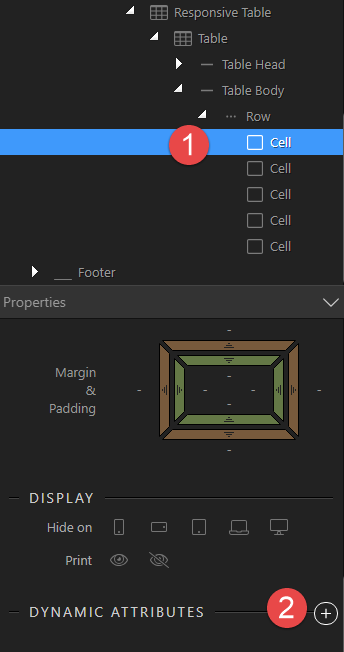
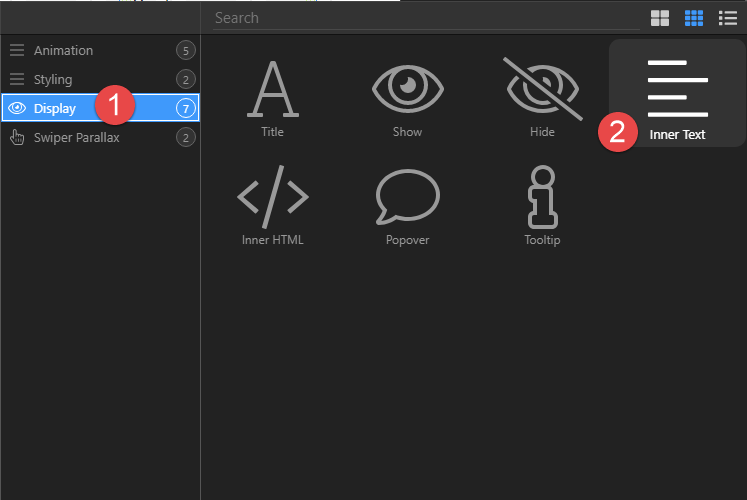
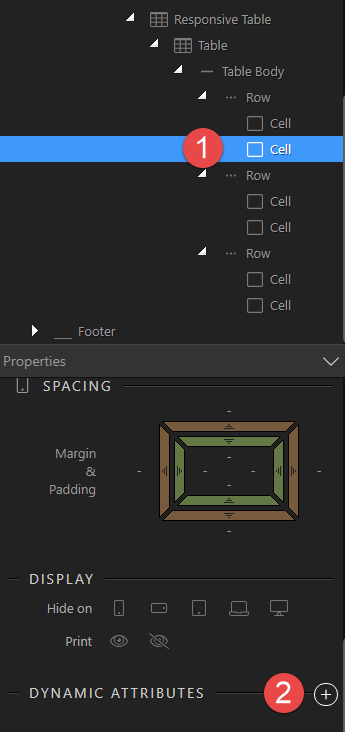
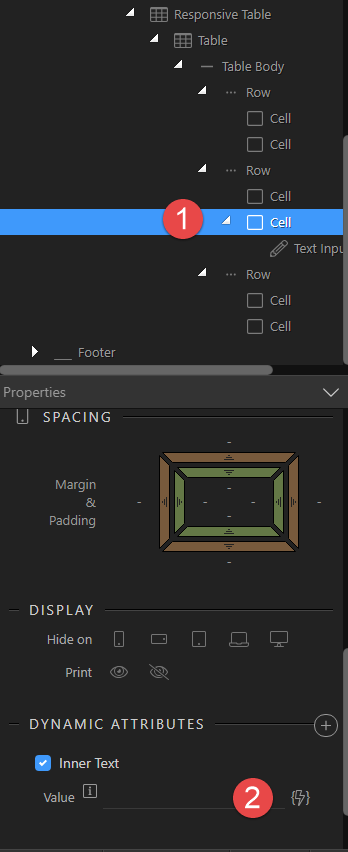
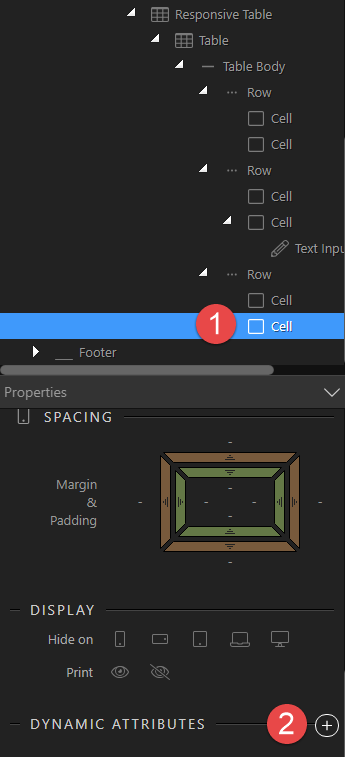
To populate the Cells, select the first Cell (1) and click on Dynamic Attributes (2)
-
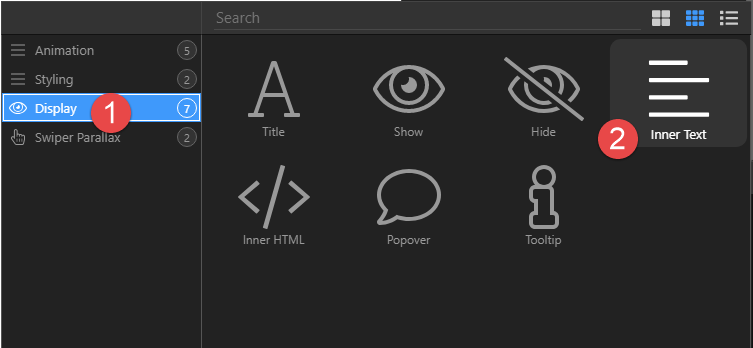
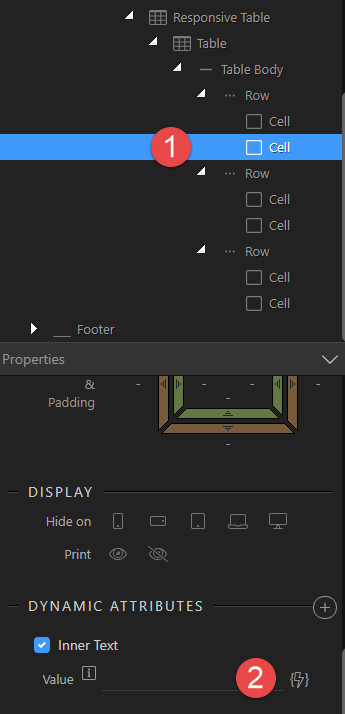
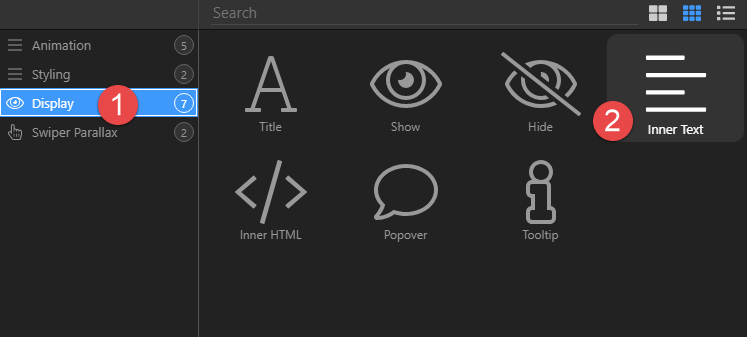
In the pop-up, select Display (1) and Inner Text (2)
-
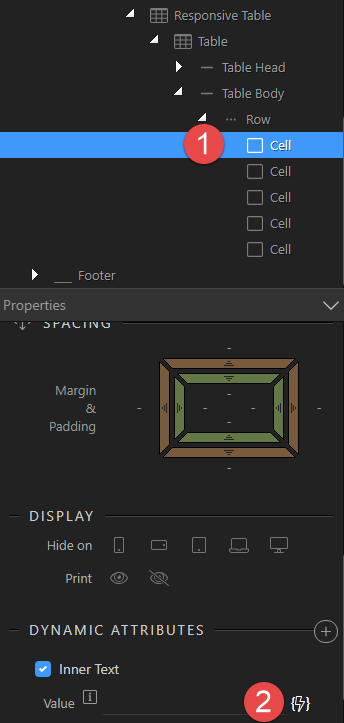
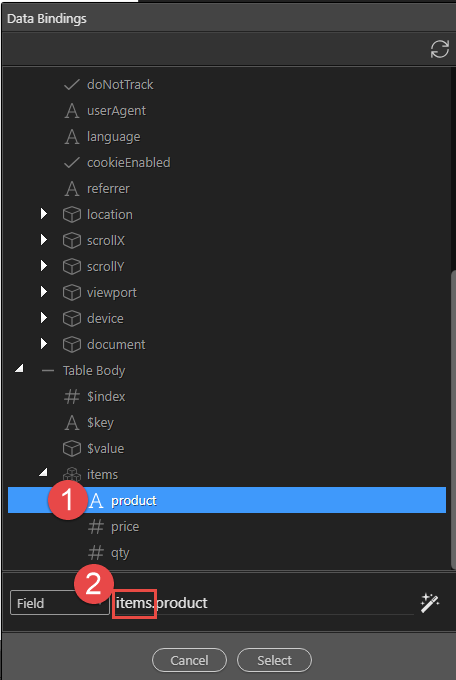
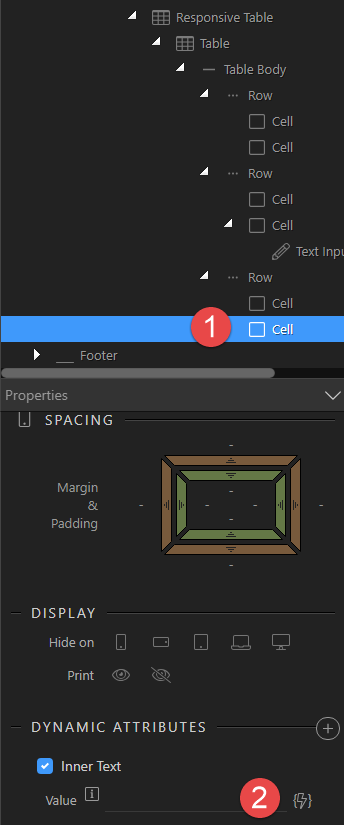
With the Cell still selected (1), click the lightning bolt for the Value (2)
-
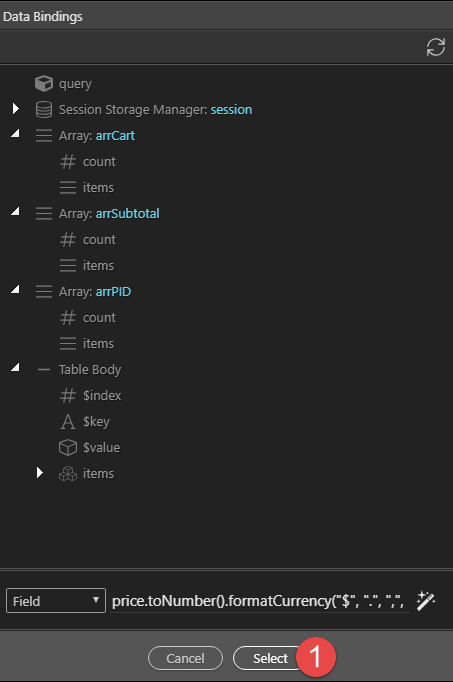
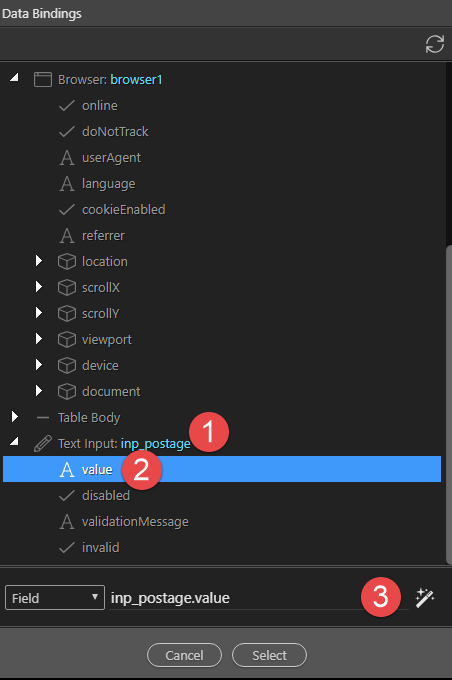
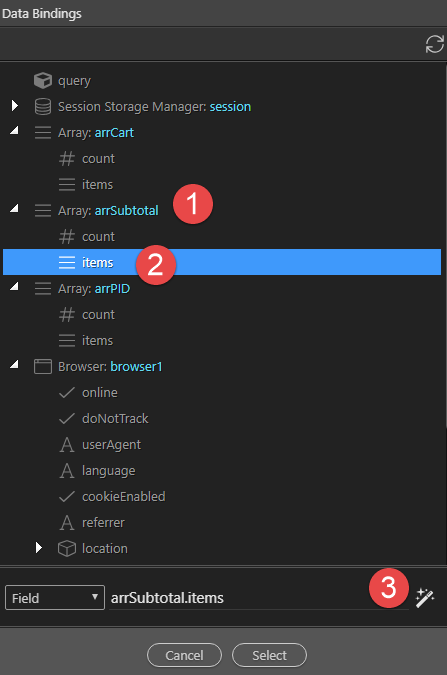
In the pop-up select product (1) and remove items. from the field (2) so that product remains
-
Click Select (1) to apply the binding.
-
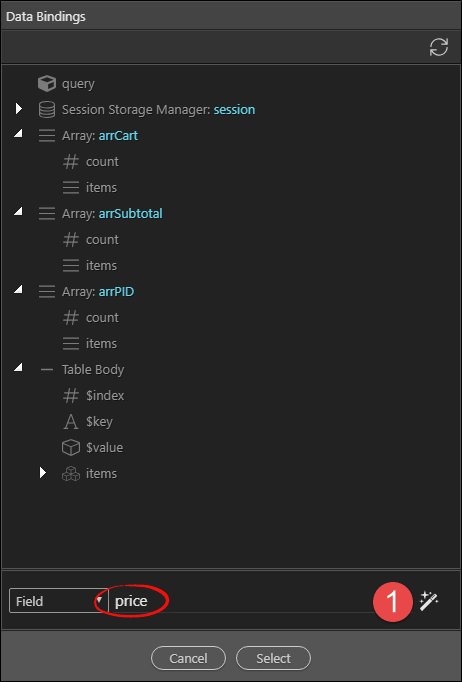
Repeat steps 22-24 for Quantity and Price. However, for Price we will do a bit of formatting. At step 17 and before applying the binding, hit the Format button (1).
-
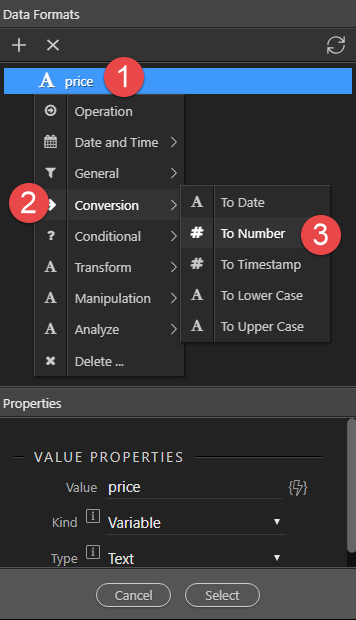
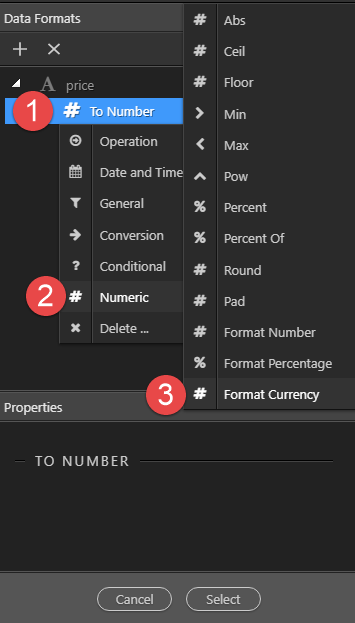
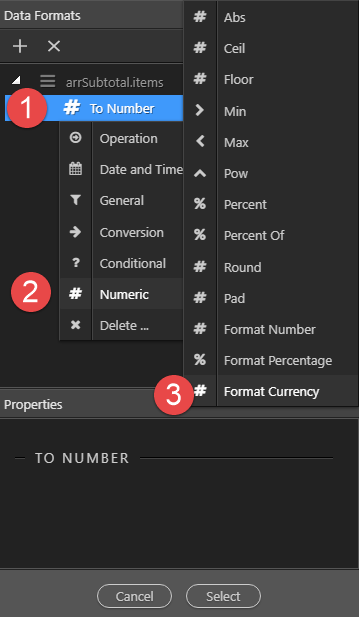
In the pop-up, right click price (1), choose Conversion (2) and click on To Number (3)
-
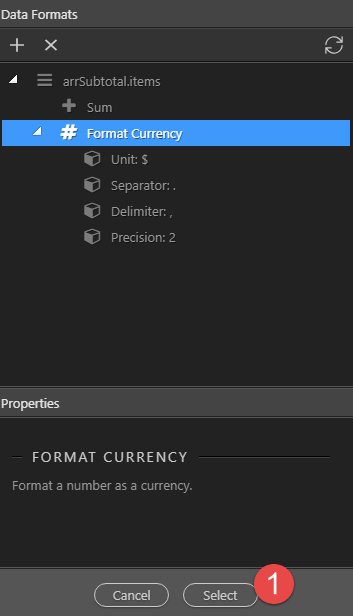
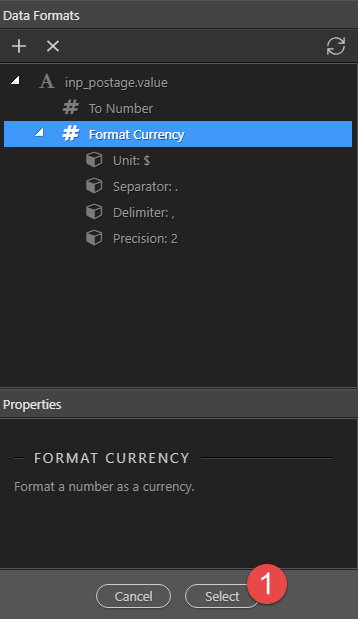
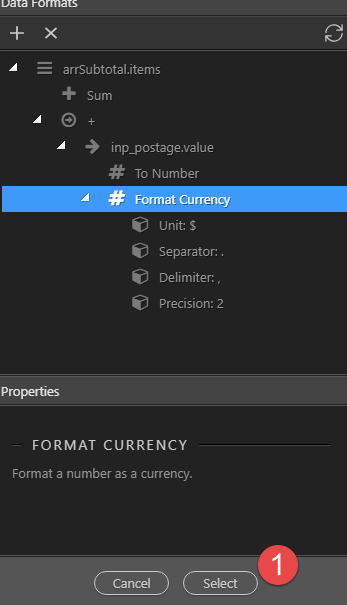
Right click To Number (1), choose Numeric (2) and click on Format Currency (3)
-
Format the Currency to suit. In our case we will keep the default setting and hit Select (1)
-
Hit Select again (1) to bind the data
-
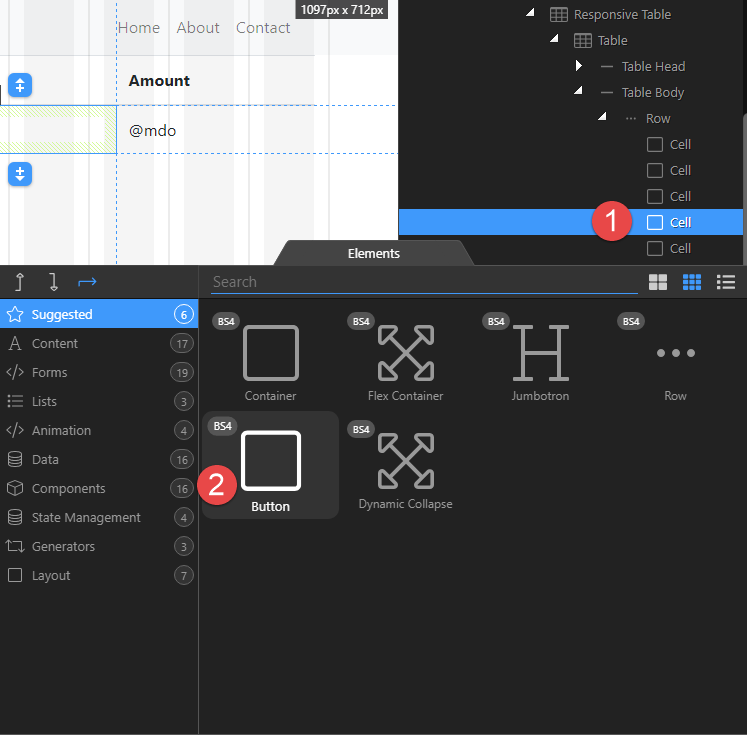
To a a Remove button, right click the 4th Cell (1) and in the pop-up, select Button (2)
-
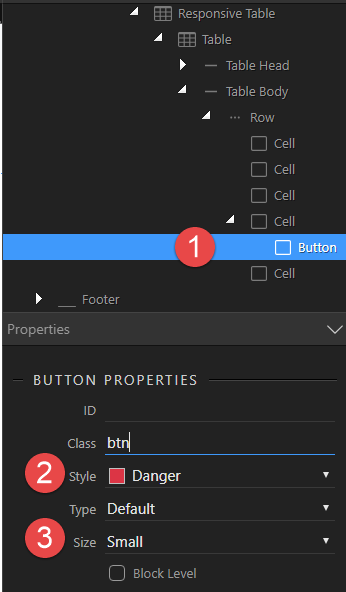
With the Button still selected (1), change the Style (2) and Size (3) of the button
-
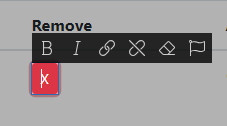
Double click the button and change the text to an upper case X (1) and remove all other text in the cell.
-
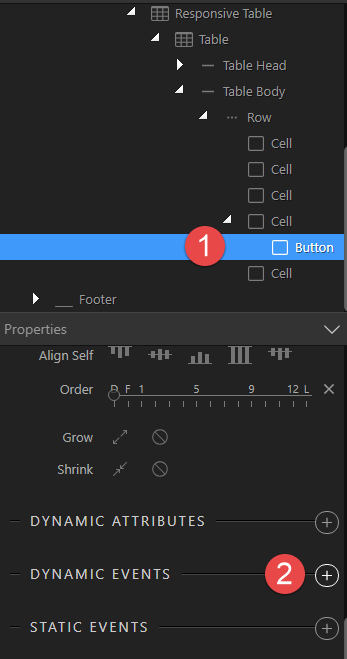
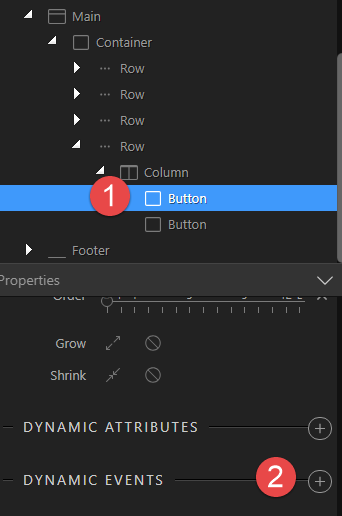
With the Button still selected (1), click on Dynamic Events (2)
-
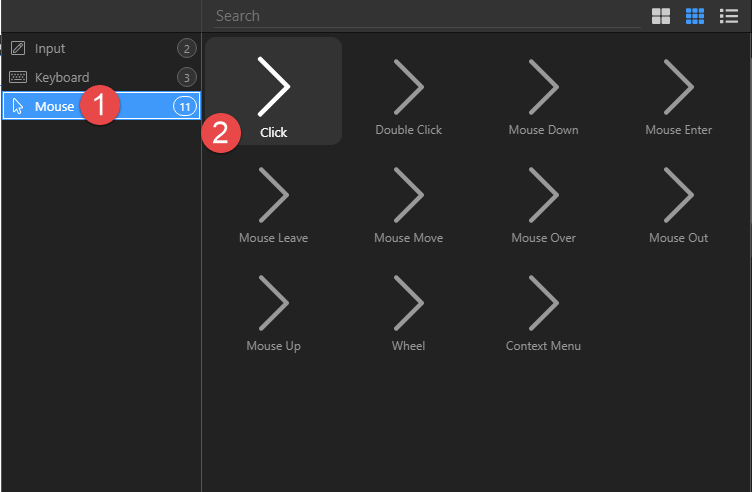
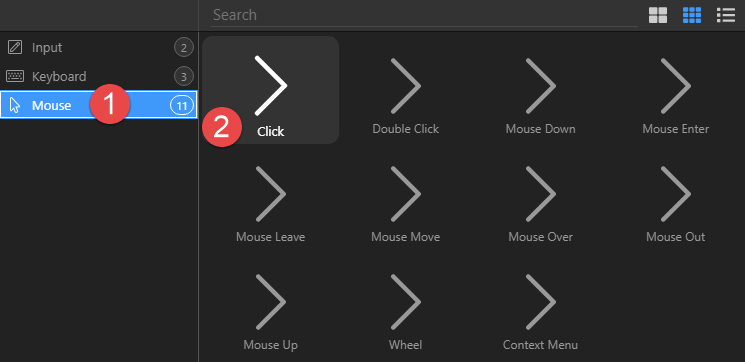
In the pop-up, select Mouse (1) and Click (2)
-
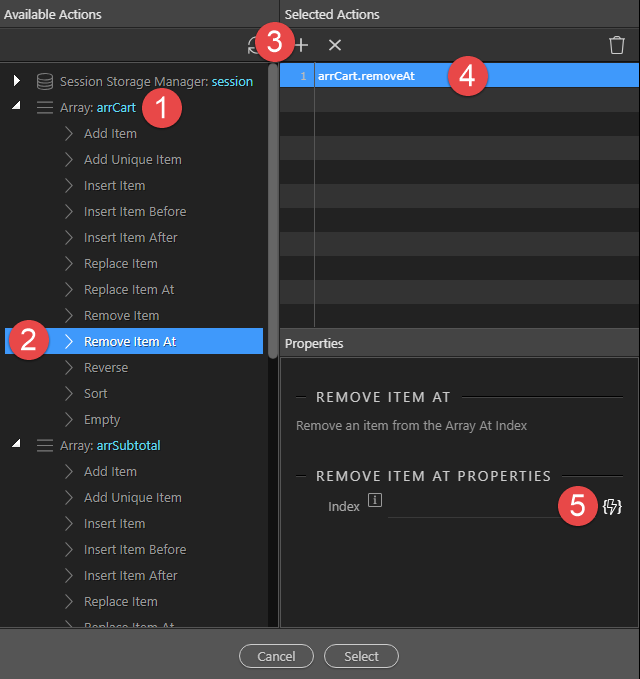
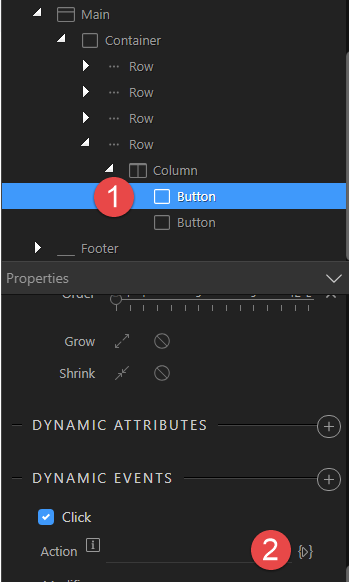
Click the Action button (1)

-
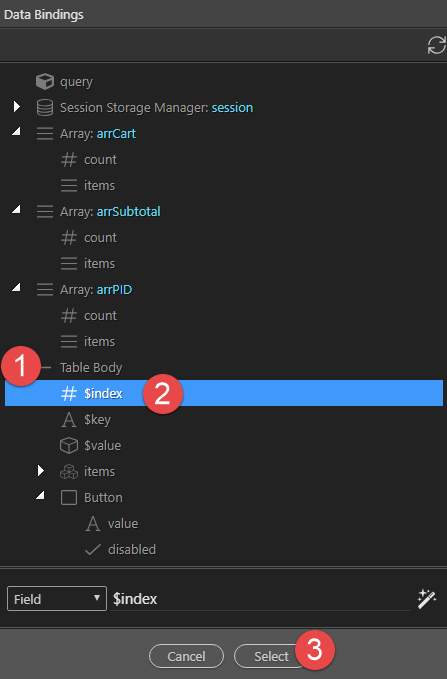
In the pop-up, go to arrCart (1), select Remove Item At (2) and add to list of actions (3). Select arrCart.removeAt (4) and click on the lightning bolt for Index ((5)
-
Under Table Body (1) click on $index (2) and Select (3)
-
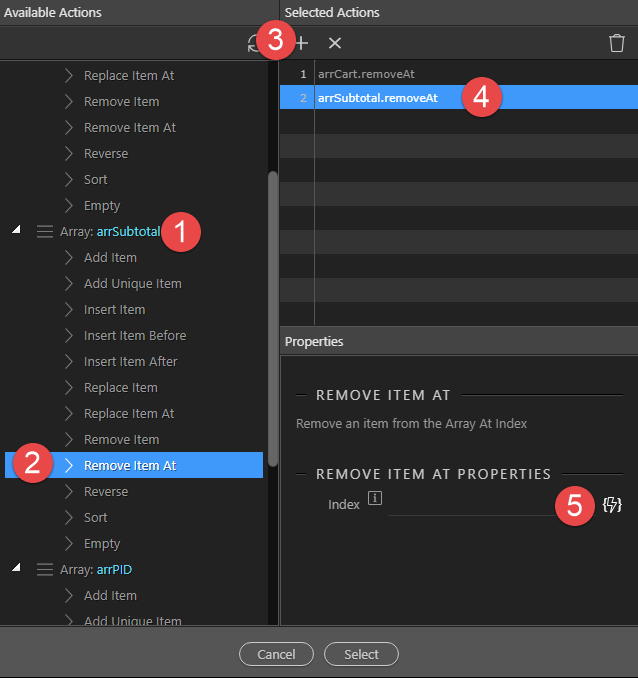
Similarly, to remove the Subtotal, go to arrSubtotal (1), select Remove Item At (2) and add to list of actions (3). Select arrSubtotal.removeAt (4) and click on the lightning bolt for Index ((5)
-
Under Table Body (1) click on $index (2) and Select (3)
-
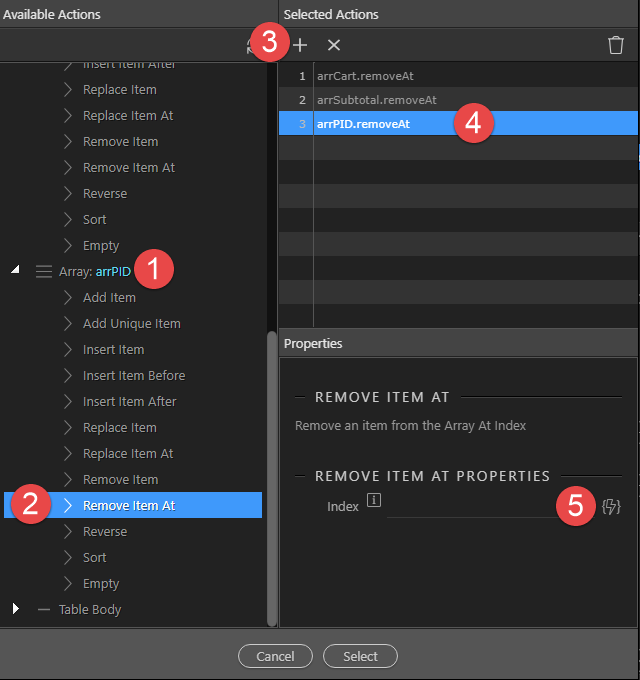
Lastly, to remove the Product ID, go to arrPID (1), select Remove Item At (2) and add to list of actions (3). Select arrPID.removeAt (4) and click on the lightning bolt for Index ((5)
-
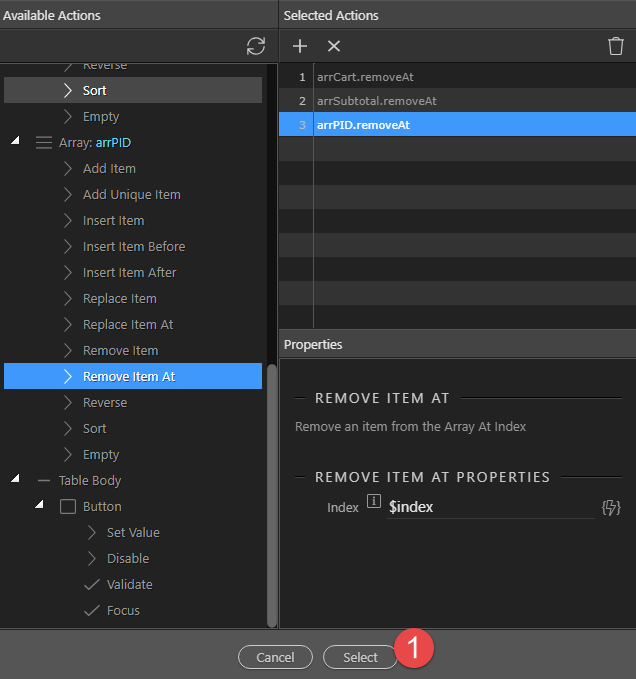
Under Table Body (1) click on $index (2) and Select (3)
-
Click Select (1) to apply the actions
-
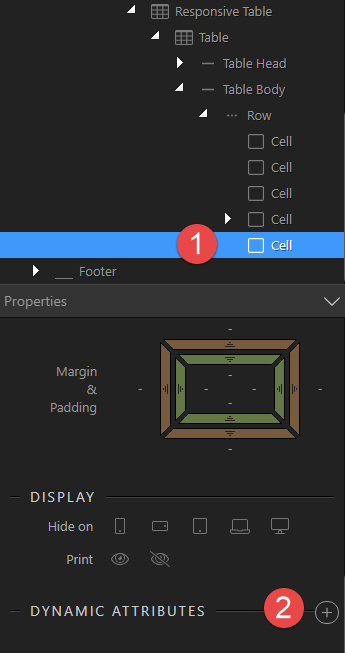
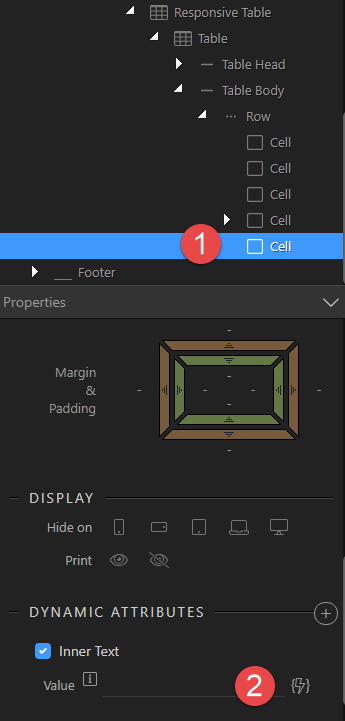
Select the last Cell (1) and Dynamic Attributes (2)
-
In the pop-up, select Display (1) and Inner Text (2)
-
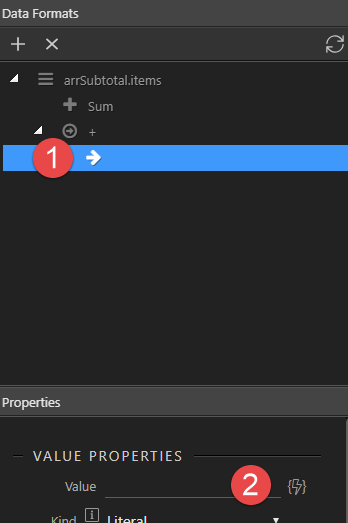
With the Cell still selected (1), click the thunderbolt for the Value (2)
-
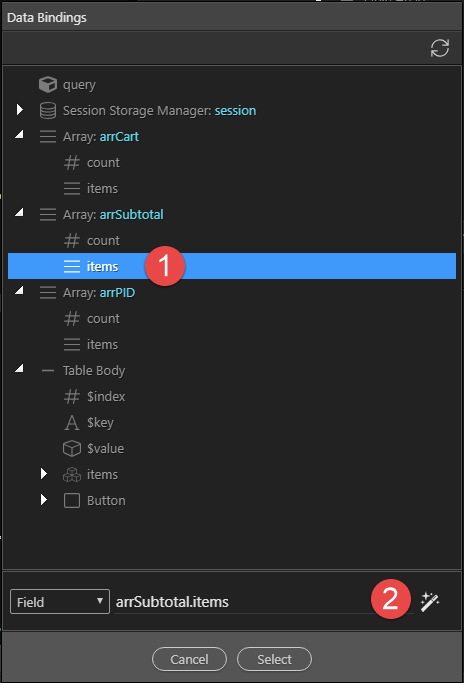
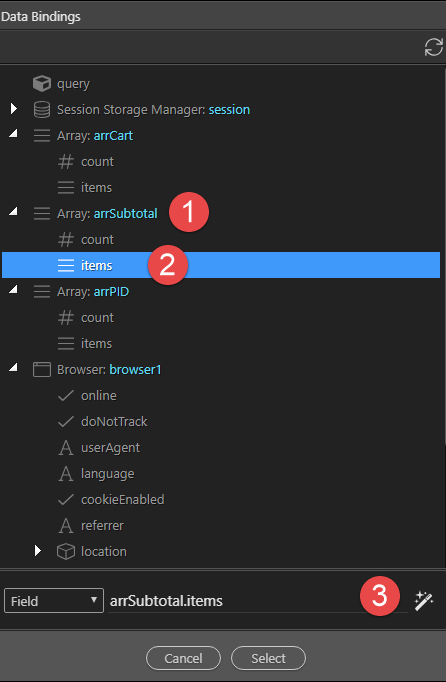
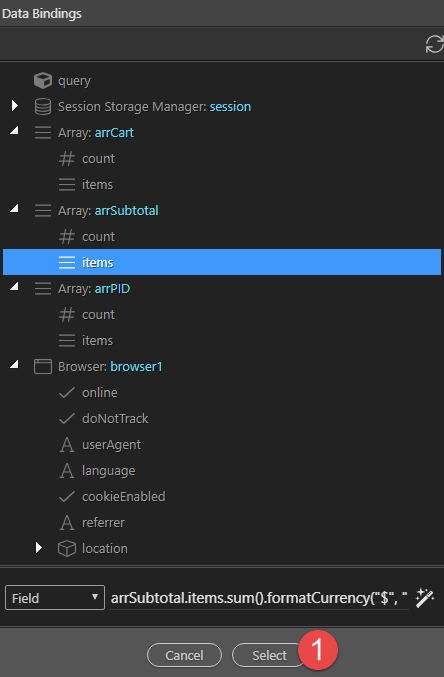
In the pop-up, select items under arrSubtotal (1) and click the format button (2)
-
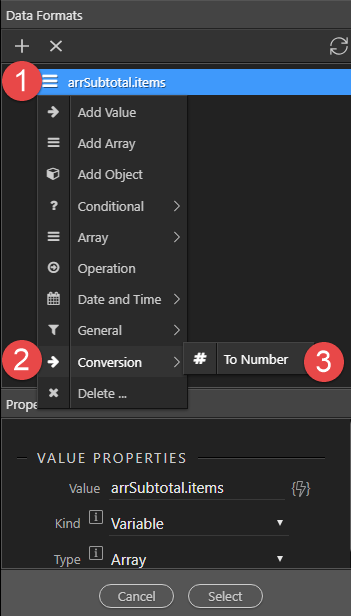
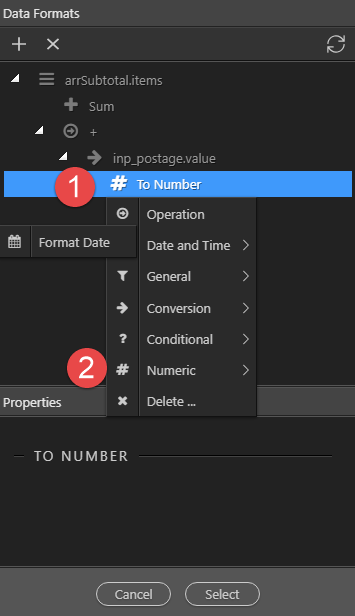
In the pop-up, right click arrSubtotal.items (1), choose Conversion (2) and click on To Number (3)
-
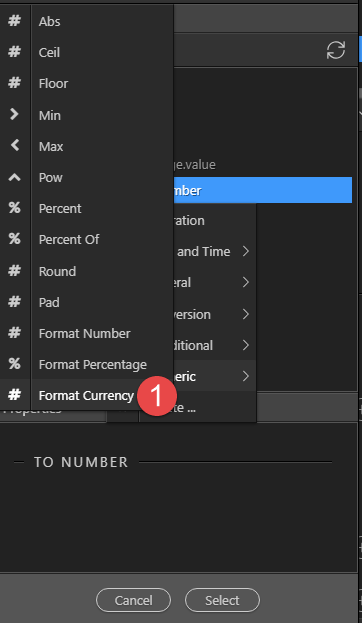
Right click To Number (1), choose Numeric (2) and click on Format Currency (3)
-
Format the Currency to suit. In our case we will keep the default setting and hit Select (1)
-
Because we are dealing with an array of items, we need to tell the array which index we are referring to. After arrSubtotal.items we need to add
[$index](1) so that the field will look like
arrSubtotal.items[$index].toNumber().formatCurrency("$", ".", ",", "2")
Click on Select (2) when done -
Right click the second Row (1), select Add After (2) and Row (3)
-
Right click the new Row (1) and select Column (2)
-
As before, we need to select the Mobile (1) version first. Then, with the new Column (2) still selected, give it a Size (3) of 12
-
Switch to Tablet (1) view and with the new Column (2) still selected, give it a Size (3) of 6 and and Offset (4) of 6.
-
Right click the new Column (1), choose Content (2) and Title (3)
-
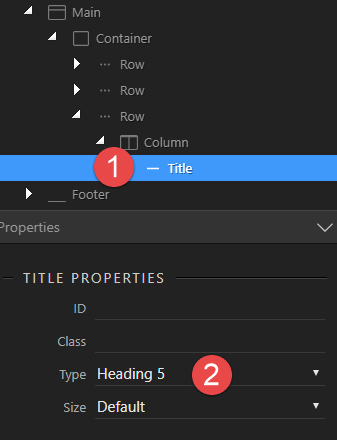
With the Title (1) selected, change the Type (2) to Heading 5
-
Double click the Title in Design view and change the text accordingly.

-
Right click Title (1), select to Add After (2), Content (3) and Responsive Table (4)
-
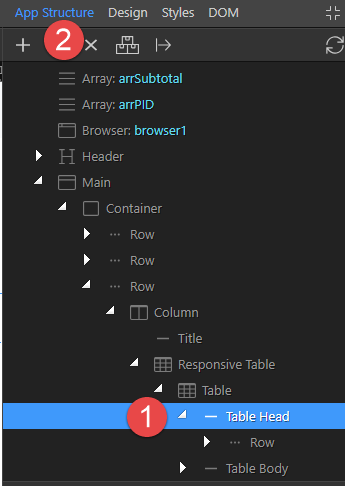
Select the Table Head (1) and click the Delete (2) button
-
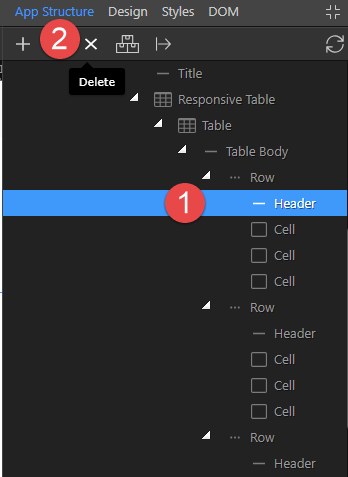
In each of the 3 Table Rows, select Header (1) and Delete (2)
-
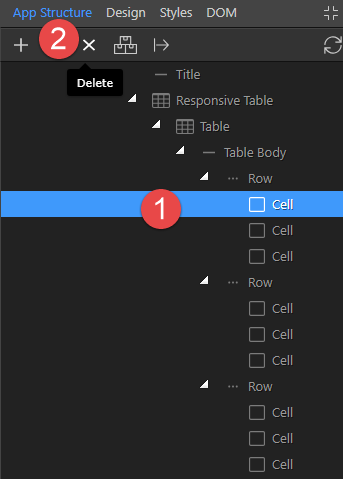
In each of the 3 Table Rows, select the first Cell (1) and Delete (2)
-
Select the first Cell (1) of the first Row and enter the Text as Sub-total (2)
-
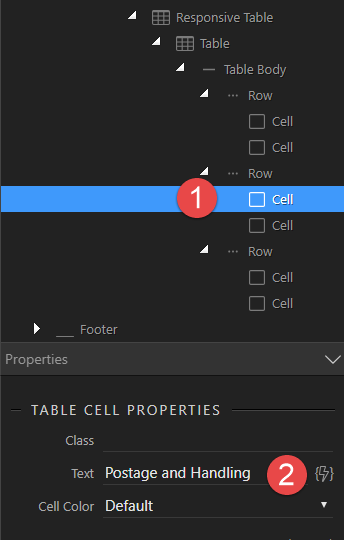
Select the first Cell (1) of the second Row and enter the Text as Postage and Handling (2)
-
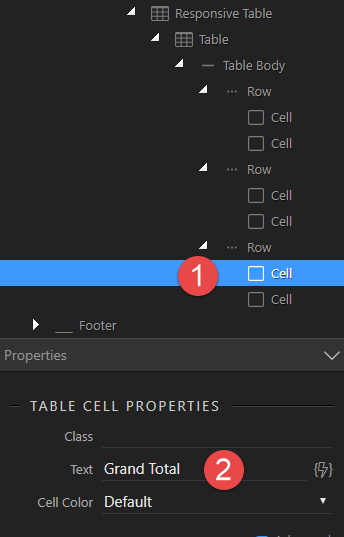
Select the first Cell (1) of the third Row and enter the Text as Grand Total (2)
-
Select the second Cell (1) of the first Row and click on Dynamic Attributes (2)
-
In the pop-up, select Display (1) and Inner Text (2)
-
With the Cell still selected, click the Value lightning bolt (2)
-
In the pop-up, choose Array arrSubtotal (1), items (2) and click on the Format button (3)
-
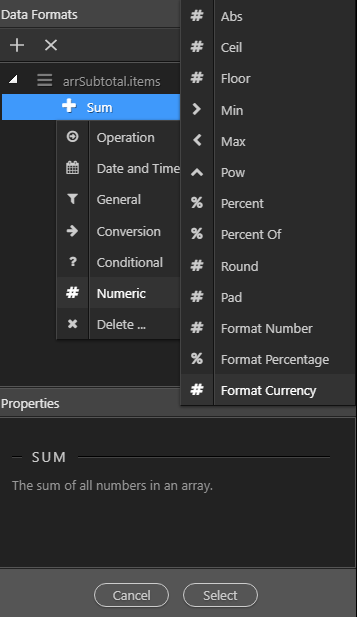
In the pop-up, right click arrSubtotal.items (1), choose Array (2) and click on Sum (3)
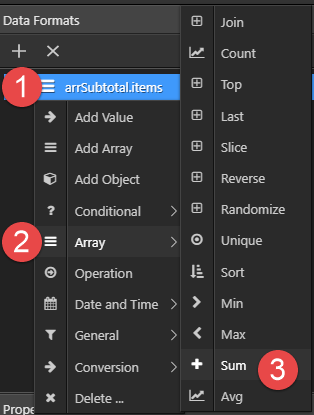
-
Right click Sum (1), Numeric (2) and Format Currency (3)
-
Format the Currency as desired and click Select (1)
-
Click Select (1) to apply the binding.
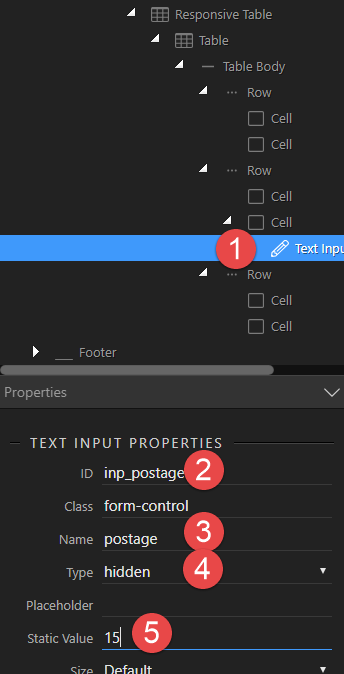
The next cell is for Postage, but because this can take on many different forms, we will give it a constant value for our project.
-
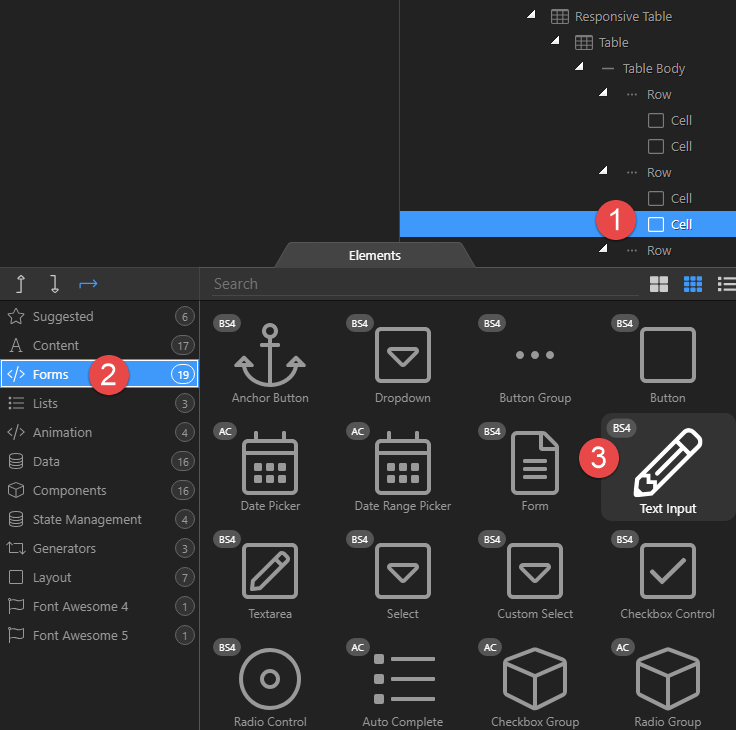
Select the second Cell (1) of the second Row, and in the pop-up, select Forms (2) and Text Input (3)
-
Select the new Text Input (1) and give it an ID (2), a Name (3), a Type of Hidden (4) and a Static Value of 15 (5)
-
Select the Cell (1) again and click on Dynamic Attributes (2)
-
In the pop-up, select Display (1) and Inner Text (2)
-
With the Cell still selected, click the Value thunder bolt (2)
-
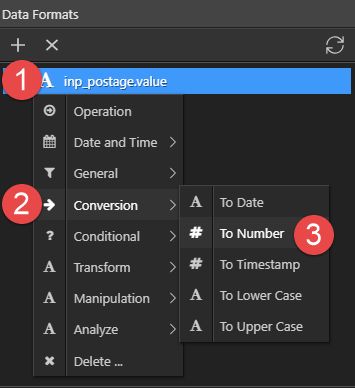
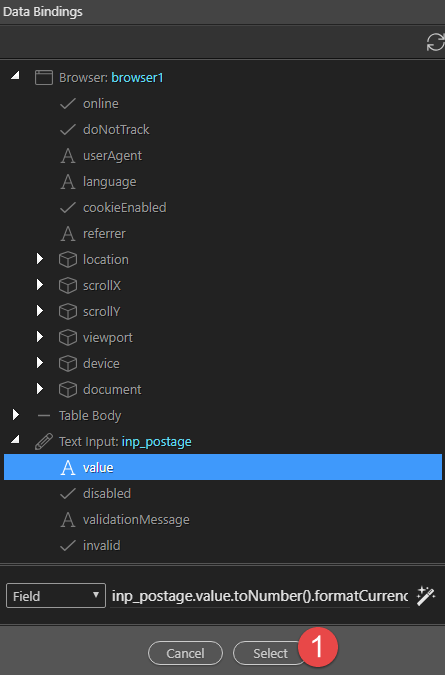
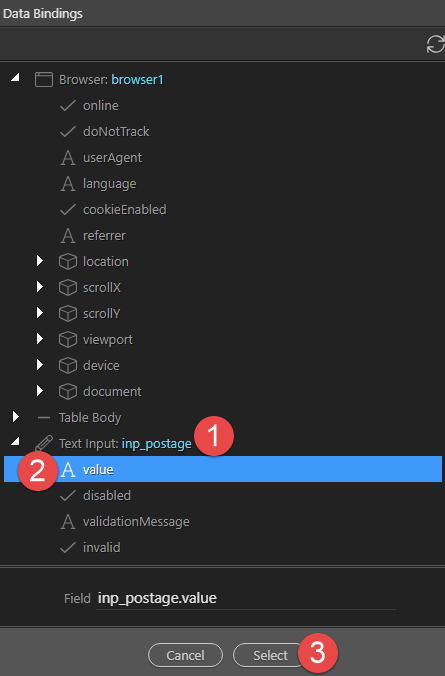
In the pop-up, select Text Input inp_postage (1), value (2) and click on the Format button (3)
-
In the pop-up, right click inp_postage.value (1), choose Conversion (2) and To Number (3).
-
Right click To Number (1), Numeric (2) and Format Currency (3)
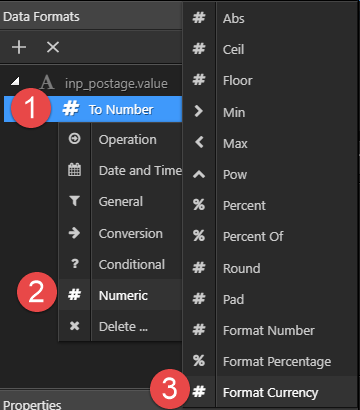
-
Format the Currency to required and click Select (1)
-
Click Select (1) to apply the binding.
-
For the Grand Total, we’ll add the postage to the Subtotal. Select the last Cell (1) and click on Dynamic Attributes (2)
-
Nothing like repetition for learning. In the pop-up, select Display (1) and Inner Text (2).
-
With the Cell (1) still selected, click the Value thunder bolt (2)
-
In the Bindings panel, select arrSubtotal (1), items(2) and click the Format button (3)
-
Right click arrSubtotal.items (1), select Array (2) and Sum (3)
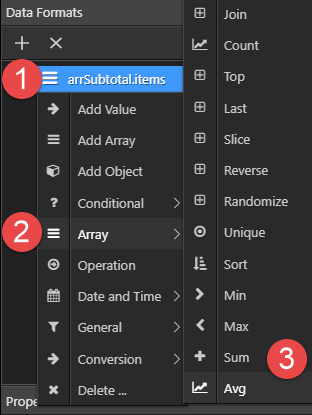
-
Right click Sum (1) and select Operation (2)
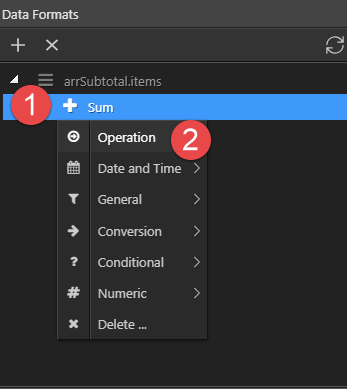
-
Select the addend (arrow) (1) and click the Value lightning bolt (2)
-
Select the Text Input for inp_postage (1), value (2) and click on Select (3)
-
Right click inp_postage.value (1), choose Conversion (2) and To Number (3)

-
Right click To Number (1) and choose Numeric (2)
-
In the pop-up, choose Format Currency (1)
-
Format the Currency to suit and click Select (1)
-
Looking at the code in Code view, I see that things have not gone to plan. The code now reads:
arrSubtotal.items.sum() + (inp_postage.value.toNumber().formatCurrency("$", ".", ",", "2"))and it should read:
(arrSubtotal.items.sum() + (inp_postage.value.toNumber())).formatCurrency("$", ".", ",", "2")Please copy and replace the original code.
-
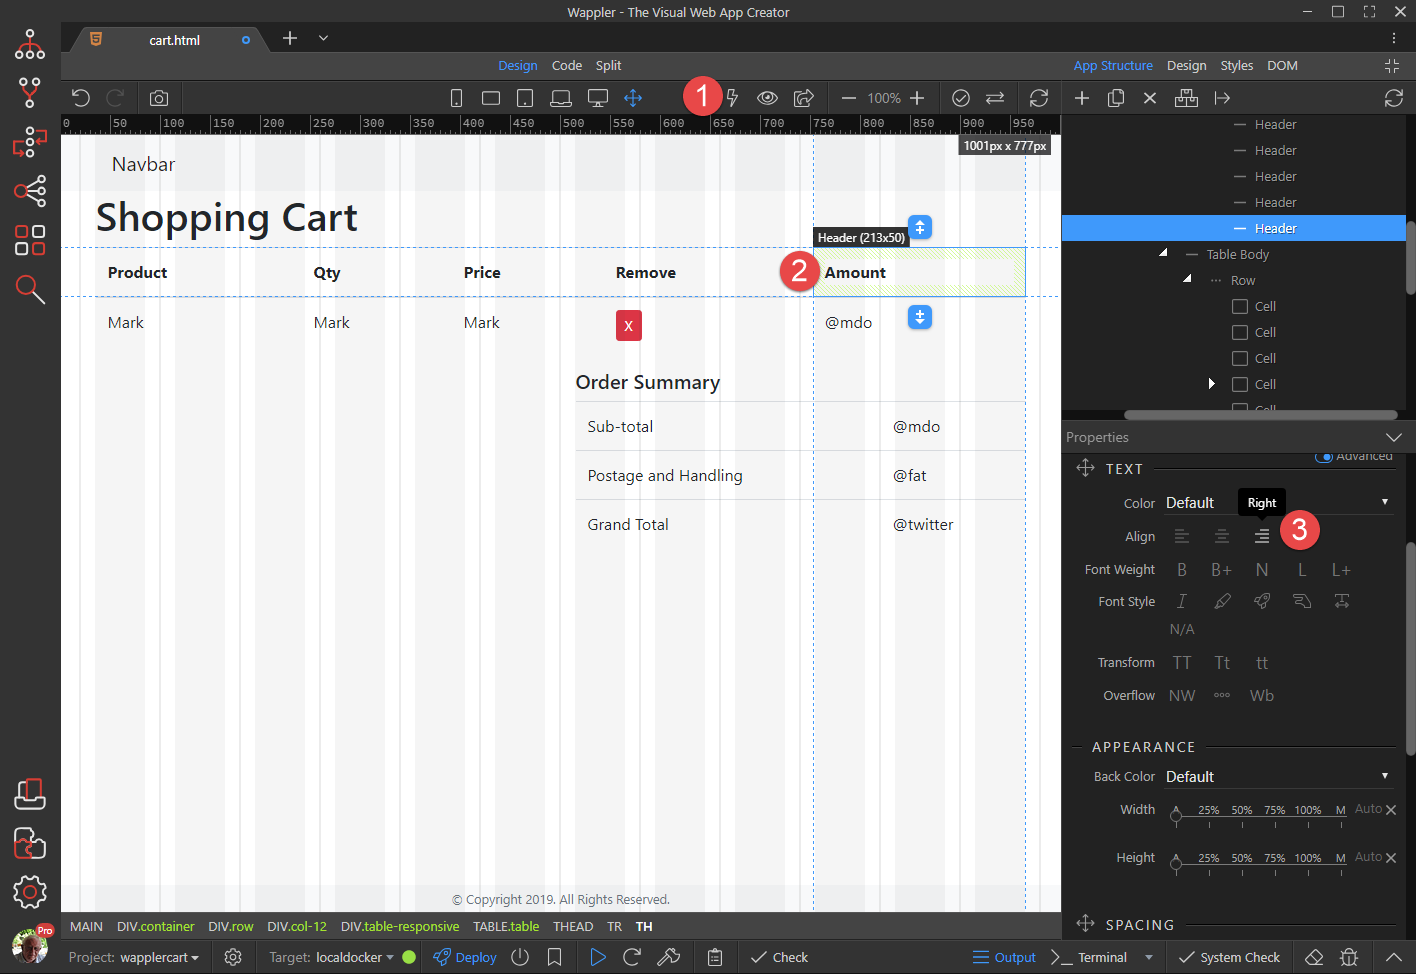
Let’s align the Amount column. Toggle App Connect Mode (1) so that we can see all of the cells in Design view. Click the Amount header (2) and right Align (3).
-
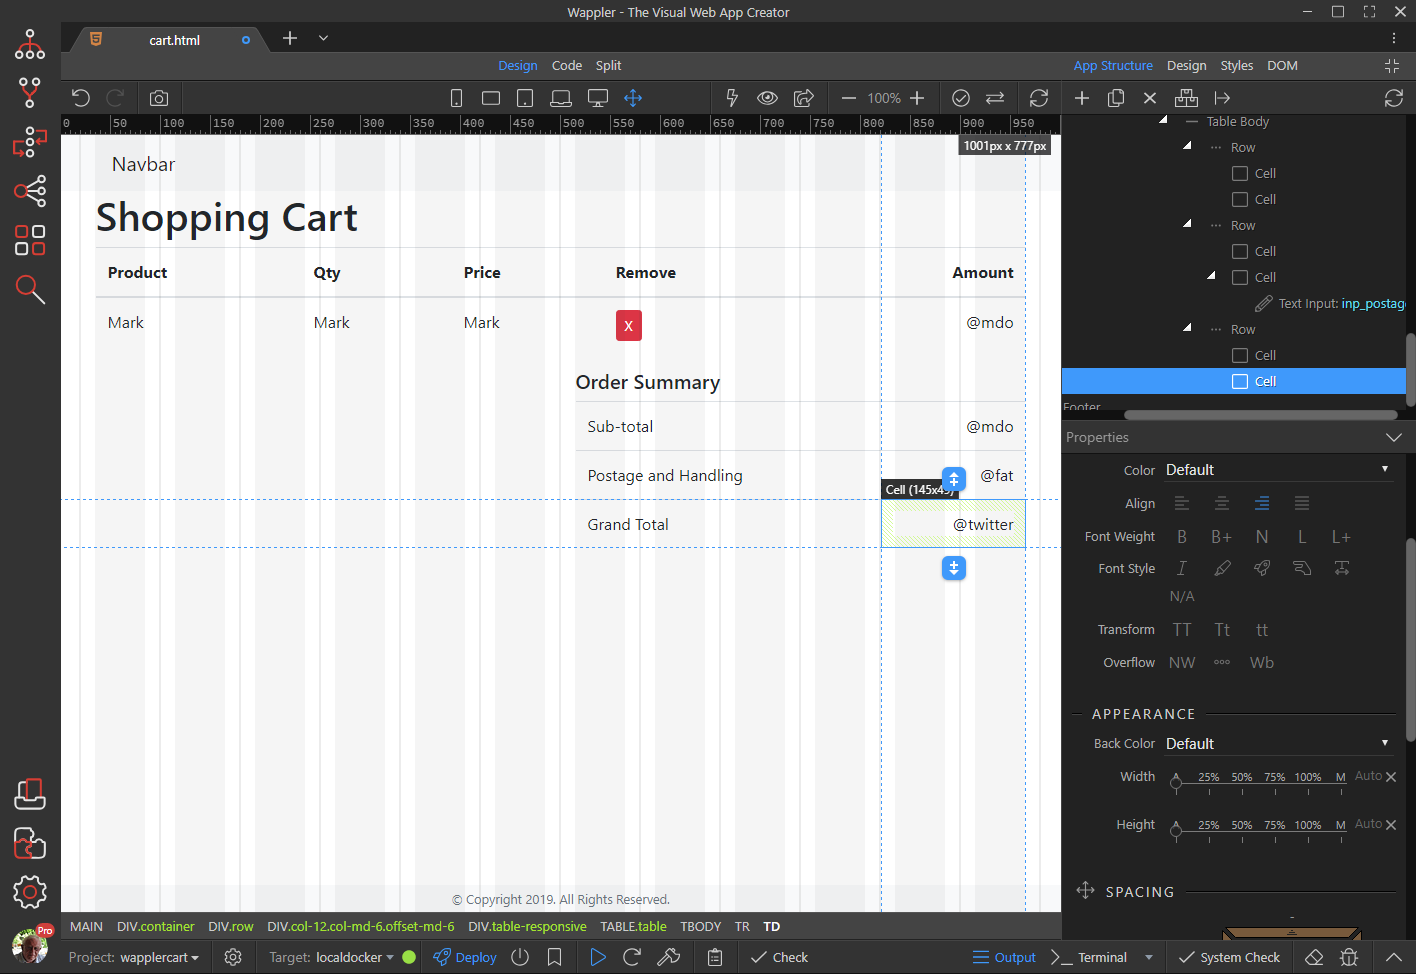
Repeat step 89 for each of the other 4 Cells so that we now see
-
Toggle the App Connect Mode back on

Lastly, we will add a couple of buttons
-
Right click the last Row (1), choose to Add After (2) and click on Row (3)
-
Right click the new Row (1) and choose Column (2)
-
Set the view to Mobile (1), make sure the Column (2) is selected, set the Size (3) to 12 and Right Align (4)
-
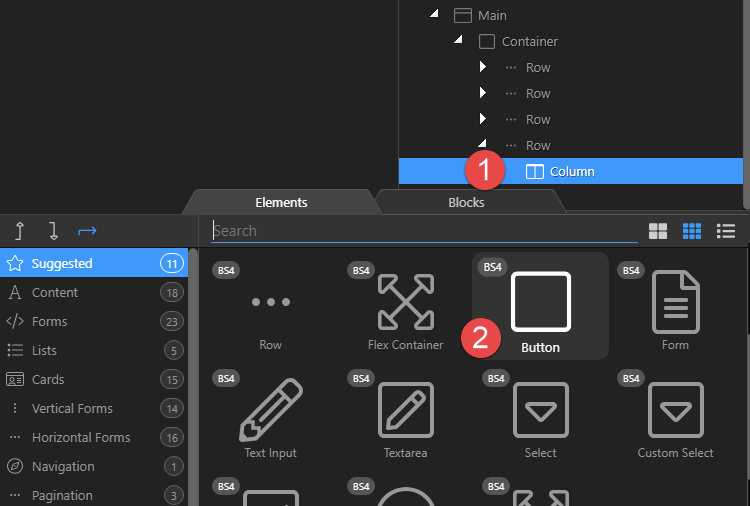
Right click the Column (1) and choose Button (2)
-
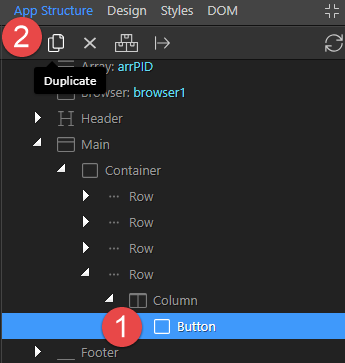
With the Button (1) still selected, click on Duplicate (2)
-
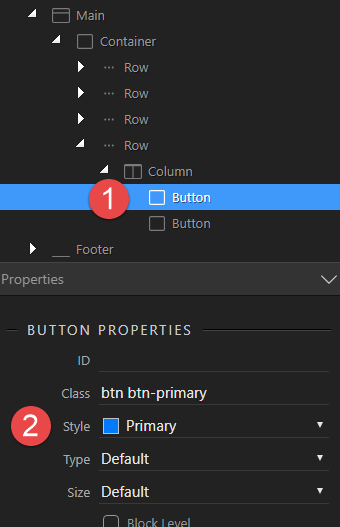
Give both of the Buttons (1) a Style (2)
-
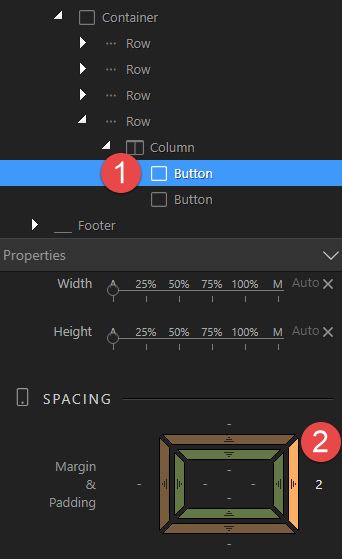
Select the first Button (1) and give it a bit of a Margin (2)
-
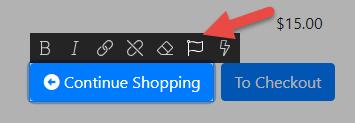
Change the Button text to suit and even include an icon as per
-
Select the first Button (1) and click on Dynamic Events (2)
-
Choose Mouse (1) and Click (2)
-
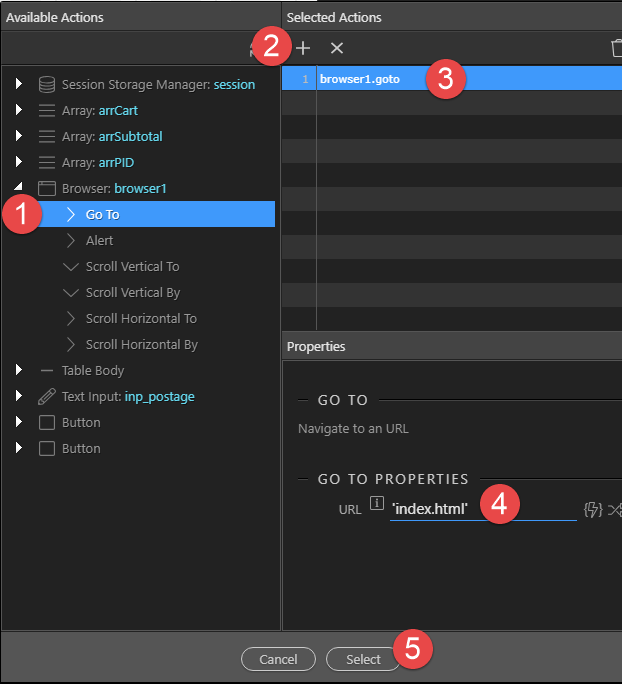
With the Button (1) still selected, click on Action (2)
-
Choose the browser Go To (1), Add to (2) the list, select the action (3) and enter the URL (4) encapsulated by single quotes. Click on Select (5)
-
Repeat steps 104 to 108 for the second Button. The goto will be checkout.html
-
Don’t forget to save your work and a backup would not go astray.


 .
.