For this part of the Tutorial, we need to be able to post the following variables to our database.
- For the Orders table we need
** OrderUserID
** OrderAmount
** OrderShipping - For the OrderDetails table we need
** DetailName
** DetailPrice
** DetailQuantity - For the Email we need
** UserName
** UserEmail
To do this, we’ll create a hidden text input for each value. These values are obtained from the information that we have already gained within the document. We need to remember that OrderDetails are kept in an array meaning that we will need to have a repeat region.
-
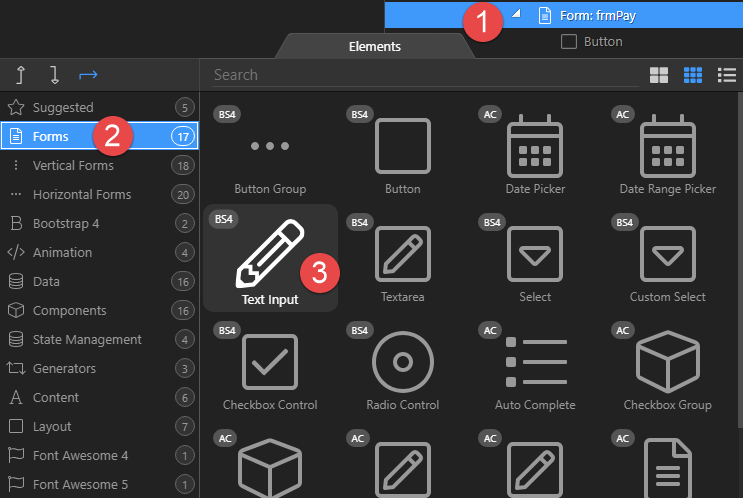
Right click the Form (1), choose Forms (2) and click on Text Input (3)
-
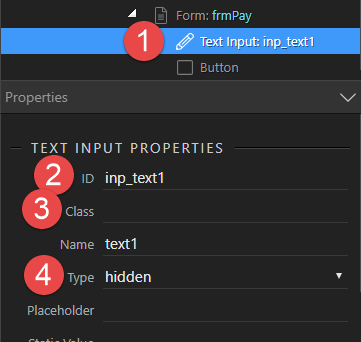
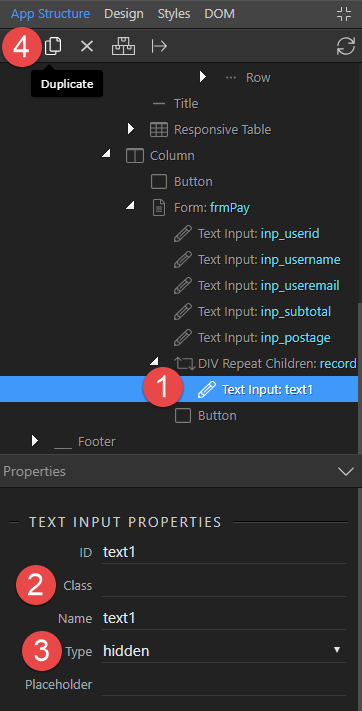
Select the Text Input (1), change the ID (2), remove the Class (3) and change the Type (4) to hidden
-
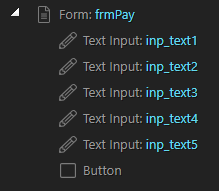
With the Text Input (1) still selected, Duplicate (2) it 4
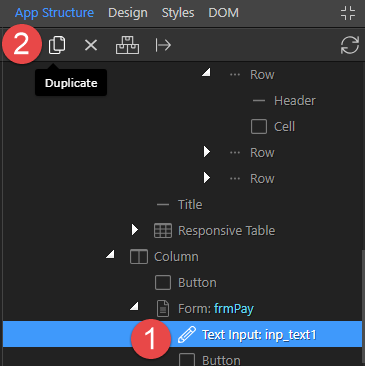
so that there are 5 Text inputs all up
-
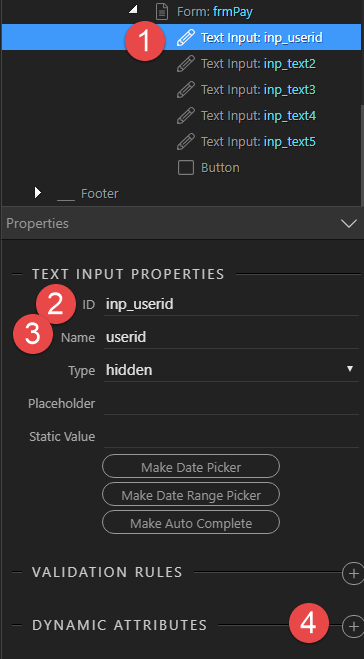
Select the first Text Input (1), change the ID (2) and Name (3) to reflect userid and click the Dynamic Attributes button (4)
-
In the pop-up, click Value (1)
-
With the Text Input (1) still selected, click the Value button (2)

-
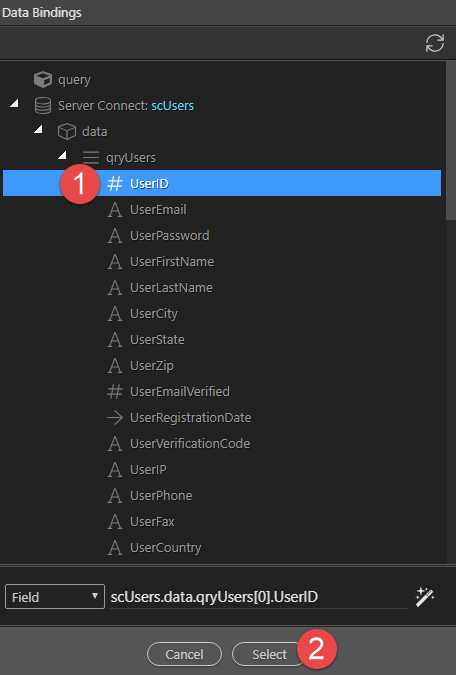
Click UserID (1) and Select (2)
-
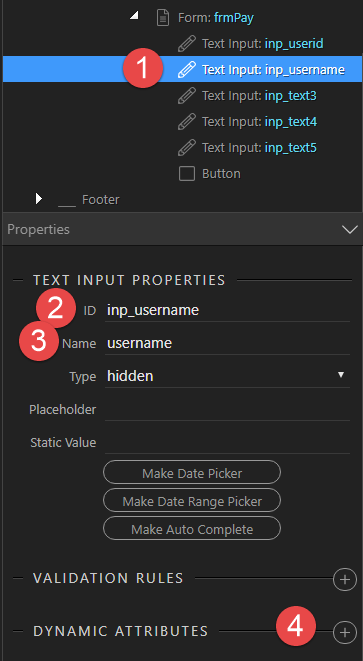
Select the next Text Input (1), change the ID (2) and Name (3) to reflect username and click the Dynamic Attributes button (4)
-
In the pop-up, click Value (1)
-
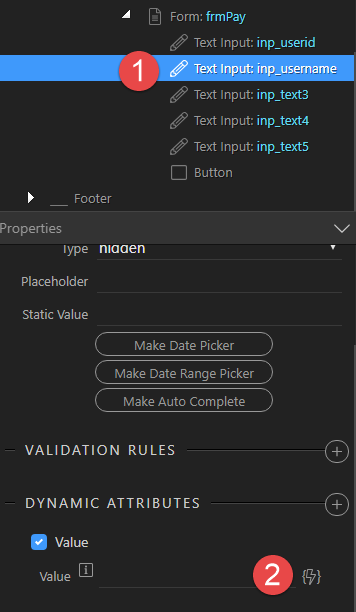
With the Text Input (1) still selected, click the Value button (2)
-
In the pop-up, change the filed to an Expression (1), click UserFirstName (2), add + ’ ’ + (3), click on UserLastName (4) and Select (5)
-
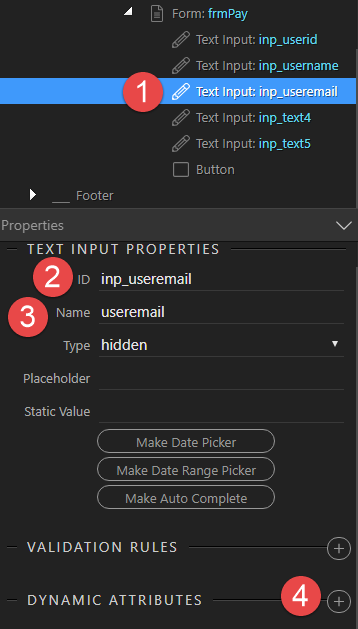
Select the next Text Input (1), change the ID (2) and Name (3) to reflect useremail and click the Dynamic Attributes button (4)
-
In the pop-up, click Value (1)
-
With the Text Input (1) still selected, click the Value button (2)
-
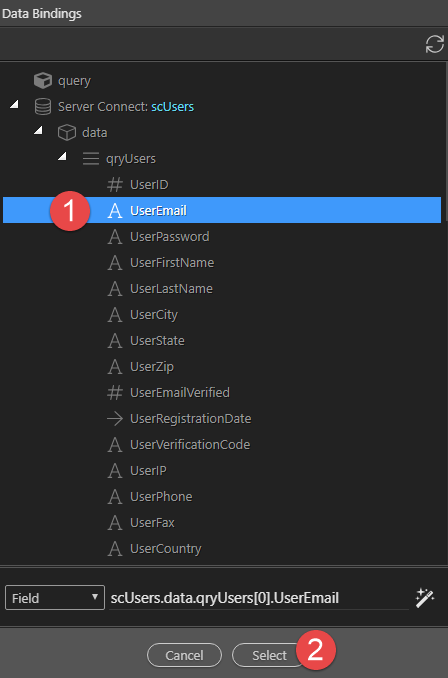
Click UserEmail (1) and Select (2)
-
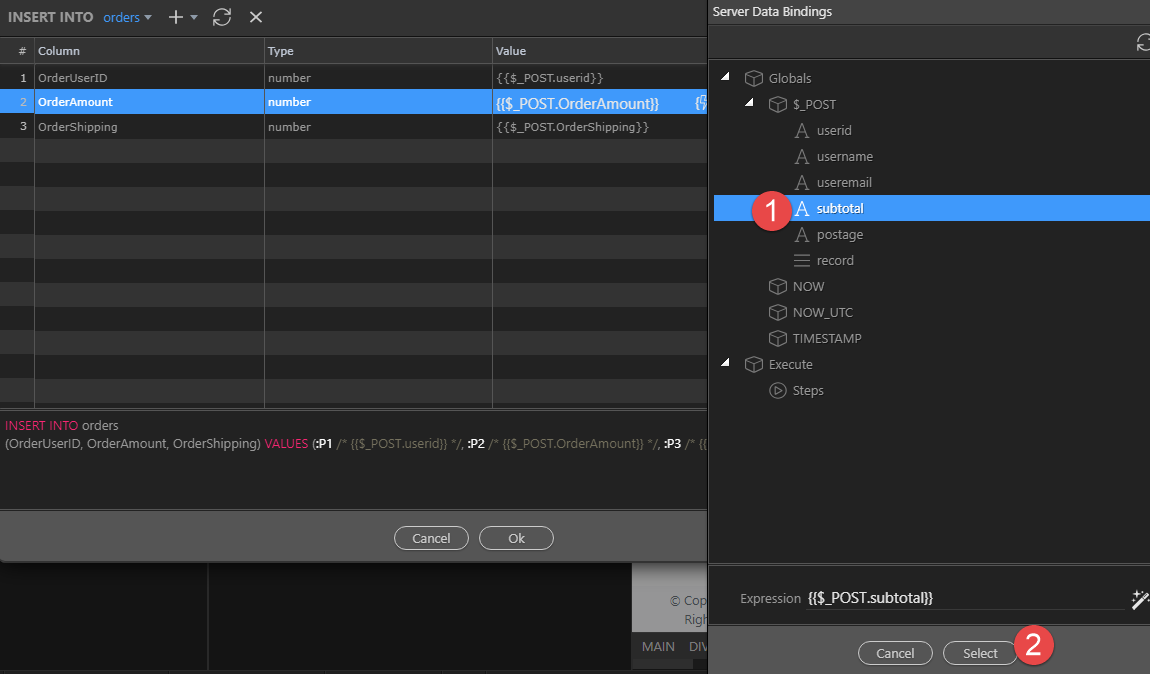
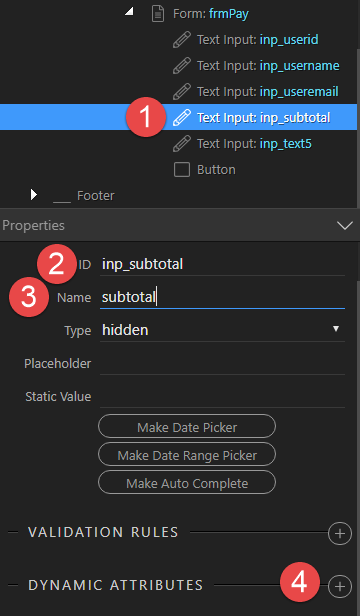
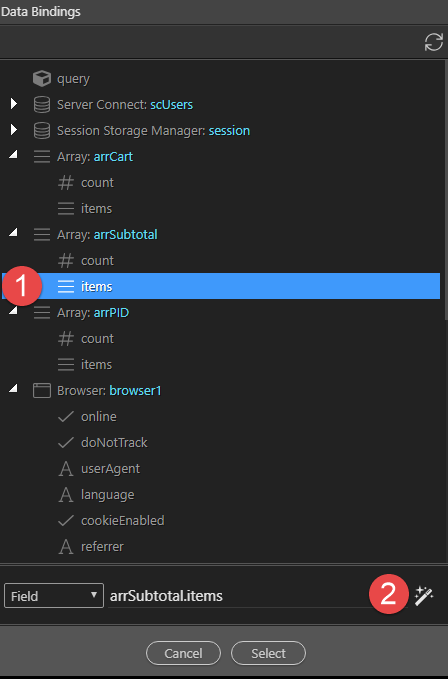
Select the next Text Input (1), change the ID (2) and Name (3) to reflect subtotal and click the Dynamic Attributes button (4)
-
In the pop-up, click Value (1)
-
With the Text Input (1) still selected, click the Value button (2)
-
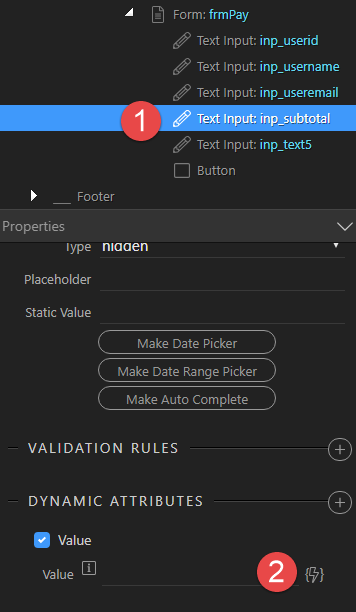
In the pop-up click arrSubtotal.items (1) and the Format button (2)
-
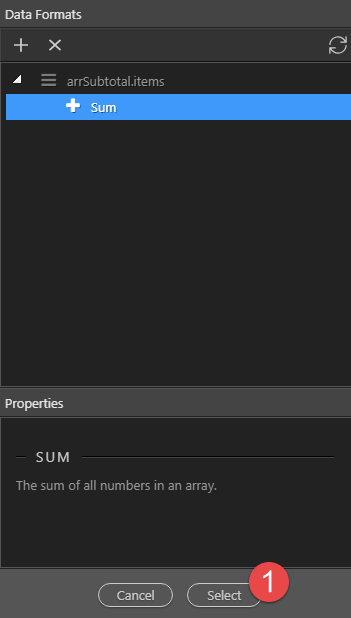
Right click arrSubtotal.items (1), choose Array (2) and click Sum (3)

-
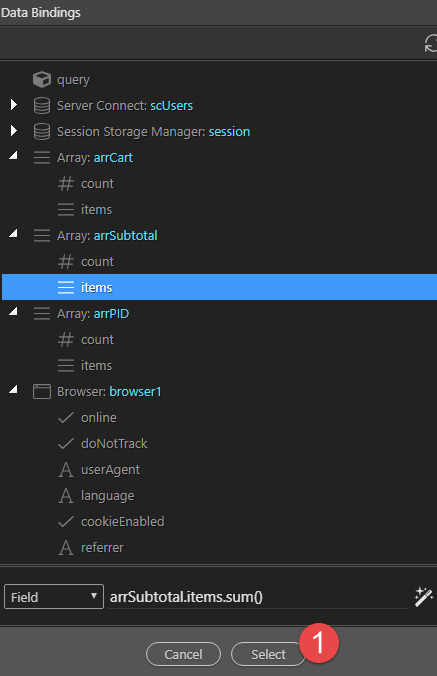
Click Select (1)
-
Click Select (1)
-
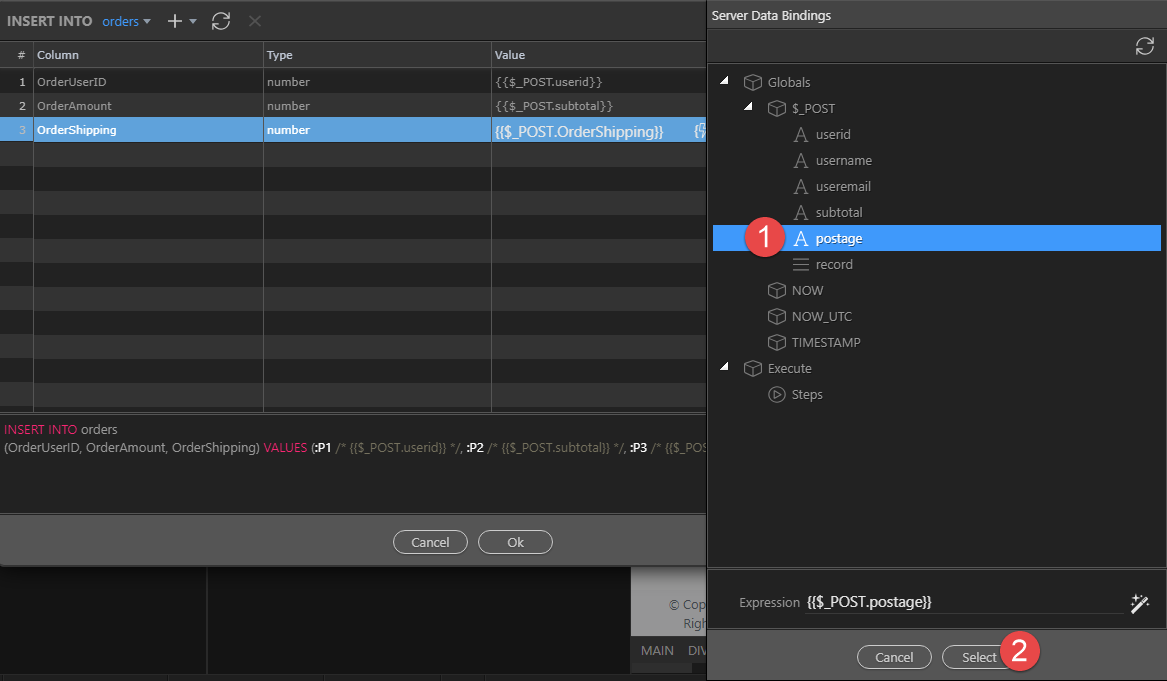
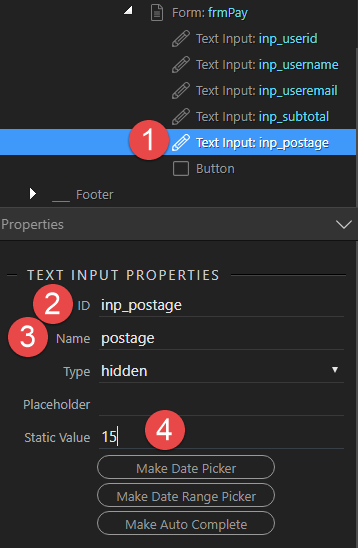
Select the last Text Input (1), change the ID (2) and Name (3) to reflect postage and enter our Static Value of 15 (4)
-
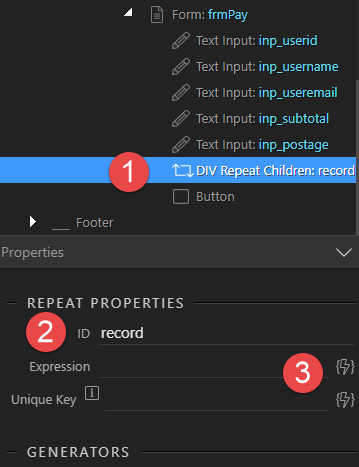
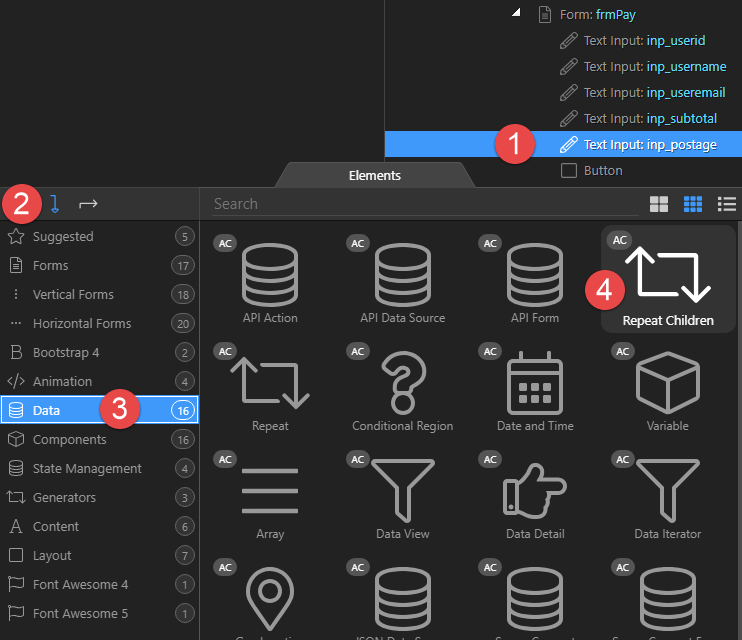
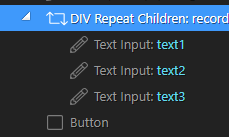
Right click the last Text Input (1), select to Add After (2), Data (3) and click Repeat Children (4)
-
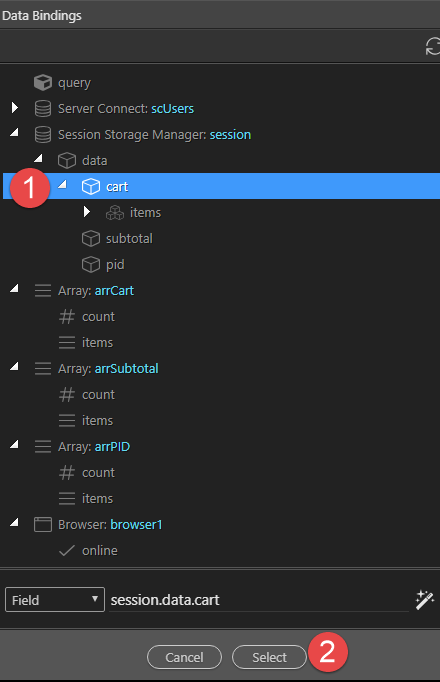
Select Div Repeat (1), give it an ID of record (2) and click the Expression button (2)
-
Click Cart (1) and Select (2)
-
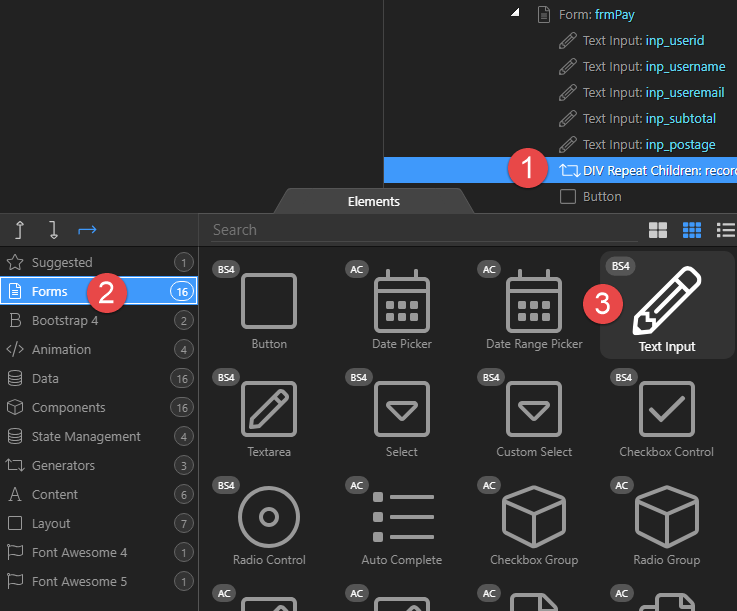
Right click Div Repeat (1), select Form (2) and click Text Input (3)
-
Select the new Text Input (1), remove the Class (2), change the Type to hidden (3) and duplicate 2 more times (4)
giving us 3 Text Inputs


-
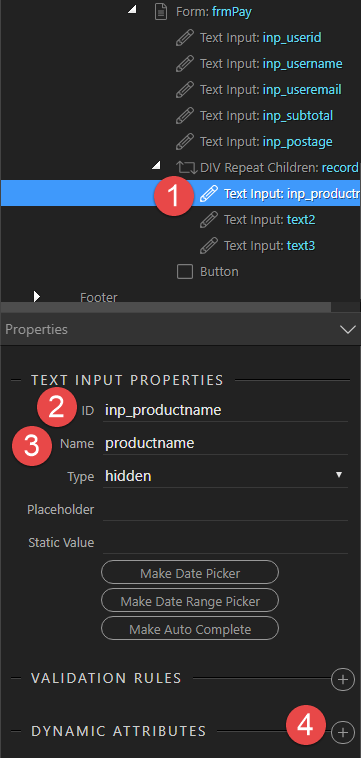
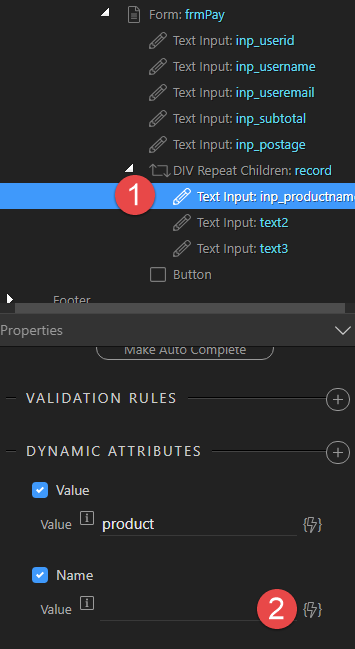
Select the First Text Input (1), change the ID (2) and Name (3) to reflect productname and click the Dynamic Attributes button (4)
-
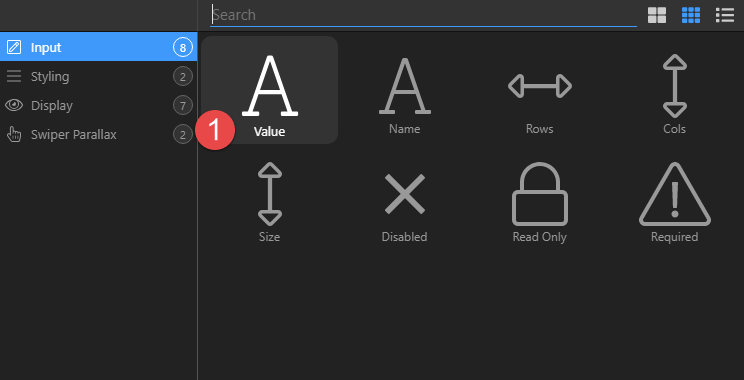
Click Value (1)
-
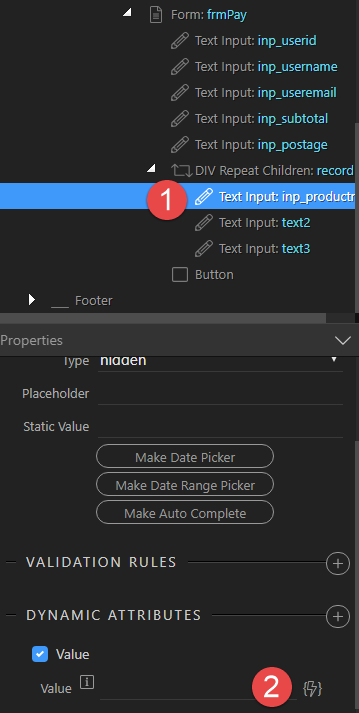
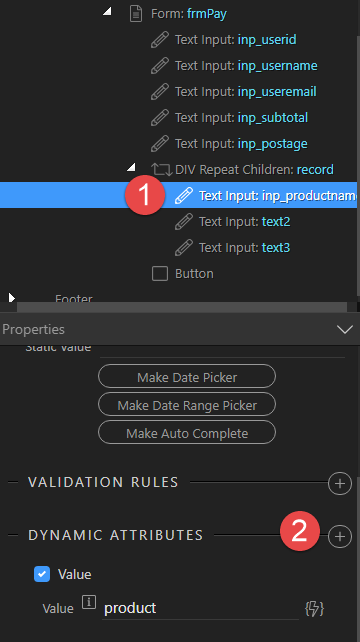
With the Text Input (1) still selected, click the Value button (2)
-
In the pop-up, select under Form: frrmPay (1), product (2). Remove items. (3) and click Select (4)
-
With the Text Input (1) still selected, click the Dynamic Attributes button (2) once again.
-
In the pop-up click Name (1)
-
With the Text Input (1) still selected, click the Name Value button (2)
-
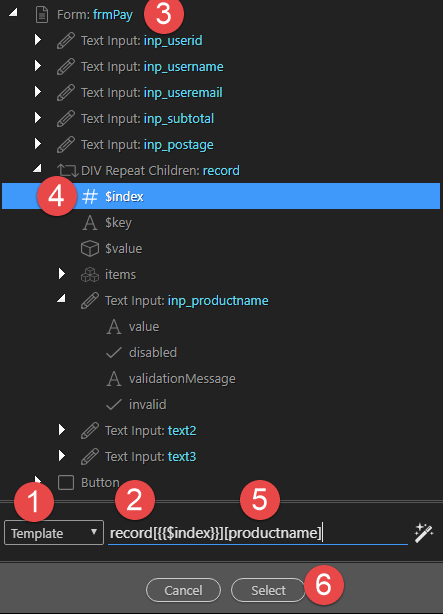
In the pop-up, change the Field to a Template (1), enter
record[(2) and under Form: frmPay (3) select $index (4). Add][productname](5) and click Select (6) -
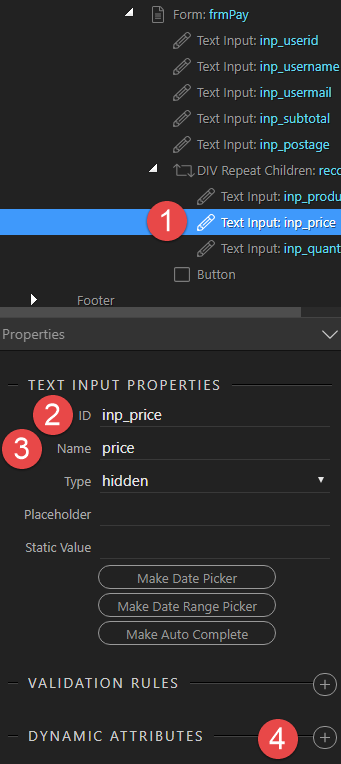
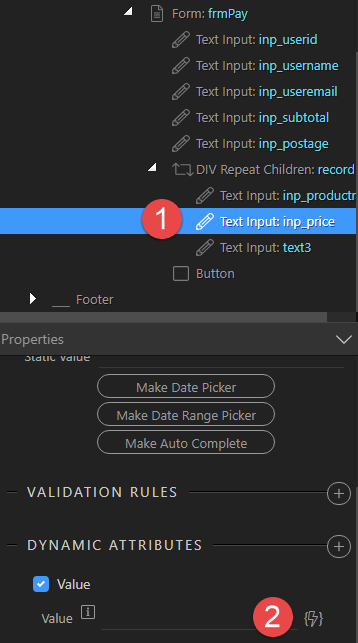
Select the second Text Input (1), change the ID (2) and Name (3) to reflect price and click the Dynamic Attributes button (4)
-
Click Value (1)
-
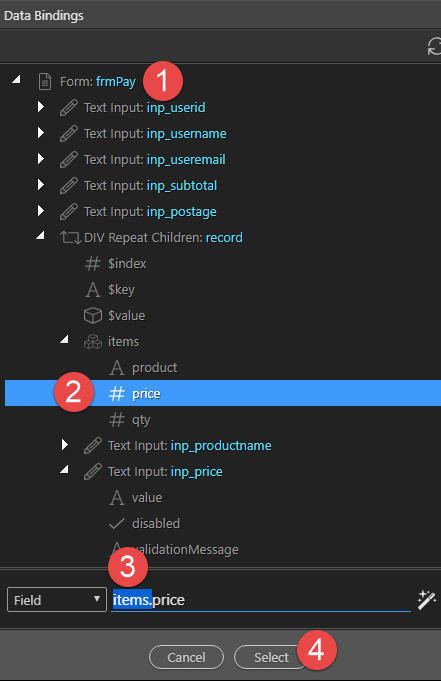
With the Text Input (1) still selected, click the Value button (2)
-
In the pop-up, select under Form: frrmPay (1), price (2). Remove items. (3) and click Select (4)
-
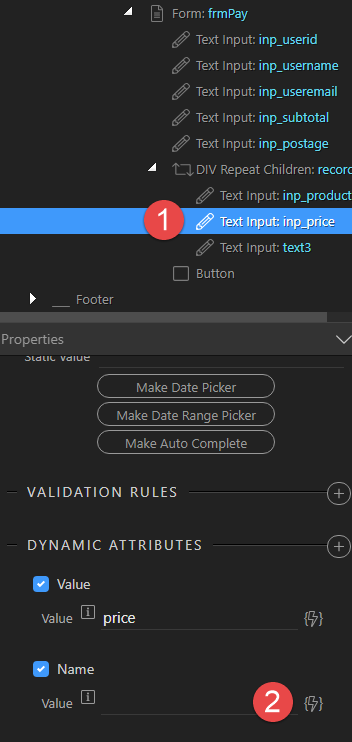
With the Text Input (1) still selected, click the Dynamic Attributes button (2) once again.
-
In the pop-up click Name (1)
-
With the Text Input (1) still selected, click the Name Value button (2)
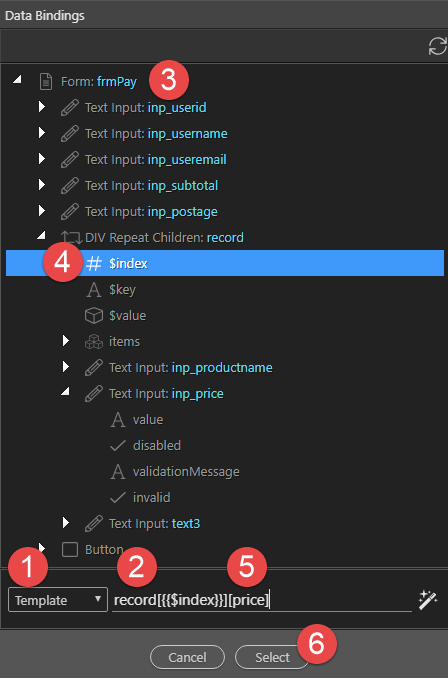
-
In the pop-up, change the Field to a Template (1), enter
record[(2) and under Form: frmPay (3) select $index (4). Add][price](5) and click Select (6) -
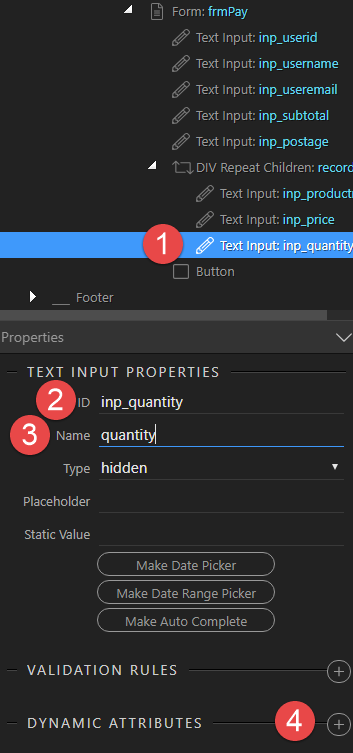
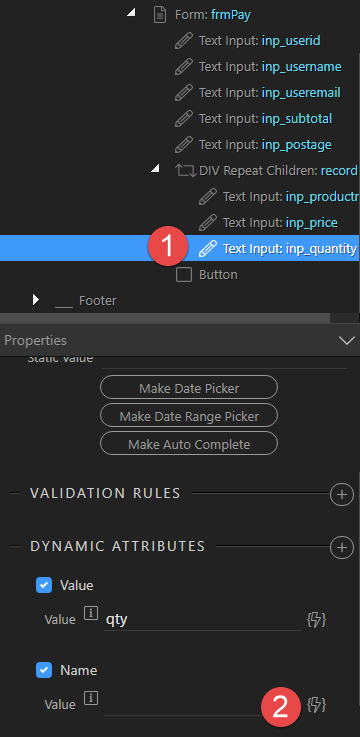
Select the last Text Input (1), change the ID (2) and Name (3) to reflect quantity and click the Dynamic Attributes button (4)
-
Click Value (1)
-
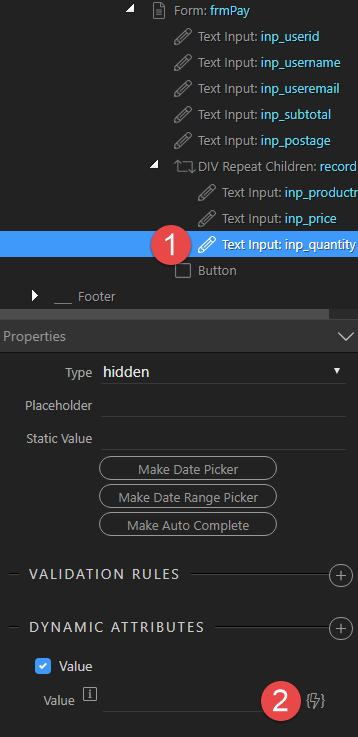
With the Text Input (1) still selected, click the Value button (2)
-
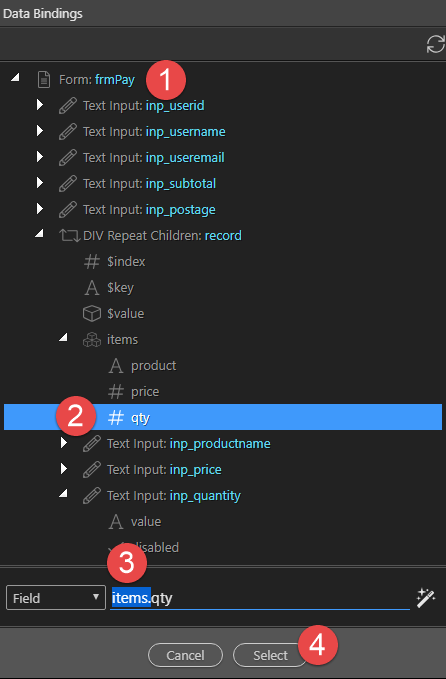
In the pop-up, select under Form: frrmPay (1), qty (2). Remove
items.(3) and click Select (4) -
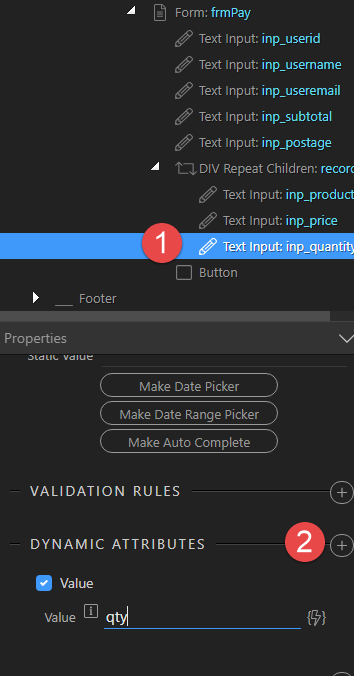
With the Text Input (1) still selected, click the Dynamic Attributes button (2) once again.
-
In the pop-up click Name (1)
-
With the Text Input (1) still selected, click the Name Value button (2)
-
In the pop-up, change the Field to a Template (1), enter
record[(2) and under Form: frmPay (3) select $index (4). Add][quantity](5) and click Select (6) -
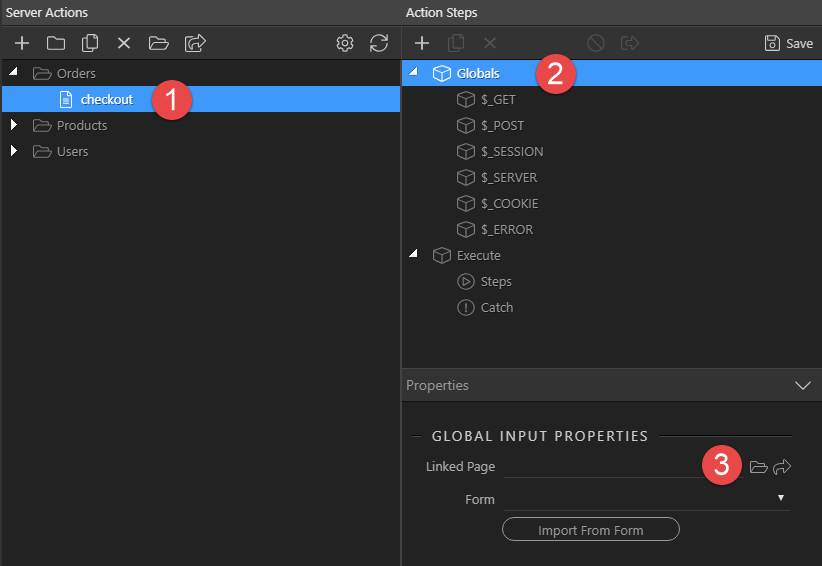
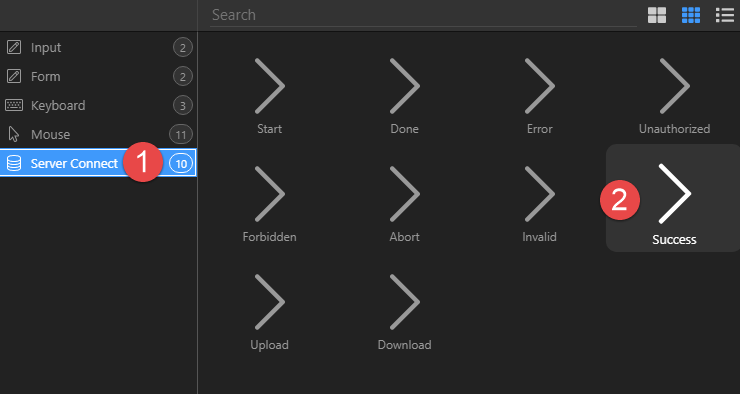
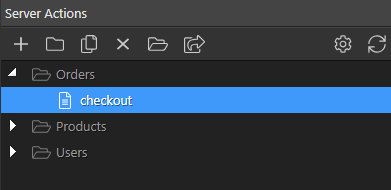
Now for some Server Actions. Under Orders, add a new action called checkout (1)
-
Keep checkout (1) selected, select Globals (2) and click the Linked Page folder (3)
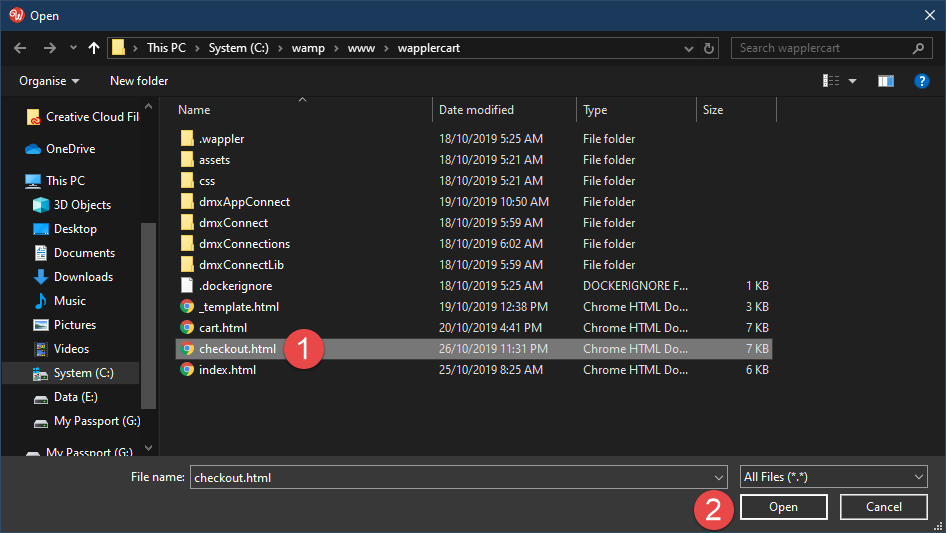
-
Select our checkout page (1) and click Open (2)
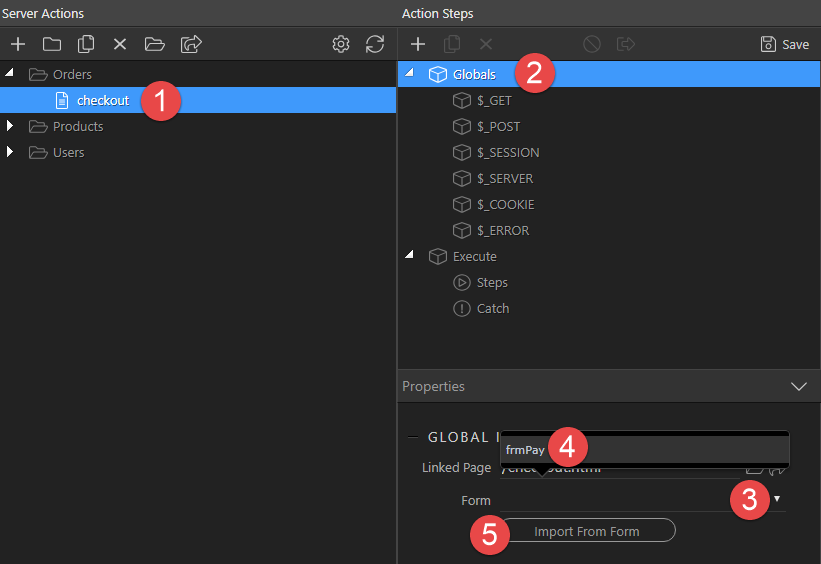
-
With checkout (1) and Globals (2) still selected, click the Form button (3) and choose our frmPay (4) from the list. Click Import From Form (5)
-
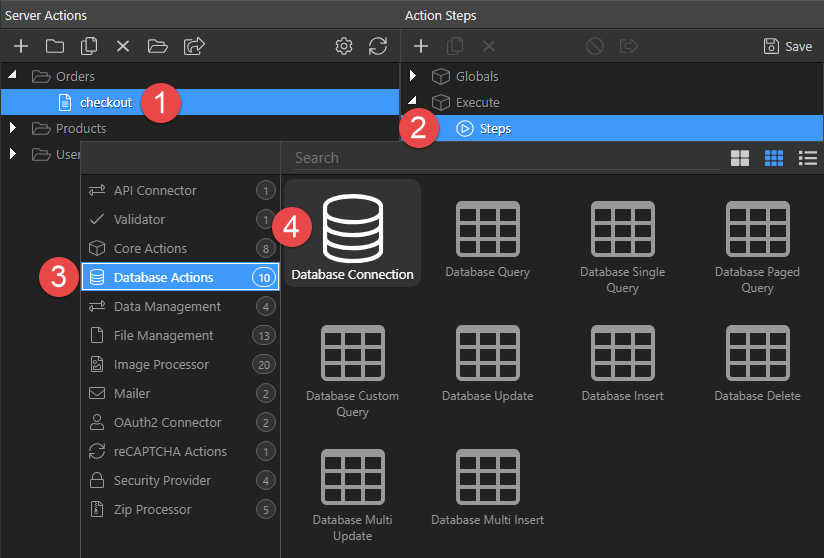
With checkout (1) still selected, right click Steps (2), choose Database Actions (3) and click on Database Connection (4)
-
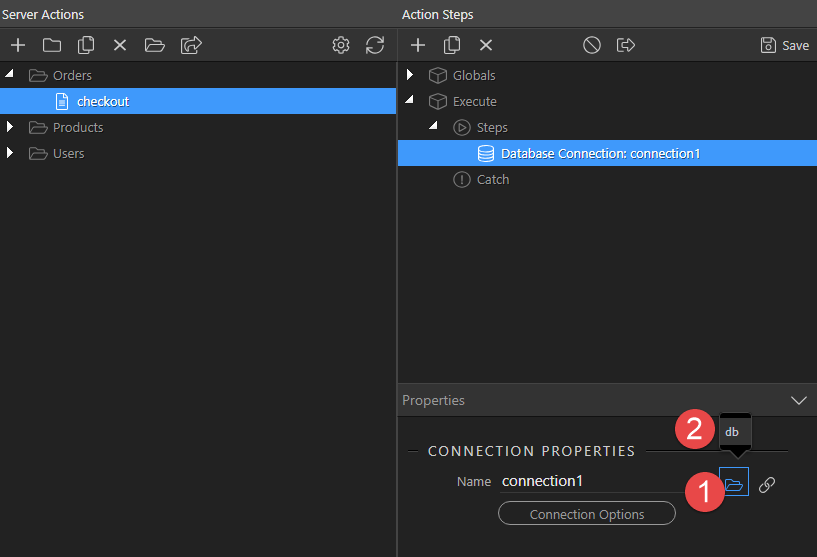
Click the connection folder (1) and click the database connection (2).
-
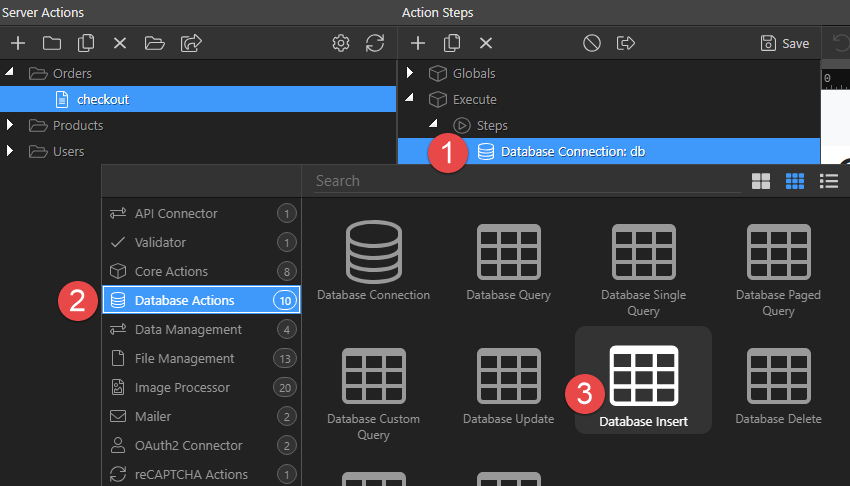
Right click Database Connection (1), choose Database Actions (2) and click on Database Insert (3)
-
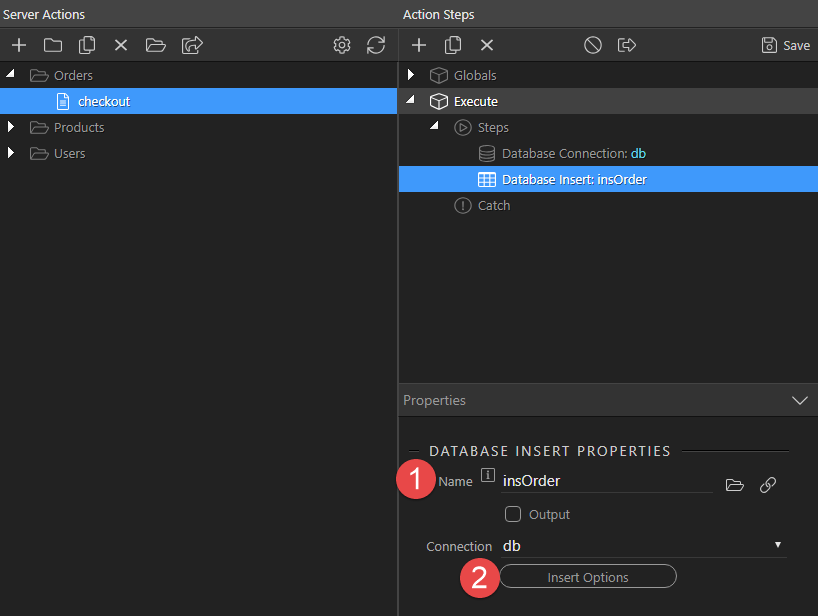
Assign a Name (1) and click Insert Options (2)
-
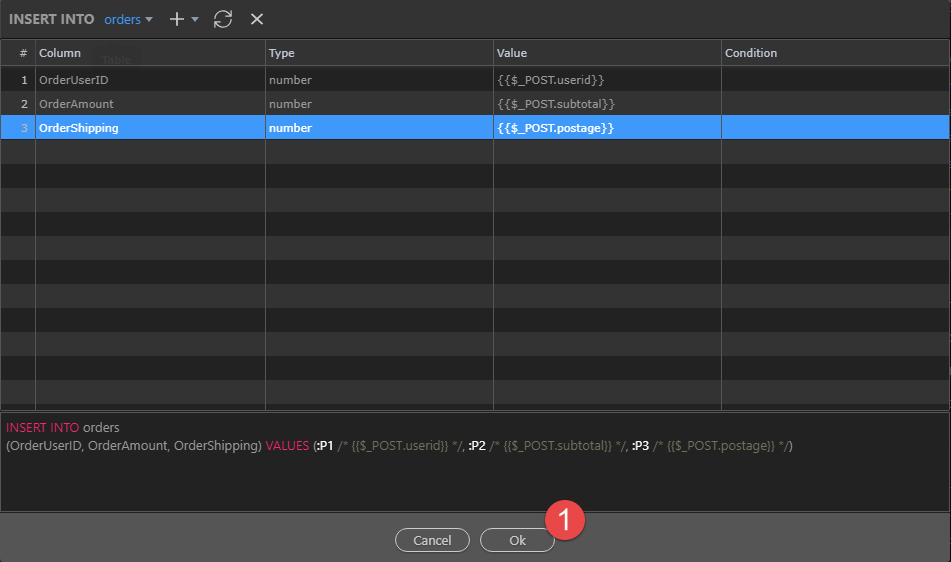
Select the orders table (1), remove all of the unwanted columns so that we are left with these (2) and click on the Value thunderbolt for OrderUserID (3)
-
Choose userid (1) and click Select (2)
-
Repeat for OrderAmount
-
For OrderShipping
-
Click OK (1)
-
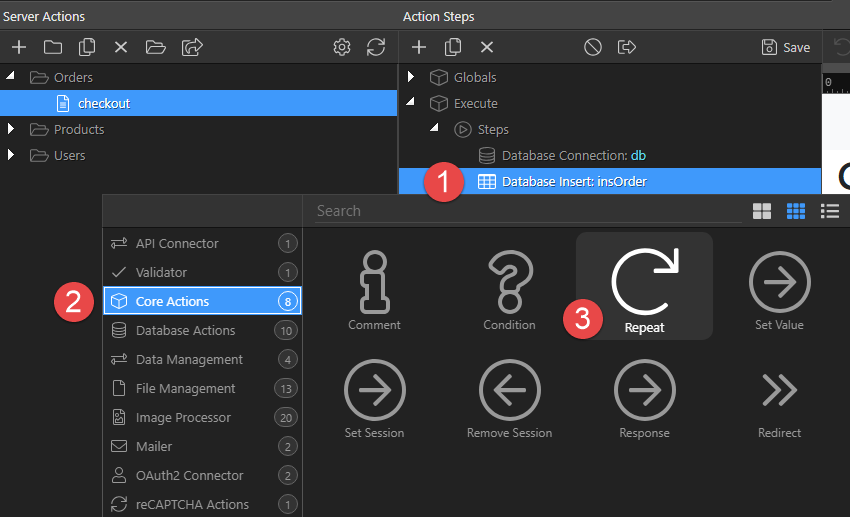
Right click Database Insert (1), choose Core Actions (2) and click Repeat (3)
-
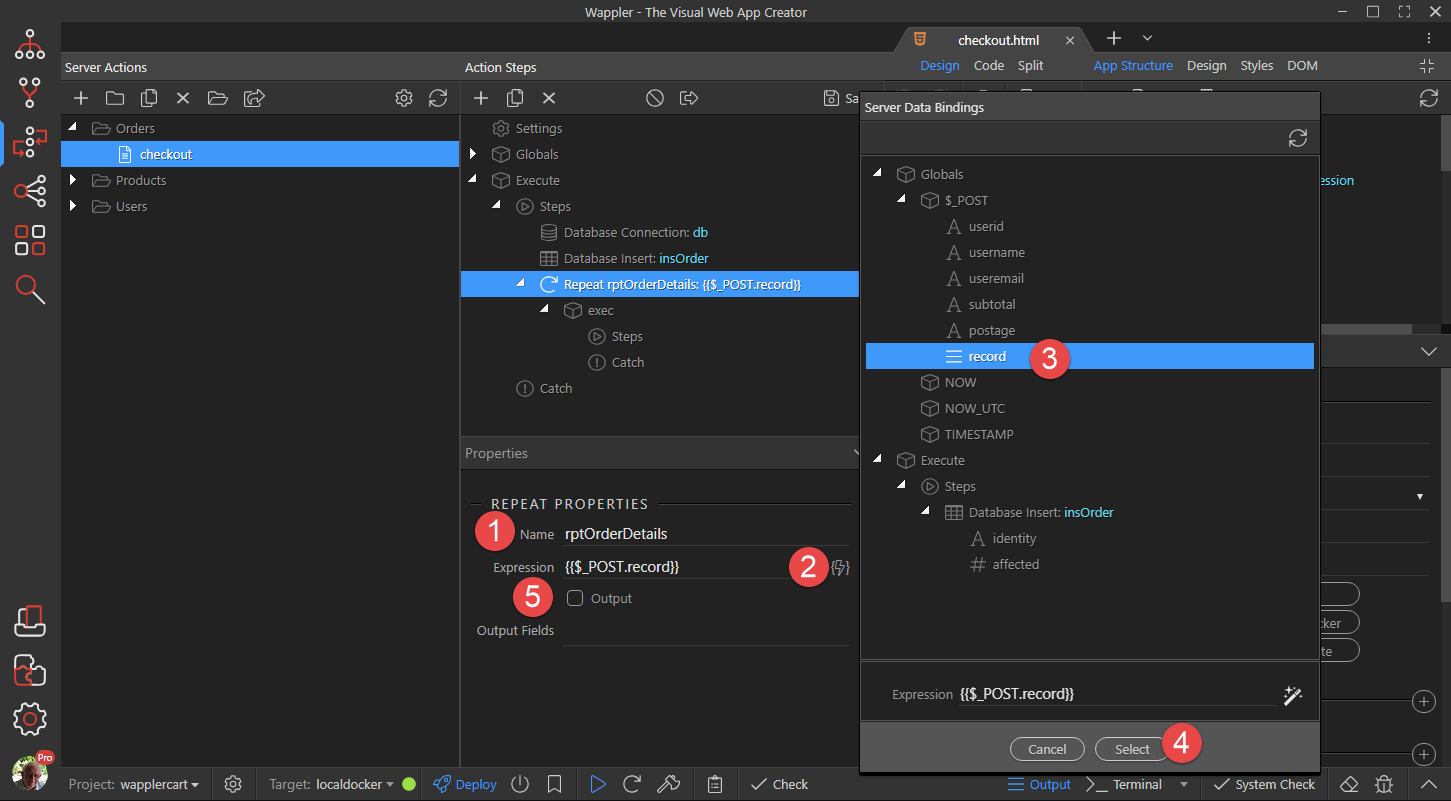
Give the Repeat a Name (1), click the Expression thunderbolt (2) click record (3) and Select (4). Make sure that Output (5) is not selected.
-
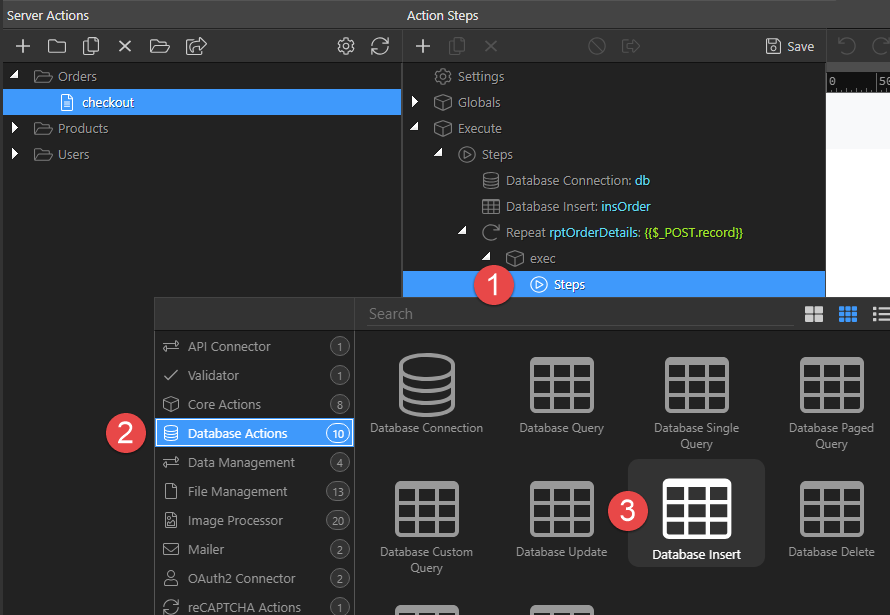
Right click Steps (1), choose Database Actions (2) and click Database Insert (3)
-
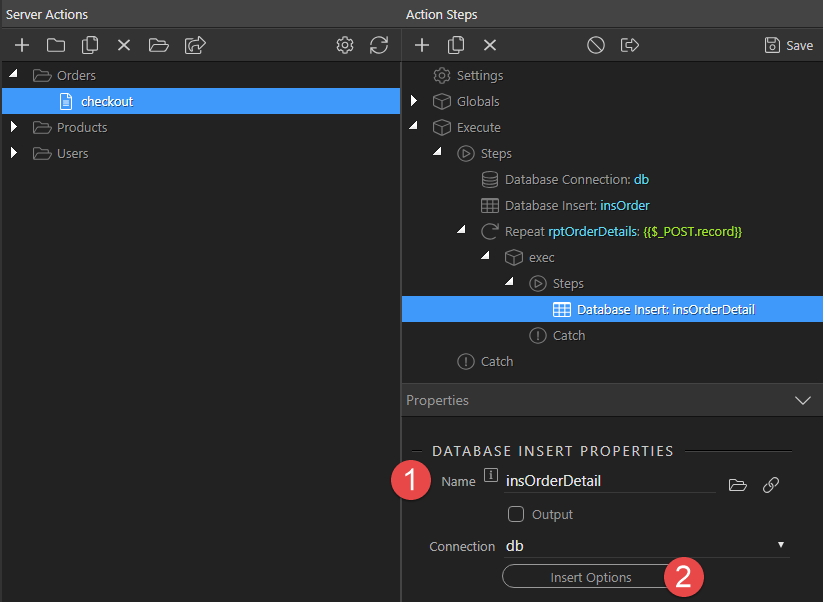
Give the Action Step a Name (1) and click Insert Options (2)
-
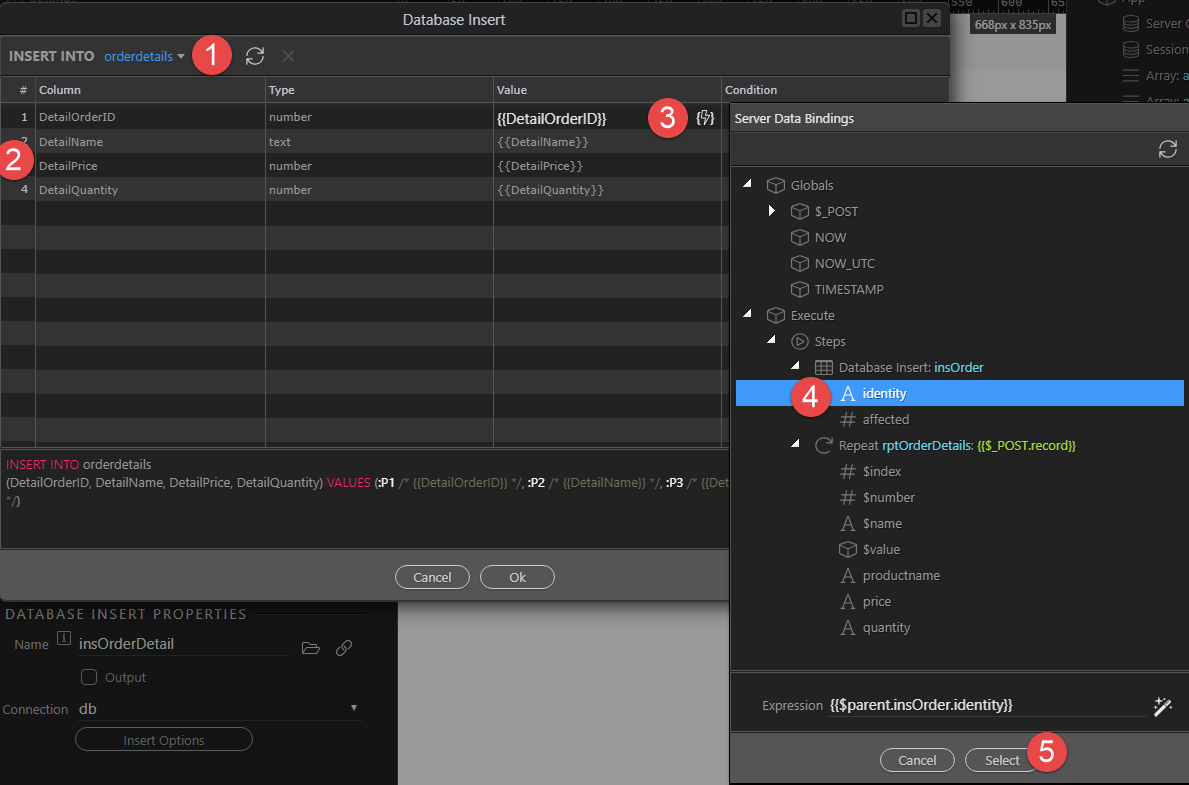
Choose the orderdetails table (1), make sure that we show only those fields that are required (2), click the DetailOrderID thunderbolt (3),
identity (4) and Select (5) -
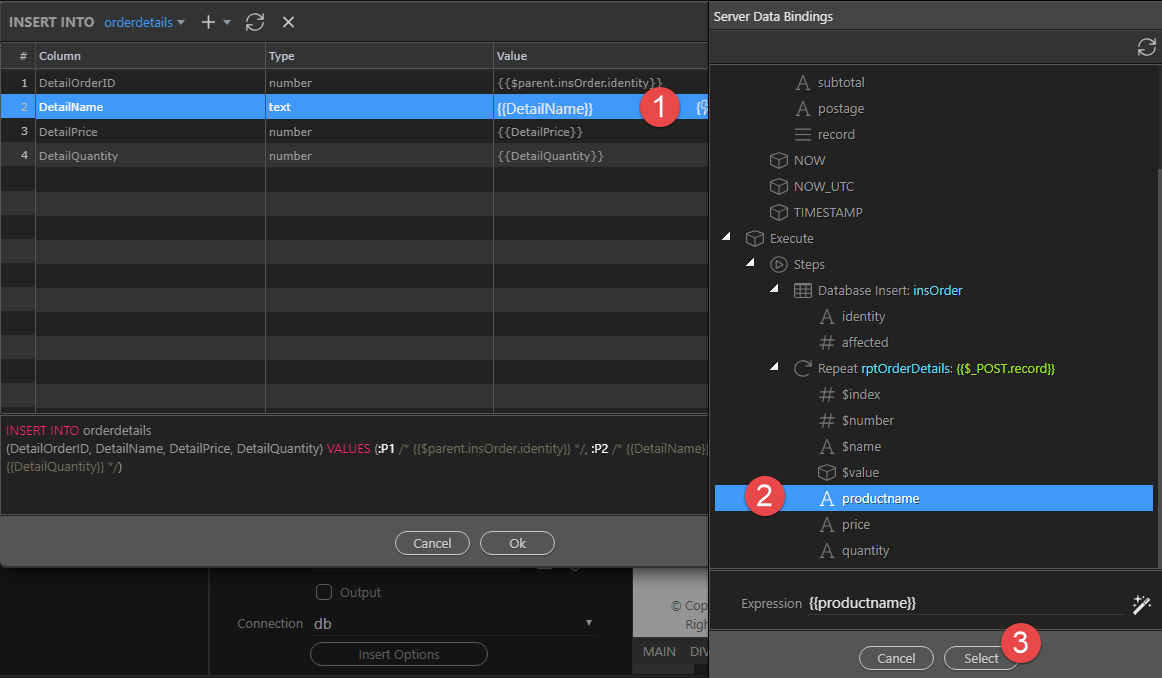
Click the thunderbolt for DetailName (1), choose productname (2) and click Select (3)
-
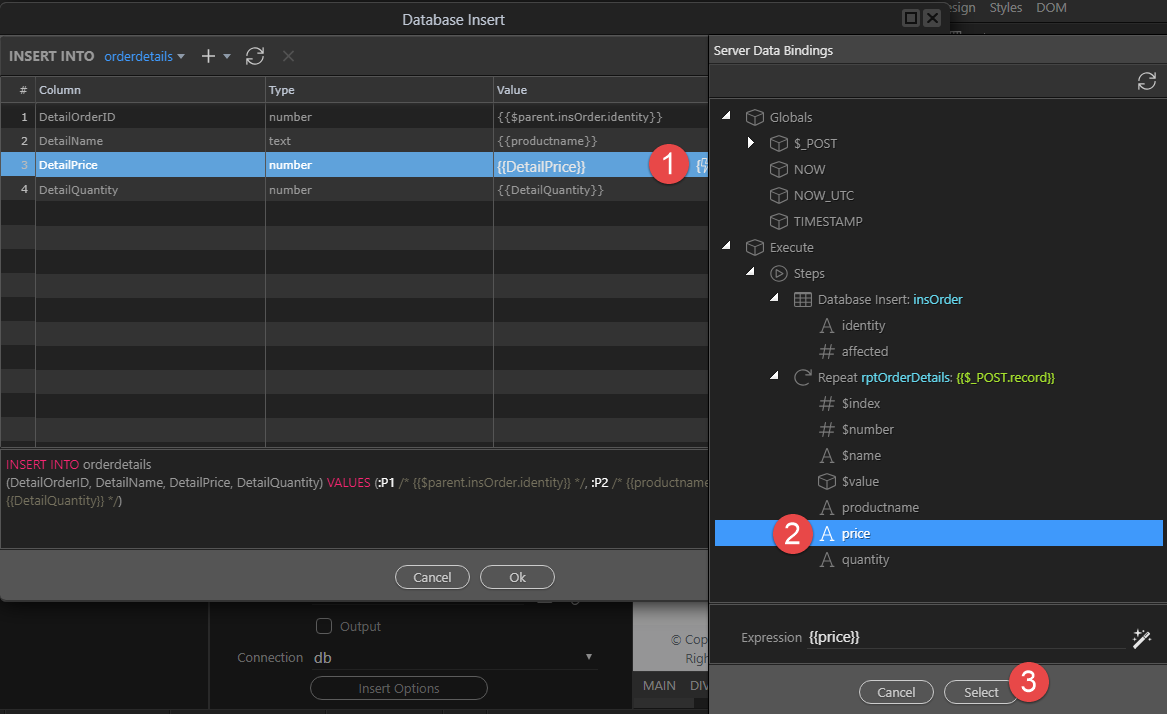
Repeat for DetailPrice
-
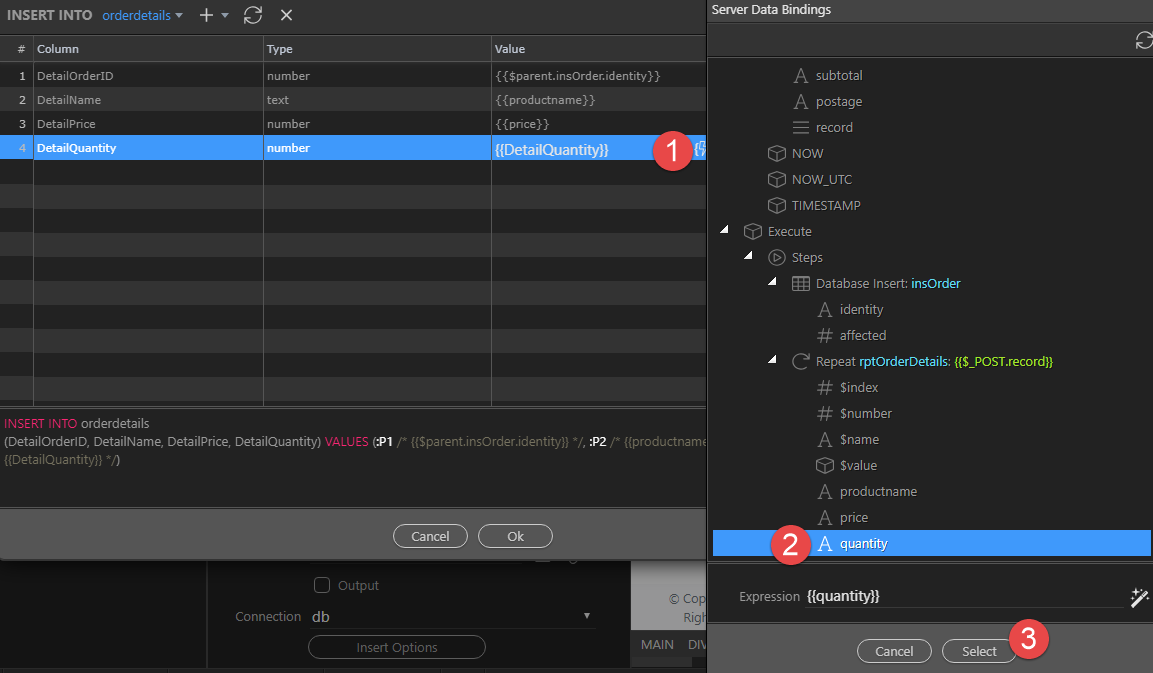
And for DetailQuantity
-
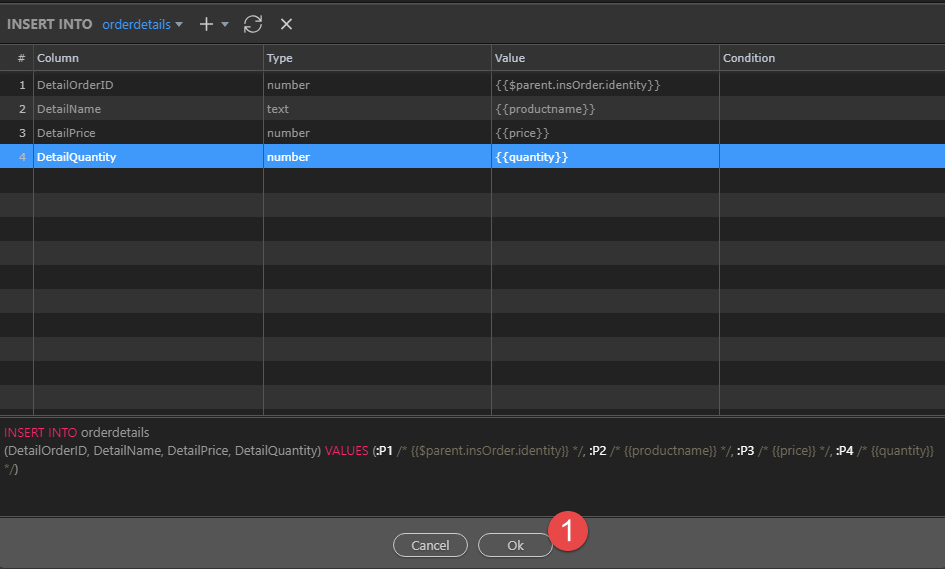
Click OK (1)
-
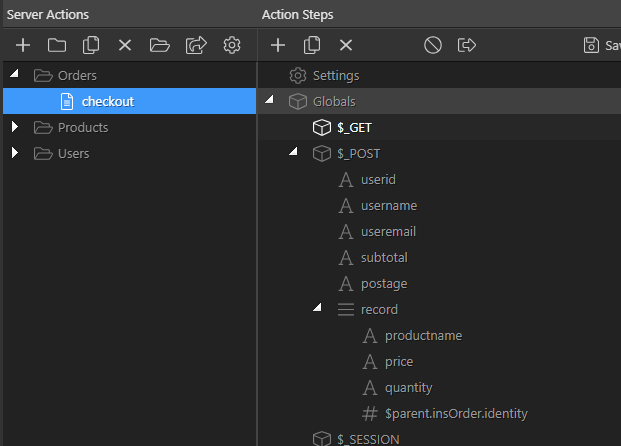
For orientation, this is what the Globals $_POST section looks like
and this is what the Action Steps look like
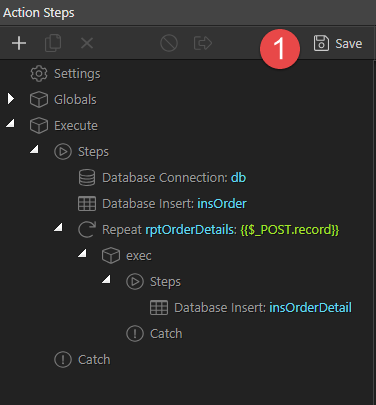
Don’t forget to Save (1) our actions
-
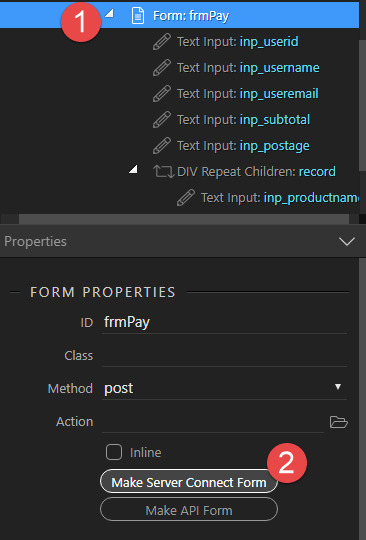
Back to checkout.html. select the Form (1) and click Make Server Connect Form (2)
-
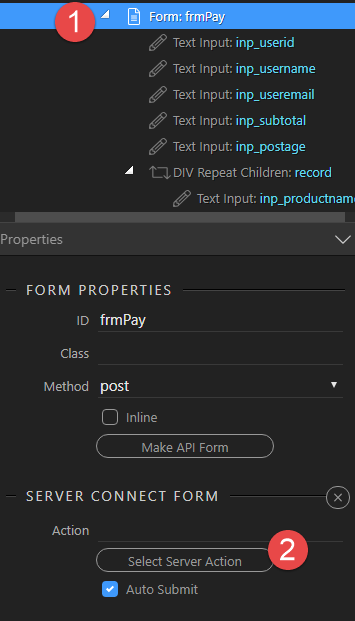
With the Form (1) still selected, click Select Server Action (2)
-
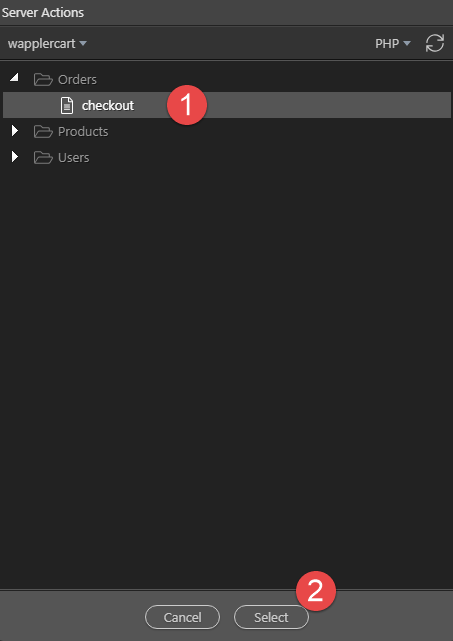
Select checkout (1) and click Select (2)
-
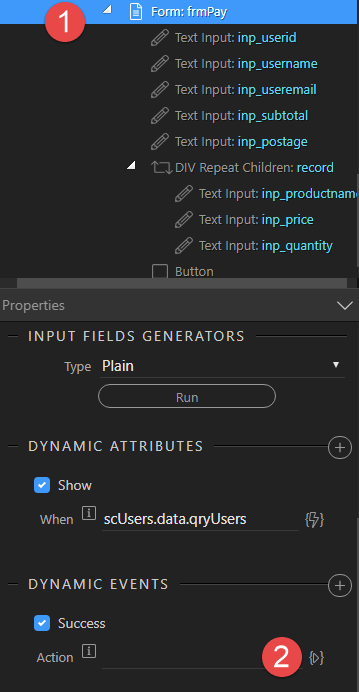
With the Form (1) still selected, click Dynamic Events (2)
-
Choose Server Connect and click Success (2)
-
With the Form (1) still selected, click the Action button (2)
-
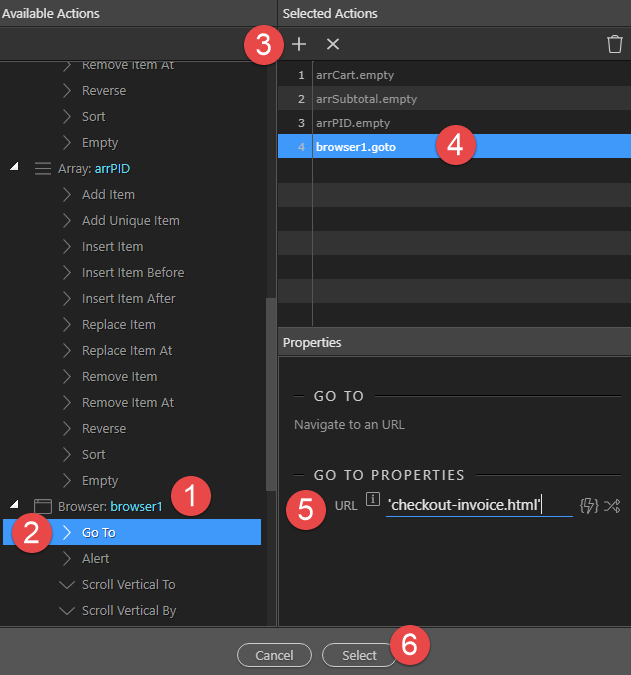
We will now empty our arrays, we have emptied the cart and logged the details in our database. Choose each of the 3 Arrays (1), choose Empty (2) and click the Add To button (3)
-
We will also direct our user to the invoice page. Under Browser (1), choose Go To (2), click the Add To button (3) select browser1.goto (4), enter the URL as ‘checkout-invoice.html’ (5) not forgetting the single quotes and click Select (6)