Stripe Integration Part 4b - The Basic Payment Action - Server Connect Page

Introduction

We have covered the creation of the APP connect based payment page and this tutorial follows on from that to deal with the server connect and API parts of the process

Before we start, i have made some amendments to the part 4a code relating to the hidden fields

Former App Connect Page Amendments

The hidden field “ProductID” has now been changed to lower case “productid” and i have added another field, quantity so we now have:

      <input type="hidden" name="productid" class="form-control mb-3 StripeElement StripeElement--empty"  value="1">
      <input type="hidden" name="quantity" class="form-control mb-3 StripeElement StripeElement--empty"  value="1">

The Product Order Detail

In this case we are selling a quantity of 1 Type 1 Widget (product Id = 1)

This should be priced at 250 currency units, in my case UK pence so total £2.50 ( i have priced the product table in pence, not pounds)
image

The Server Action

So create your sever action, i have called it send_charge.

POST Variables

Add your post variables. stripeToken must match this case, productid and quantity must match those in your app connect form in name and case.

Server Action Overview

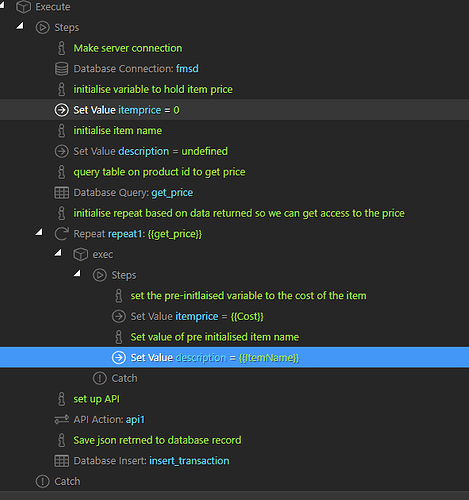
Now we set up the server action

Initializing The Variables

Firstly we make a server connection, this is well documented and i won’t say more
Next we go to Core Actions =>Set Value and declare a variable. It’s value is not important as this is overwritten later. This is initialised purely as it will not be available in the data picker unless initialised outside the repeat

We do the same for the product description which we will also obtain from a data query later

Retrieving the Price and Description via a data query

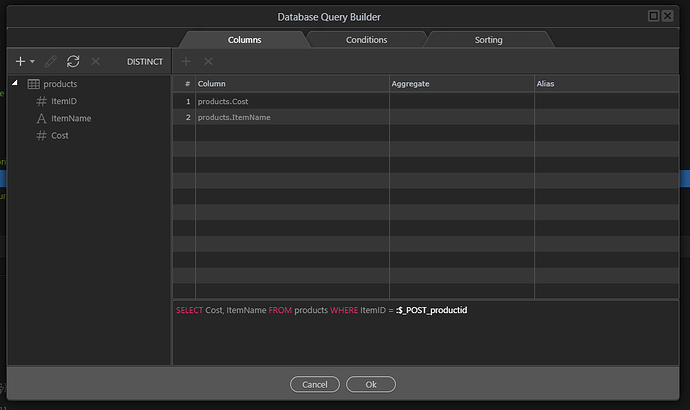
Next we query our products table using the product id posted to the action and return the price (in the cost column of the table)

Extracting Price and Description from the data query

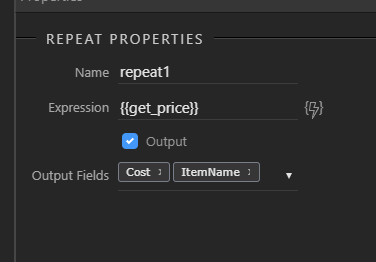
We now set up a repeat based on that query i have called get_price
image

Setting the Price and Description variables

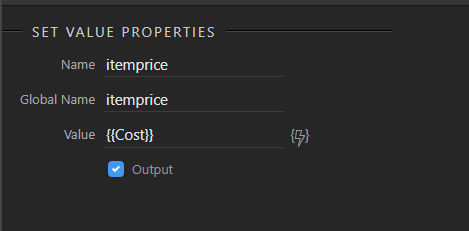
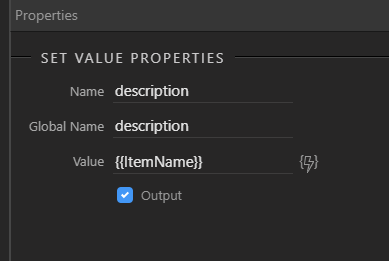
Next form within that repeat we redefine the variables itemprice and description to the values returned by the query from the products table.
image
image

Now we have retrieved the price and description so we can send the payment to Stripe

The API Call

Add an API Action stage

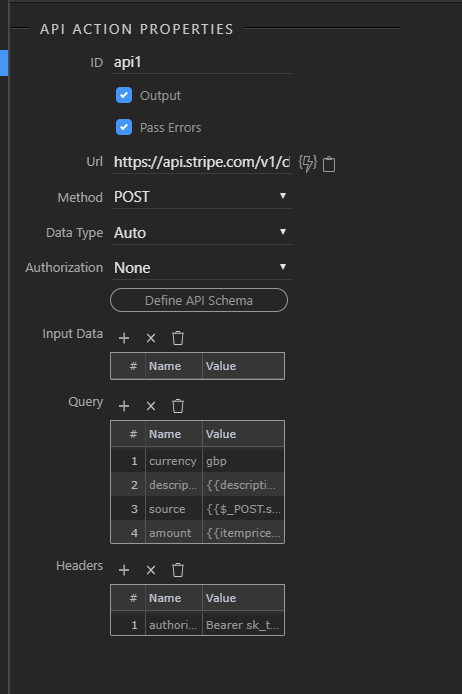
Our Action will be as below

Pass Errors Option

Keep “Pass Errors” checked until fully debugged so errors are echoed to the console

The API Call URL and Type

Our API Url is: https://api.stripe.com/v1/charges and Method is POST

The API Header

In the headers Section add the authorisation string i.e. the word Bearer followed by your secret key as outlined in Parts 1 and 2

The API Query

In the Query section we add the following:

Currency

currency: in my case gbp

Description

Description: This is the value of out variable {{description}}

Source

source is our stripeToken {{$_POST.stripeToken}} (which is automatically created at app connect level by the stripe javascript)

Amount

amount is our variable {{itemprice}}

The returned Object for Stripe

Once posted Stripe returns the object for the newly charged item, the makeup can be viewed via this link

Storing the Results in a Database Table

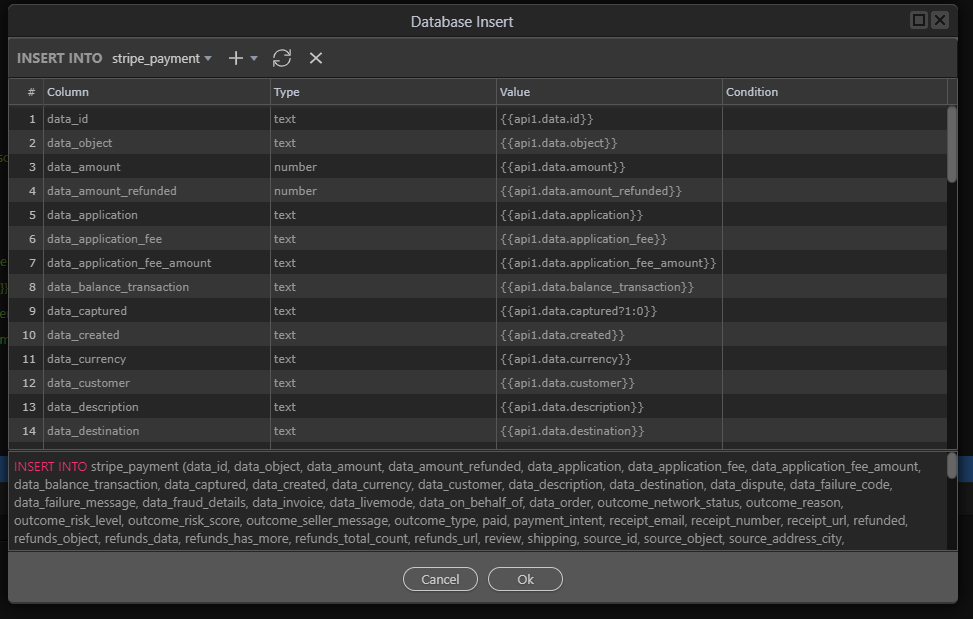
This can then be stored in a database table using an insert action

What needs to be stored

As most data can be retrieved via the API (see later) it is not actually necessary to store much more than the transaction ID however in this demo I have stored the entire returned object to illustrate how it works (63 columns)

The API Data Types

The API returns 4 data types
Numeric and string can be stored as is
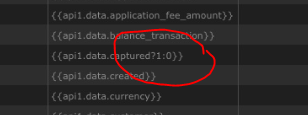
Boolean can be stored using the expression {{fieldname?1:0}
Stripe also returns arrays for items like metadata (we will discuss this later) At this stage I suggest you ignore these until you understand their function as empty arrays are returned which can cause errors when storing.

###The Data Insert Query
A sample screen for this action is below:

Sample Table in Zipped .sql Format

An empty copy of this table in zipped .sql is attached. stripe_payment.zip (963 Bytes)

Ensure your app connect form has the correct server action set to point to this new server action

The Data Table Contents after the Transaction

The data is then stored in the database table (see sample below)

Checking your Stripe Account for Confirmation of the Transaction

Check your stripe account and you will see the transaction listed in your Dashboard

Next we will look at adding shipping details
4 Likes

Hi Brian

This is an excellent tutorial and I’m making good progress. At this stage you mention the stripeToken but I can’t find any reference of how this should be created. Are you able to give me some more info?

Thanks, Jon.

Back in office tomorrow, will take a look and sent iinfo

1 Like

I understand your confusion, i had to go through the stripe docs to answer that one!

The $_POST variable stripeToken is automatically created by the javascript in the app connect page (as a hidden field) and is effectively a security identifier. NO need to worry about it, it just needs to be defined in global to accept the token sent

1 Like

Thanks Brian, I really appreciate your time to confirm, I’ll crack on with it.

One other quick question. When I’ve followed your process, will the visitor see a Stripe modal appear where they enter their card details? I know that’s how Stripe works but am just curious I’ve understood the process in Wappler for this.

Sorry about delay, no modal, it is like this, simple input line for all details

Thanks Brian. Yep, I continued with the process and spotted that.

It seems this way of working isn’t using the new SCA regulations so I’m looking at it afresh. Have you any experience of the new processes?

I believe stripe are still finalising this
You can sign up for updates here

Thanks again. Have you looked at this?

I’m thinking this might be easier all round and it’s fully SCA ready.

Will take a look thanks

1 Like

Hello Hyperbytes,
Thank you for your video. It was very helpful. However, for some reason, my credit card form is not displaying on the screen at all. I even try to exactly use the file you had on your video. Do you know if there is any particular reason for that. Or maybe I miss something.
I read everything I could find around I believe no one had an issue like this before.
Any help will be appreciated.

Thank you

Good day Brian! I had a question. when you are creating the database insert step how do you generate the schema from the api? I’m guessing you just put the query details in the api schema editor. but I don’t know how you generate the token? In the form when its used the javascript component generates the token. How would you then generate the token to use to generate schema?

thanks your any input

From memory, there is a “global” API test key on the stripe API website which can be used to generate the schema.

Hi Brain,
I have worked my way through this tutorial and successfully created the charge object on stripe. That said I am running into a separate issue when I try to insert the api data into the final Database update action step. I turned on the debugging features and received this info:

code 0
file “/var/www/html/dmxConnectLib/lib/db/Connection.php”
line 105
message “Object of class stdClass could not be converted to string”
trace #0 [internal function]: exception_error_handler(4096, ‘Object of class…’, ‘/var/www/html/d…’, 105, Array)\n#1 /var/www/html/dmxConnectLib/lib/db/Connection.php(105): PDOStatement->bindParam(18, ‘Object’, 2)\n#2 /var/www/html/dmxConnectLib/modules/dbupdater.php(38): lib\db\Connection->execute(‘INSERT INTO `st…’, Array, false, ‘stripe_payment’)\n#3 /var/www/html/dmxConnectLib/lib/App.php(173): modules\dbupdater->insert(Object(stdClass), ‘insert1’)\n#4 /var/www/html/dmxConnectLib/lib/App.php(137): lib\App->execSteps(Object(stdClass))\n#5 /var/www/html/dmxConnectLib/lib/App.php(107): lib\App->execSteps(Array)\n#6 /var/www/html/dmxConnectLib/lib/App.php(72): lib\App->exec(Object(stdClass))\n#7 /var/www/html/dmxConnect/api/stripe/send_charge.php(8): lib\App->define(Object(stdClass))\n#8 {main}”

Any ideas what the issue might be? Also, at the end of your tut you wrote: “Ensure your app connect form has the correct server action set to point to this new server action” I am not seeing a second server action. Did I miss something. Thank you, Dan

Suggests you are trying to save an object into a string field. An i see a screen shot of your server action?

try taking the condition out here
image

Thank you will do.

Hello @Hyperbytes Brian
First , thanks for your work
I try to generate api schema…without success
I ve generated several api keys (sources, tokens…) in stripe for that but no one is working
"No such token, param:"source, “type”:“invalid_request_error”
Do you have a solution?
Thank you

If i recall correctly you have to generate the schema from the stripe website then paste it into the schema window, to be honest not looked at stripe since doing these tutorials so a bit rusty