The easiest way to integrate with Stripe is to use their hosted Checkout. It's SCA compliant and regularly update with new features. It supports Apple and Google pay for compatible browsers.
1. Create Checkout Session
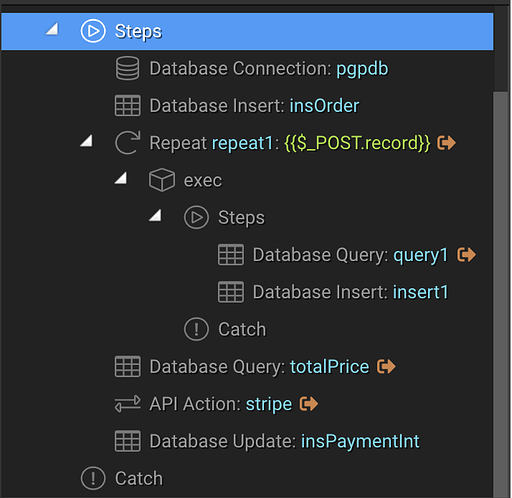
For one time payments we need to create a checkout session. To do this create a server action folder called stripe and then a new action file within called checkout.
This will assume that you already have a way setup to insert details of the order to the database. (For example lines of an order)
- Database Connection
- Database Query to find the total price
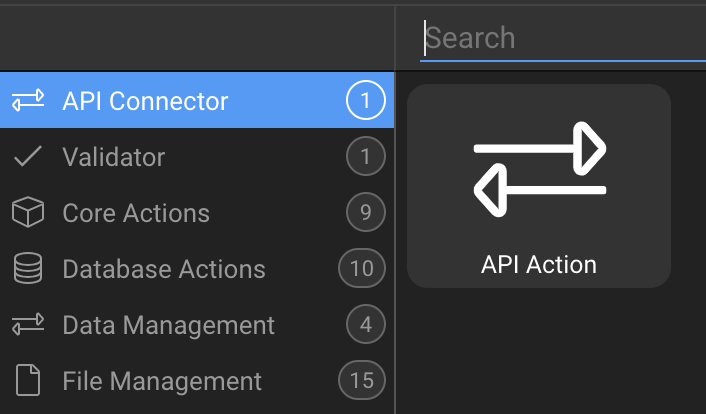
- API Action
- Database Update
Database Query
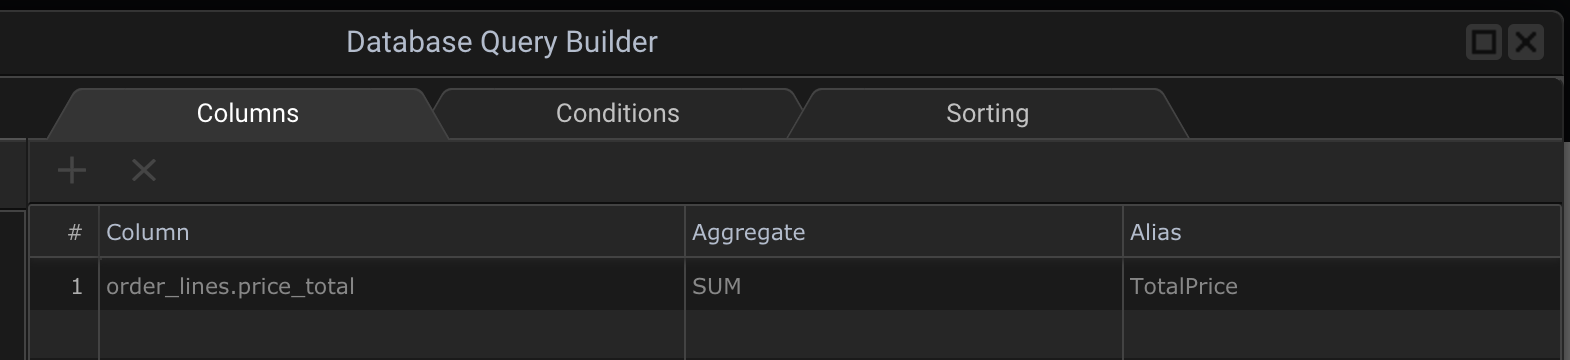
The database query will depend on your setup but in my case I have another server action that inserts products from a shopping cart in data store to the database, and inserts a new record in the table order that contains the user details.
A query is required to find out how much you would like to charge. This wouldn't be required if you simply only have a single product or service to charge for.
API action
Create an API action after the database query (if it was required) and set the id as stripe.
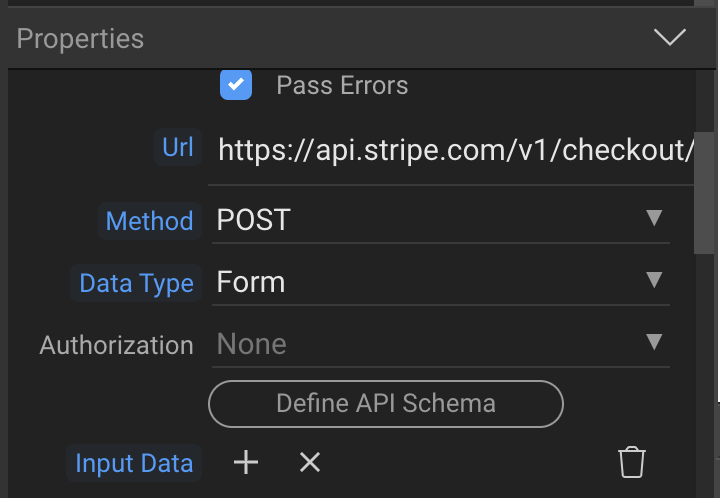
Turn on output and pass errors.
Set the URL as: https://api.stripe.com/v1/checkout/sessions
Change the method to POST and the Data Type to Form.
Under Input Data we need to create a few fields:
| Name | Value |
|---|---|
| success_url | https://mydomain.com/success |
| cancel_url | https://mydomain.com/cancel |
| mode | payment |
| payment_method_types[0] | card |
| customer_email | ***Note: Not required but pre-fills Stripe checkout |
| line_items[0][currency] | usd |
| line_items[0][amount] | {{totalPrice[0].TotalPrice * 100}} - Change for your query or price |
| line_items[0][name] | Give this a description your user will recognise |
| line_items[0][quantity] | 1 |
Lastly we need to set two Headers:
| Name | Value |
|---|---|
| Authorization | Bearer sk_test_xxxxYour_Stripe_Key_xxxxx |
| Idempotency-Key | {{NOW_UTC.sha1("16dUk6RsXSat18")}} |
Copy and paste your Stripe key into the Authorization value field, be sure to prefix it with the word Bearer like in the example above.
We set an Idempotency Key to safely retry requests without accidentally performing the same operation twice, for example if there is a network error on the client and the request fails, Stripe will retry the same request without making multiple charges. I just set this to NOW_UTC and generate a random SHA1 hash.
Now this is setup, we need to click on Define API Structure.
In the popup window you'll need to press 'Fetch Schema' and once this is complete you will see the API schema in the right-hand panel.

Press Save and you'll now be able to access the Stripe api schema throughout Wappler data bindings.
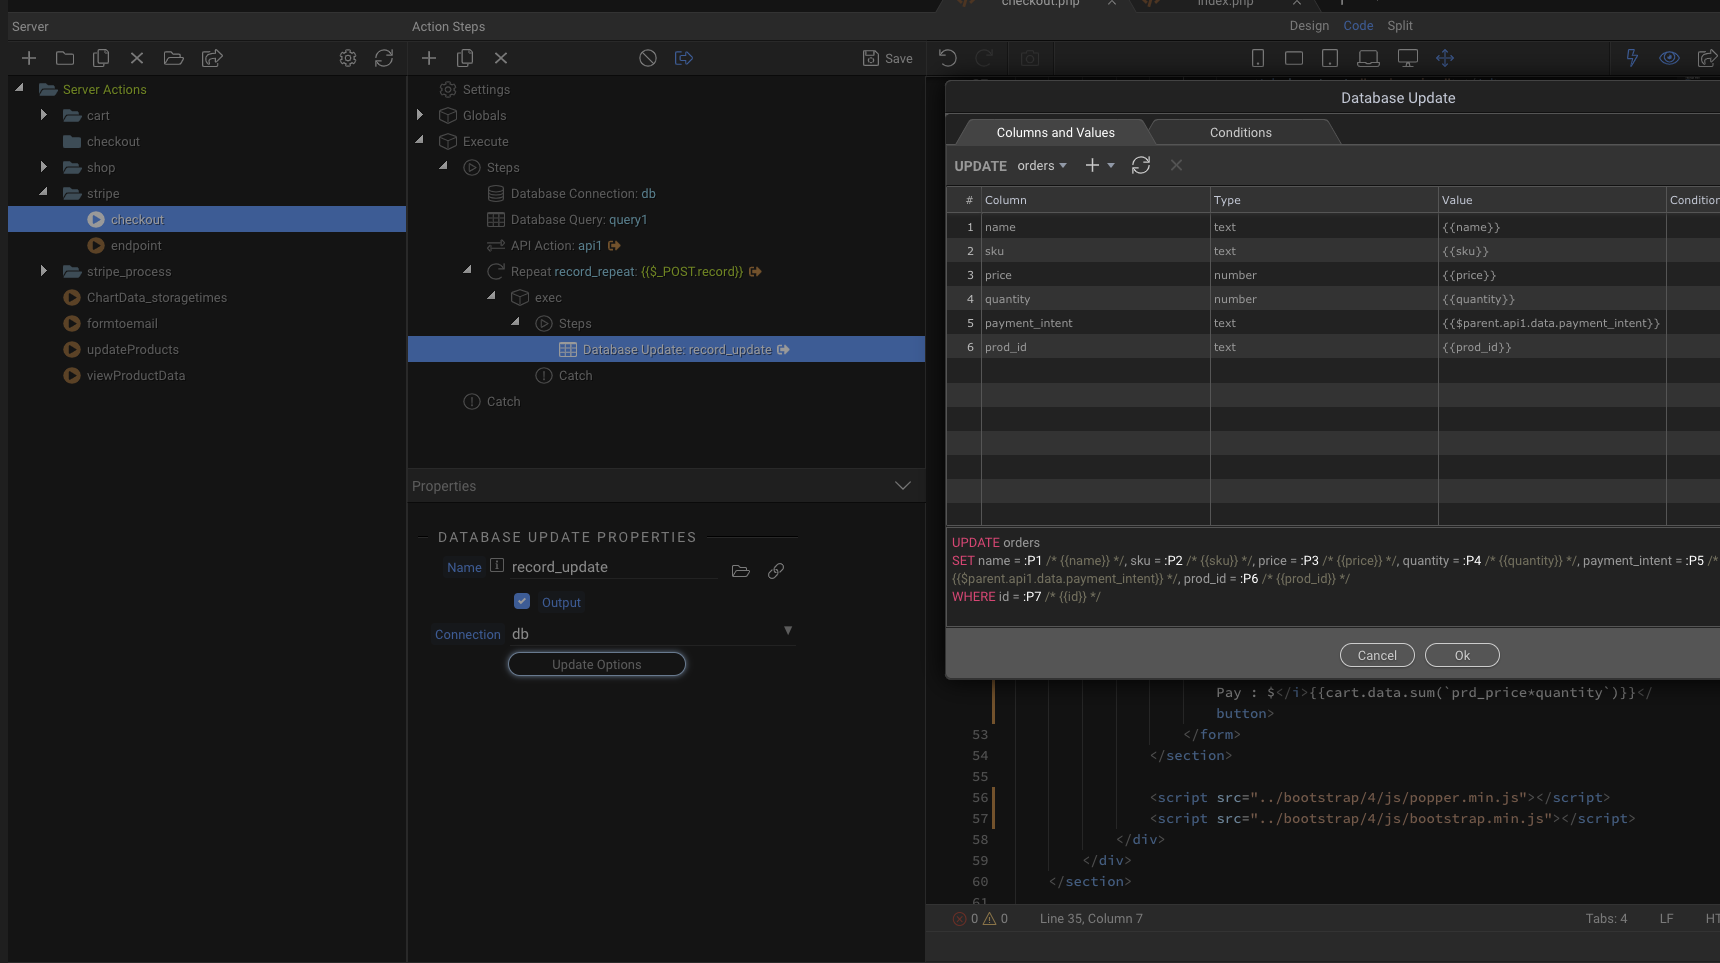
Database Update
The last step of this action file is to save the Payment Intent. In my case I will save this to my customer_order table in the database. The reason we need to save the PaymentIntent is because we will need to verify it later in our webhook.
If the Fetch Schema works correctly in the previous step then should be able to access the PaymentIntent under the dynamic data picker as:
{{stripe.data.payment_intent}}
2. Redirect to Stripe
On our page we need to include Stripe.JS in our header. Copy this script tag and include it before the closing </head> tag.
<script src="https://js.stripe.com/v3/"></script>
We must also create a "checkout or pay" button on our page for the user to click.
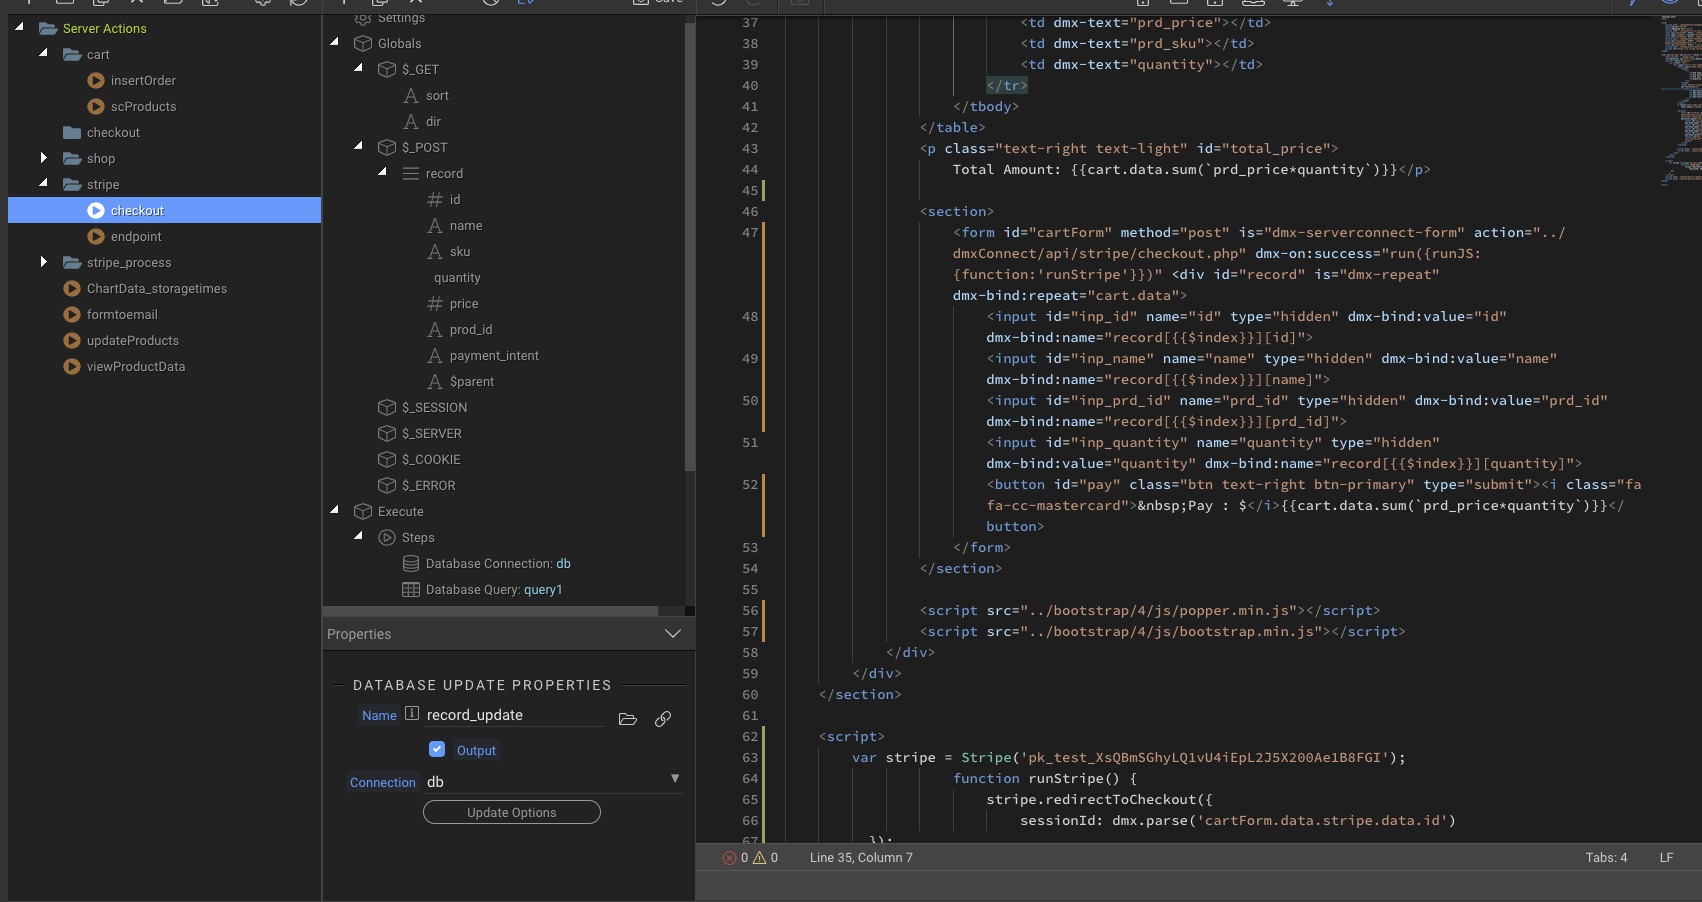
First create a ServerConnect form (I'll call this cartForm) that POST's data to our server connect action file that we just created.
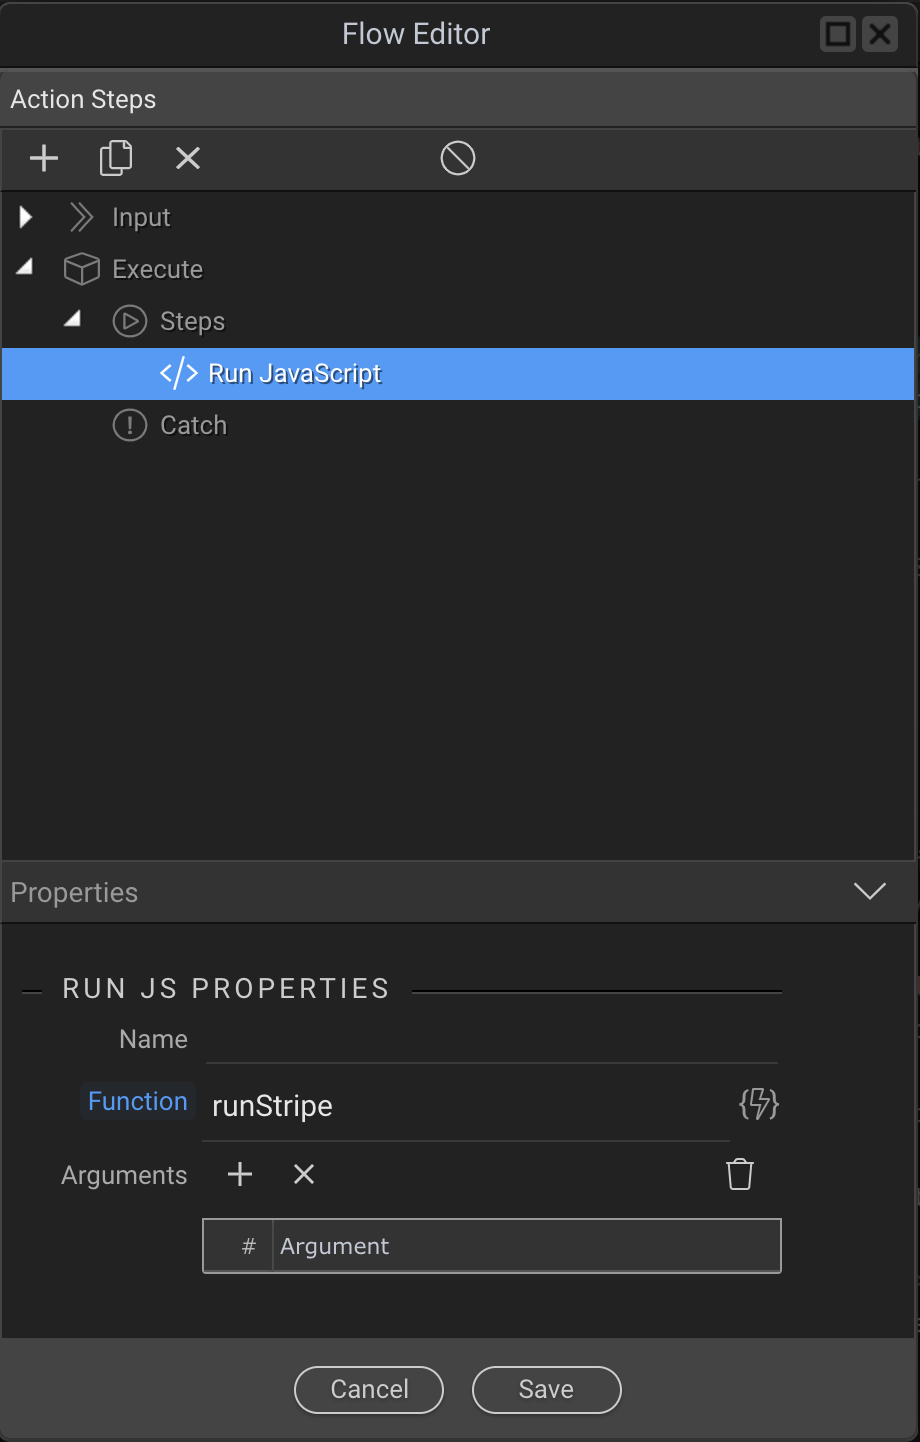
<form id="cartForm" method="post" is="dmx-serverconnect-form" action="dmxConnect/api/stripe/checkout.php" dmx-on:success="run({runJS:{function:'runStripe'}})">
As you can see from the snippet, we will also set an onSuccess dynamic event to run a flow. Inside the flow we select Run Javascript and we call the function runStripe.
You can now place a button inside of the form and make sure to set its Type as Submit.
Finally, we need to place some javascript just before the closing </body> tag on our page.
  <script>
		var stripe = Stripe('pk_test_xxxxYour_Stripe_Key_xxxxx');
		function runStripe() {
			stripe.redirectToCheckout({
  			  sessionId: dmx.parse('cartForm.data.stripe.data.id')
		  });
		}
  </script>
This is the javascript function that is run from our Flow.
Replace the Stripe key with your own and you may need to change cartForm to the ID of your form.
sessionId: dmx.parse('cartForm.data.stripe.data.id')
With:
sessionId: dmx.parse('yourFormID.data.stripe.data.id')
That's it. You should now have a working Stripe Checkout integration that takes your user to https://checkout.stripe.com on button click.
But we're not quite done.
Unless you want to manually poll the Stripe dashboard to verify someone has paid you, we will setup an automatic webkook server action to update our database upon successful payment.
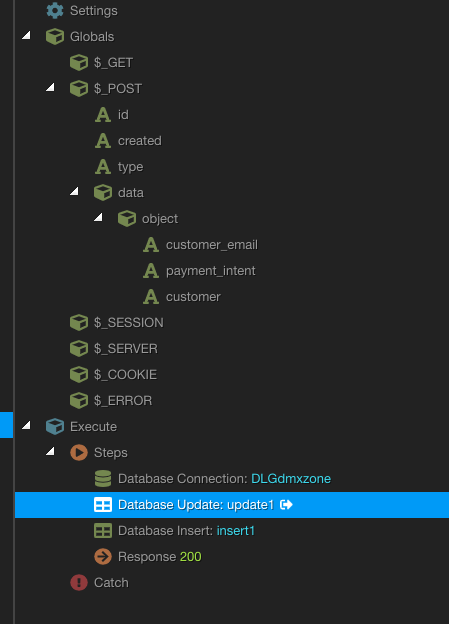
3. Create an Endpoint
- Create a new server action within the stripe folder and call it endpoint. It should then be accessible at:
dmxConnect/api/stripe/endpoint.php
- Next we need to create a few $_POST variables under Globals.
Variable: id
Variable: created
Variable: type

Object: data
    Object: object
            Variable: payment_intent
Mine looks like this:
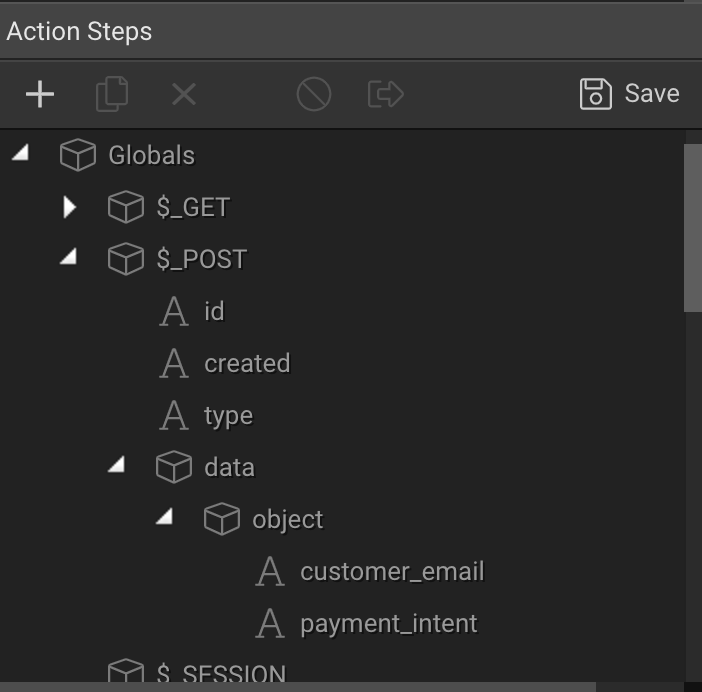
You can add more variables from the Stripe API scheme if you need them. For example I've also added the customer_email field too.
- Add a Database connection followed by a Database Query.
In my case the query will be the customer_order table and I will set a condition that matches the payment intent stored agains the payment intent provided by the Stripe webhook.

-
In my case I now insert a Database Update step to update the customer_order as paid.
-
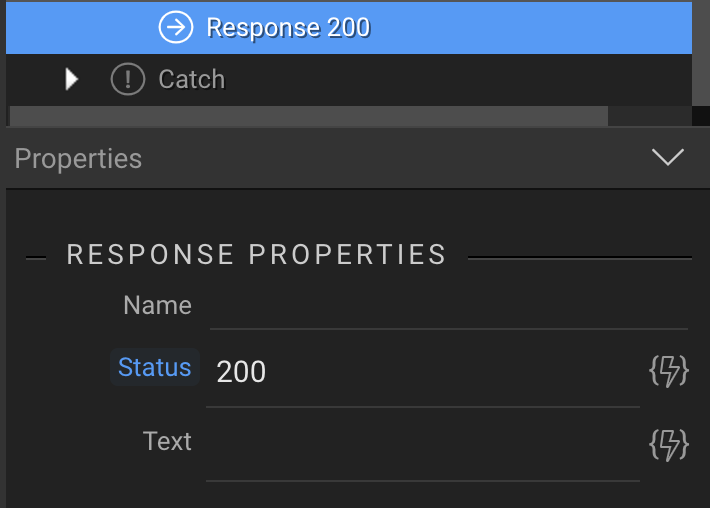
And finally I insert a Response and set it to 200. This is to alert Stripe that we have received and accepted the webhook.
Note - It has been reported that by adding a 200 Response may cause an error on Stripe's end. You may not need to add this step.
4. Tell Stripe about our Endpoint
We now need to enter the URL of our endpoint within the Stripe dashboard.
-
Go to Stripe Dashboard > Developers > Webhooks
-
Click the Add Endpoint button under the section 'Endpoints receiving events from your account'
-
Set the endpoint URL as your server action location, e.g.
https://mydomain.com/dmxConnect/api/stripe/endpoint.php
- Under the Events to send dropdown, select
checkout.session.completed
- Click Add Endpoint and you're done.
Stripe will now send the checkout.session.completed webhook to your server connect endpoint action we just created. You can also use the Stripe dashboard to access the webhook logs.
Advanced:
You could go one step further by adding a condition at the beginning of your endpoint server action to check that
$_POST.type == checkout.session.completed
And if that condition fails you could add a 500 Response.
You could also take it one step further and check that the webhook originated from Stripe by verifying the webhook signature.

