Ok, this will be my final post on the eCommerce tools or lack of in Wappler.
I have one week left to inform a client if I can redo their site or not before their AGM. (Been putting it off for two years now) So, even though I am sure I cannot do it, I am going to try. I need to know what my best plan of attack is. Please don’t link to the tutorials on this, I have read them all many times. Stripe tutorials as well. I am even more confused after reading them than I was before.
My need is very simple. I have a community theatre website and I have to sell theatre tickets to the plays online. To make it even simpler it is only one show at a time. So I need one item (name of show) with up to 12 options (show dates). I need to be able to add this to a cart, adjust quantity, checkout to Stripe Checkout or PayPal. Both client and purchaser should get an email with purchase details. Thats it. I do not need any shipping or taxes or anything like that. Just a simple one product, add to cart and checkout. Should be very simple.
Do I have to have my products in a database or do I administer my products from the Stripe dashboard?
- If I add my products to the Stripe Dashboard, how do I add them to my site?
- If I had my products to the Stripe Dashboard, how do I enter product options? Or do I have to enter in a product for each date?
I do not need to track any purchases in a database (but it’s ok if that is an easier way to go). I do need in the confirmation email that both parties get is the purchaser name and product.
- Does the Stripe purchase email confirmation go to both parties and contain that information?
- Is there a Stripe transaction email that goes to both parties?
Can this all be done without custom hand coding?
Suppose I get a cart working, how do you test to make sure checkout is working?
As you can see, my needs are very basic. I just have no idea where to start or how to set this up.
When payment has been made, the purchaser is redirected to the invoice that can be printed. There is also a logged in page where the purchaser can review/print the invoices.
A link to the invoices page is supplied in the email.
I recently completed a similar project you can see in the portfolio. It uses the data store component for the shopping cart and Stripe for payment. It was slightly more complex than normal as the client wanted members to be able to sign up, renew and receive discounted tickets.
Keep them in a database, I chose not to use Stripe for managing the products.
As you've got the database already for storing the tickets you may as well store the order details too. It's easier for integrating with Stripe, sending emails etc.
This was probably one of the more trickiest parts to get around as Wappler doesn't yet support repeats within the email body. I used an external email provider and sent them the data as an array. Still not ideal but the tickets can be seen on the user's online account.
Yes there is a setting in the Stripe dashboard to enable admin email receipts. You could in fact let Stripe handle all of the email receipts to be fair. (I didn't think of this until now)
It can all be done within Wappler, I started my project in PHP as Node was very early days. Again on standard shared hosting, no docker or anything else fancy for the infrastructure.
As Ben has mentioned Stripe give you two sets of keys, on is for development and the other is for live use. The development key lets you process payments without actually charging the card, you can use their test card numbers to trial the checkout process - Test card numbers | Stripe Documentation
My app works in a very similar way to Max. I send all the emails from my app via Postmark… The I can use repeats in server actions to compose the email content. I just use Stripe to take payment - nothing else.
Here is how to integrate Stripe just for payment…
(Link is coming… Can’t seem to copy it on my phone!)
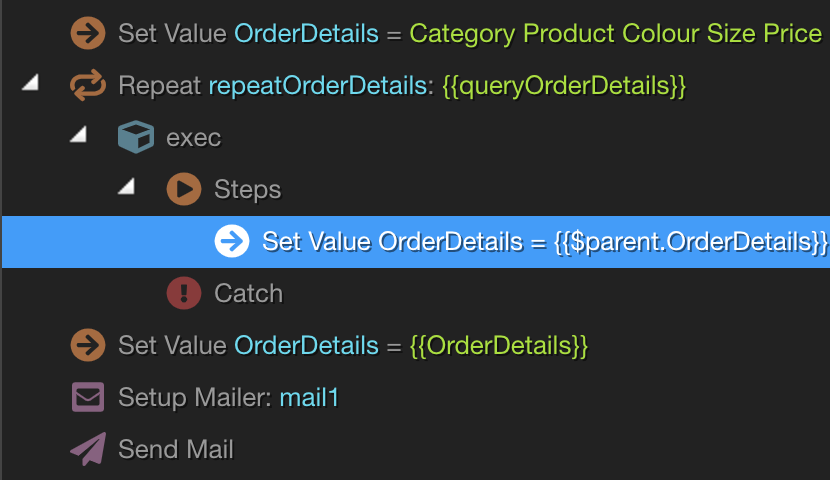
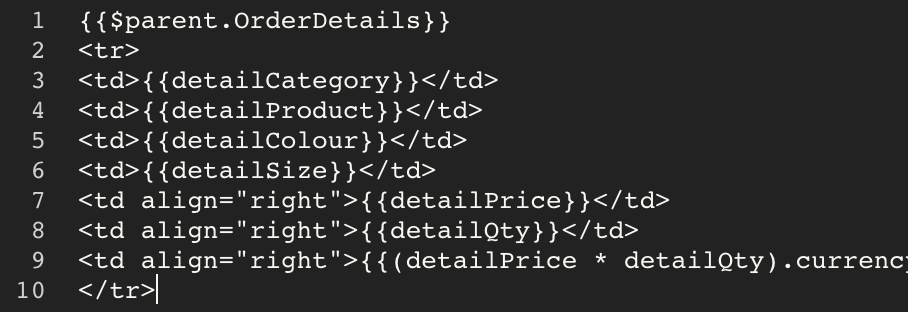
Just to chip in. I set up confirmation emails completely within Wappler by creating a variable which would contain the table in the email (the actual list of products ordered). I used a repeat to go through the products in the order and appended the html to the end of it.
eg. A variable called ‘items’ and a repeat which went through all the items in the order adding <tr><td>{item_name}</td><td>{qty}</td></tr> to it. My email body then had the <table> and </table> tags and output the variable inbetween them. Works perfectly.
I’m having some trouble with Stripe’s API. I can send the basics (currency, source, amount, description) But I cannot send any billing details or shipping details. At the moment, I would just like to send the customers name and email to the API so that when I view the charges in the Stripe dashboard I could tell which one is for whom. My payment is straightforward, just an amount. I already know the user’s name and email, can get it from the database.
How are you using Stripe? Which method?
What files did you have to setup?(ie: js, css, php, etc)
What does the Server Action look like?
What does the api call in that Server Action look like?