Visual testing with CodeceptJS
About visual testing
How does one test if the UI being rendered appears correctly to the users or how to test if each UI element appears in the right position and size? The traditional way to test the UI of the application has always been manually, which is time consuming.
CodeceptJS is a framework that can help us in this case.
What is CodeceptJS
CodeceptJS is a new testing framework for end-to-end testing with WebDriver (or others). It abstracts browser interaction to simple steps that are written from a user perspective.
CodeceptJS is an open source MIT licensed testing framework.
It comes with a lot of nice features for testing our Wappler webapps, here are some:
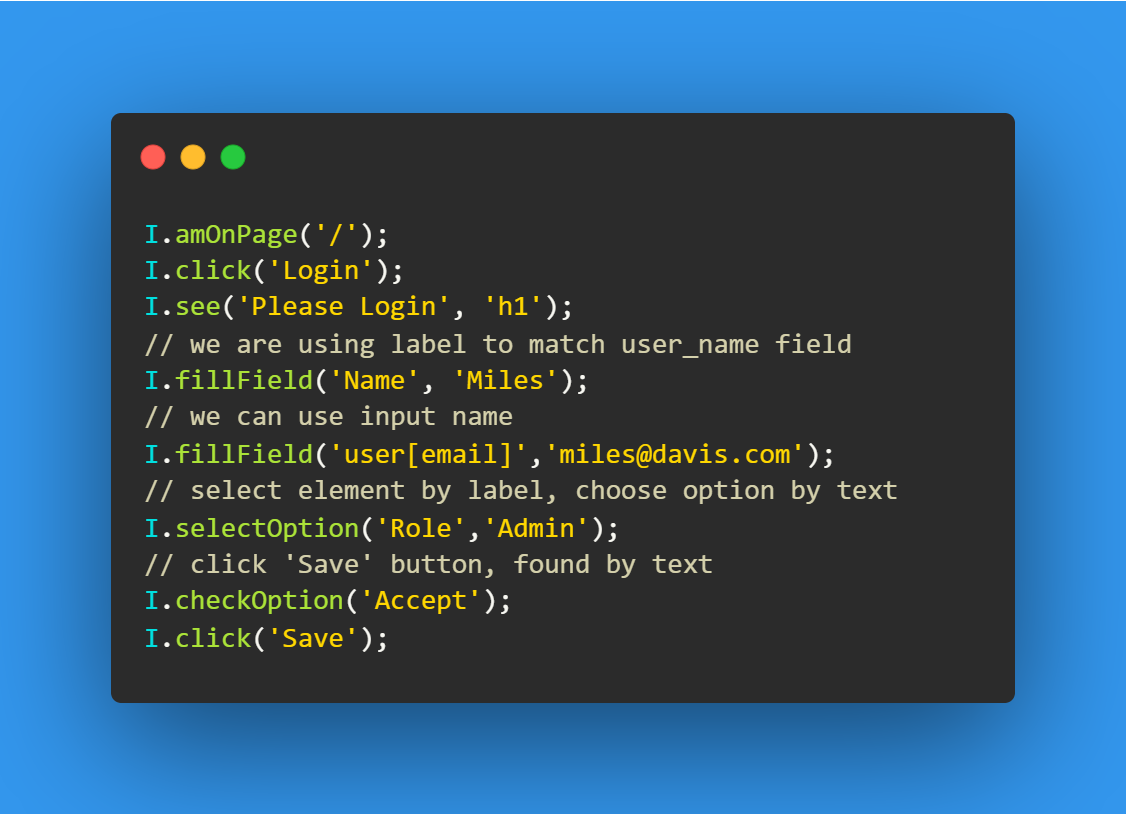
- Extremely descriptive: Tests are written from a user's perspective, here's some example code to prove it
- Scenario driven: easily create flows which are reuseable, here's some example test for a test

- Built in screenshoter (also gif maker and logger) which by default takes a screenshot for every failed action for us so that we can preview later where something went wrong
What this post will contain
In this post we will walk through installing the full version CodeceptJS with Playwright backend (meaning it will not cover the mobile testing, but the original docs are very well done)
and will be creatind a basic example (using a wappler webapp with login).
NOTE ~ CodeceptJS requires
Node.jsversion 8.9.1+ or later.
To use the parallel tests execution, requiring Node.js version 11.7 or later.
Setup and basic example
Installation
We will use npm to install both codecepts and playwright
npm i codeceptjs playwright
and I would also suggest to also install the nice UI we might have seen at the beginning in the tutorial.
npm i @codeceptjs/ui
Start a project
Starting the project is as easy as:
npx codeceptjs init
Then accepting the defaults, such as:s
-
where will be the tests
-
what helper to use (backend to drive the browser, should select Playwright)
-
where to store logs, screenshots, reports
-
what is the base url of the site we are testing (I am using
localhost:8100) -
what browser should be used for testing
-
what feature are we testing first (i will name it
loginin this demo, which will create alogin_test.jsfile)
After this a lot of files will be generated, for our tutorial we will take a look at only two:
-
codecept.conf.js- containing the configs -
x_test.js- our example test
Configs
It is worthwile to take a look at our codecept.conf.js since thats where most things are configured. We can notice that what we filled in / accepted during setup is all stored and can be changed here, so if I would like to change my browser that I test by default, I change from chromium to firefox, or add windows size specification: windowSize: '1600x900',.
Make sure to note how the
urlis represented here, it should beurl: 'http://localhost:8100',where the port might be different for you. Now in your tests / Scenarios you need to sayI.amOnPage('/')so that it generateshttp://localhost:8100/
Test running
NOTE ~ Before test running, it is adviseable for those who will use git here, is to add an exclusion for the pictures (or just everything) in
./output(the default output folder for screenshots), so create / open our.gitignoreand add this line:./output.
Here is how we run all tests from CLI (however we might want to check out the UI first, so scroll down)
npx codeceptjs run {options}
{options}:
-
To see the step-by-step output of running tests:
--steps -
To see a more detailed output:
--debug -
To see very detailed output information:
--verbose
Test running with UI (in interactive mode)
Running the below command will result in the same interface that we can see in the beginnig of the tutorial
npx codecept-ui --app
if we leave the
--appargument out then it will launch it only in server mode and we have to open it in our broswer
Here we can see our account_test.js as a test, with a greyed out checkbox since we have not ran it yet. Lets try it!

For a second a broswer started up and our test is now green. That is because our test did not contain any checks or tasks, so let's change that.
Editing our account_test.js
Open up the account_test.js file and let's add some things there. This will differ very much depending on what site you have already developed with wappler and what Routes you have defined already. I will assume you have a login system already.
Let's change the name of the particular test (Scenario). Let's change the test something text to test user login.
Feature('account');
Scenario('test user login', ({ I }) => {
});
Let's go to our login page. In codeceptjs there are two main ways to go to a different url (in our case login), either by saying I.amOnPage('/login'), or if the main index page (which is served when you start up wappler and go to localhost:8100) has a link to the login, you can target it (ex. I.click('Login');, which searches the page text to find an exact match). We have a lot of options for targeting, and they are covered here: Locating Element in CodeceptJS
In the end our Scenario might look like this. Let's run it!
If you have not closed the previously started testing ui (command for it being:
npx codecept-ui --app) it automatically noticed the changes and you can just run the test again.
Feature('account');
Scenario('test user login', ({ I }) => {
    // I.amOnPage('/login')
    I.amOnPage('/')
    I.click('Login');

    I.fillField('username', 'user');
    I.fillField('password', secret('user12345'));

    I.pressKey('Enter')

    I.see('Profile')
    I.click('Profile')

    I.say('I am going to log out')
    I.click('Logout')
    I.see('logged out')
});
That was a very basic example, let's see how to create tests / Scenarios from scratch:
Learning CodeceptJS: How to model
Simple test
Create new test suite's (checking a worflow like login, or account) with
npx codeceptjs gt
npx codeceptjs generate:test
Important:
-
test files look like
x_test.jswherexis our model -
test files can contain multiple tests, and can have Before, and After tasks (ex. logging in)
Before(({ I }) => {
    I.see
 });
Page object
create action abstractions with "page object" to minimize a workflow task (ex. having to write / copy paste filling out the login form for every test, but this could be done with autoLogin plugin)
npx codeceptjs gpo
npx codeceptjs generate:pageobject
Update our codecept.conf.js file to include this page object
Ex
include: {
      loginPage: './pages/login.js',
    },
Example login action
NOTE ~ we can change the sendLoginForm methodname to anything
const { I } = inject();
module.exports = {
  fields: {
    email: 'username',
    password: 'password'
  },
  submitButton: '#send_login',
  sendLoginForm(email, password) {
    I.fillField(this.fields.email, email);
    I.fillField(this.fields.password, password);
    I.click(this.submitButton);
  }
}
Example usage of the above defined page object:
const { sendForm1 } = require("./pages/login");
Feature('login_pageobject');
Before(({ I }) => { // or Background
    I.amOnPage('/login');
  });
Scenario('test something', ({ I, loginPage }) => {
    loginPage.sendLoginForm('user', 'user12345')
});
Plugins
autoLogin
Logs user in for the first test and reuses session for next tests. Works by saving cookies into memory or file. If a session expires automatically logs in again.
For better development experience cookies can be saved into file, so a session can be reused while writing tests.
autoLogin: {
      enabled: true,
      saveToFile: true,
      inject: 'loginAs', // use `loginAs` instead of login
      users: {
        user: {
          login: (I) => {
            I.amOnPage('/login');
            I.fillField('username', 'user');
            I.fillField('password', secret('user12345'));
            I.click('#send_login')
          },
          check: (I) => {
             I.amOnPage('/');
             I.see('Hello', '.navbar');
          },
        },
        admin: {
          login: (I) => {
             I.amOnPage('/login');
             I.fillField('email', 'admin@site.com');
             I.fillField('password', '123456');
             I.click('Login');
          },
          check: (I) => {
             I.amOnPage('/');
             I.see('Admin', '.navbar');
          },
        },
      }
}
