What is the best approach for storing OAuth2 tokens?

I’ve now got the main authentication working using OAuth2 with Xero. My aim isn’t to use it to log them in, it’s to retrieve and post invoice details so there’s a sync between my app and the Xero account.

I am browsing to the SC script in order to log into Xero and get the tokens but what’s the best way to store these so I can easily connect to Xero in App Connect to get/post data after that? I need a pointer as to how to approach this so I get it right from the outset.

Many thanks.

In oauth2 provider, you can choose token handling to “session” in which case they are available as sessions variable… other option is to persist and retrieve ur tokens from a db (token handling is self-maintain), but i hv never tried this one! Don’t forget to click on the link icon to save ur oauth provider as an action file, like how u save a db connection!

If you choose the sessions way, in another server action files, u add the oauth provider, “connect” it to ur previously saved provider, and use it as “oauth” provider in ur api calls, this is the theory… See my other thread where I have raised a bug regarding this!

Meanwhile, instead of re-using your provider for token authorisation in ur api calls, u can manually add ur tokens to your own session variables and re-use them in ur api call authorisation header.

1 Like

The best way I have found to do this is to first use oauth session auth and save the
Auth token, refresh token and the expiry date/time of the token in a row.
Then in my server actions when I need to do something on the API I first check the expiry date/time and if not expired I use the access token from the saved database record, otherwise if it is expired I use the refresh token to get a new access token and then use the updated record to call the API.
Hope that makes sense.
I think in most cases the session option by itself works well and gets the refresh token when needed, I had to do it this way as a single click could run a single server action for far longer than the 3600 seconds my token was valid for.

4 Likes

These are excellent posts, thank you @Akayy and @psweb. It’s already making more sense. I had completely forgotten about the link part.

Another quick question… Should the new linked action file contain both the Provider and the Authorize actions or just the Provider? If it’s just the Provider, I assume the Authorize action goes in a different file in which case how would I use it?

Thanks again.

Good question @sitestreet… We all need clarity on the provider vs authorizer… waiting for the wappler team to respond…

if you go thru point-4 in my other post (link below), you will understand what’s going on and why its still unclear…

1 Like

On my particular app, when i only need to fetch API data and the access token is still current, i.e. not expired, then I only use the OAuth2 Provider without the Authorise step.

1 Like

More useful posts, thanks again.

Would either of you be able to just outline the processes so I can understand what each step does? Something along the lines of…

Provider - done once, stored in an action file linked so it can be used elsewhere
Authorize - stored in another file but not linked. Used when a new token Access Token is needed

This is just an example based on my current thinking but I’m not sure I’ve got this right so if you’re able to outline the processes that would be great.

I’m trying to get my head around the general way OAuth2 works so I use the best practices.

Would any of the Wappler team be able to come back with some pointers and also respond to the possible bug that @Akayy posted about?

To be very honest I have not had to adjust any Wappler source files nor relink anything as such, I just used it as Wappler provides it, and it all just worked, the worst part was figuring out what the google API itself wanted by delving through their documentation.

So here is a brief outline of what I did.
After setting up all the stuff from Google Developer Console, which i know will be different for your usage, I then moved to Wappler.

  1. Created an index.php login page, with only one text input, not even in a form, and all it takes is the users gmail address. The reason I did this is for existing users already stored in my database, so they do not have to Authorise ever again. There is a button with an onclick event which points directly to my Server Action, so it looks a bit like this.
<div class="form-group">
	<input type="email" class="form-control" id="inputemaila" name="inputemaila" aria-describedby="inputemaila_help" placeholder="Enter Email Address to Authorise" required="" data-rule-email="">
</div>
<button class="btn btn-dark" dmx-on:click="browser1.goto('https://www.example.com/g-manager/dmxConnect/api/g-api-auth-a/token-handling-login.php?inputemaila='+inputemaila.value)">Get Authorised A</button>

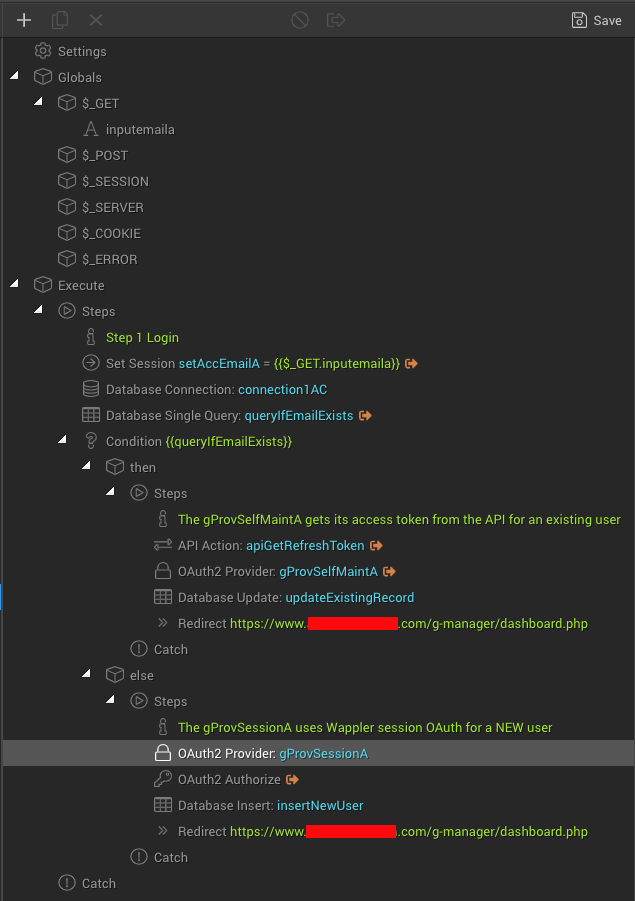
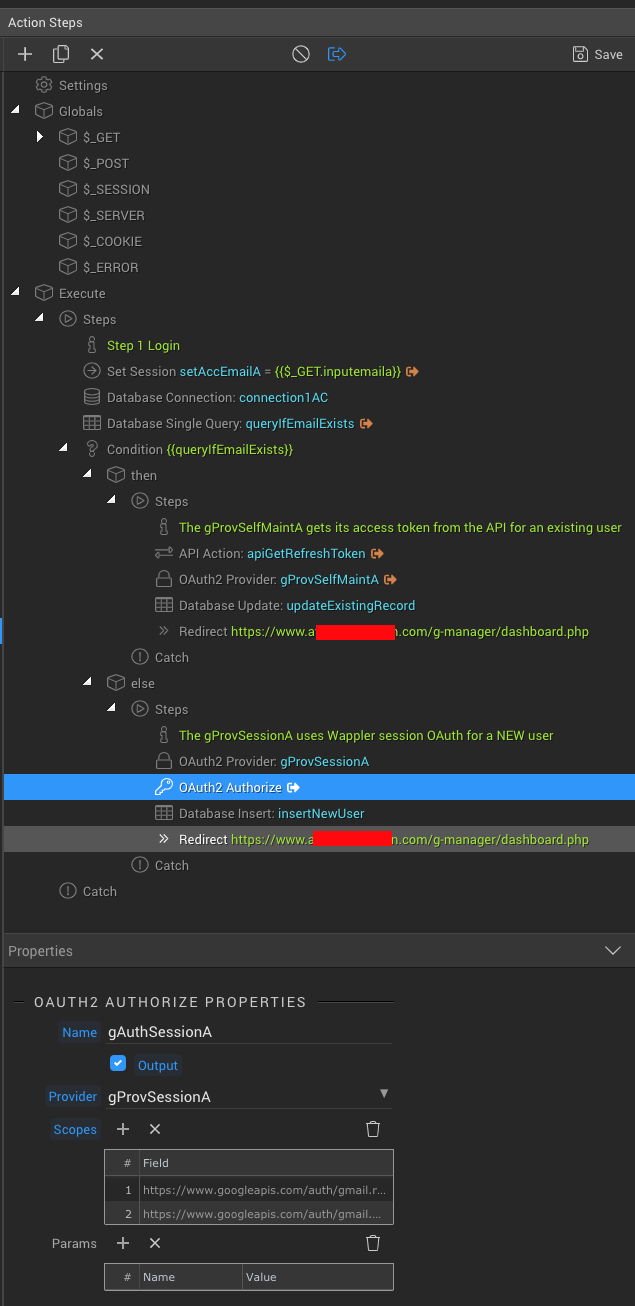
The server action looks like this
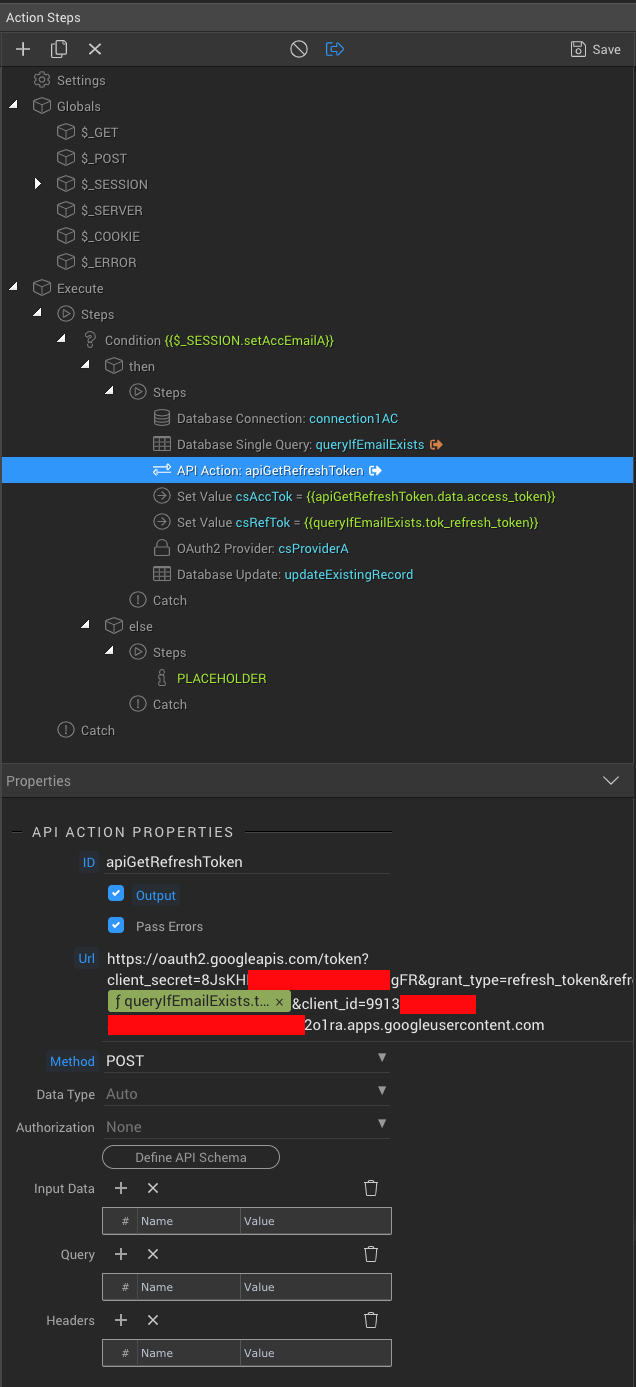

The THEN condition
All this is doing is checking the database and if the email is in the database then it runs the API Action to use the refresh token from my database and get a refreshed access token. Then sends the newly refreshed access token to the "Self Maintain"provider, and updates the database with the new access token and the time it should expire. Lastly it redirects the user to my dashboard page.

The ELSE condition
If the user is not already in my database this runs, it uses the standard “Session” Provider and Authorize, then inserts the new user into the database with their Access Token, Refresh Token and expiry time of the token. Lastly it redirects the user to the same dashboard page.
NOTE: With the Google OAuth2 API the refresh token is only handed out once, so you have to capture this and store it, the only way to make Google give you a new one is by logging into your Google account and unauthorising the application manually. The same refresh token will then be used for this particular account forever.

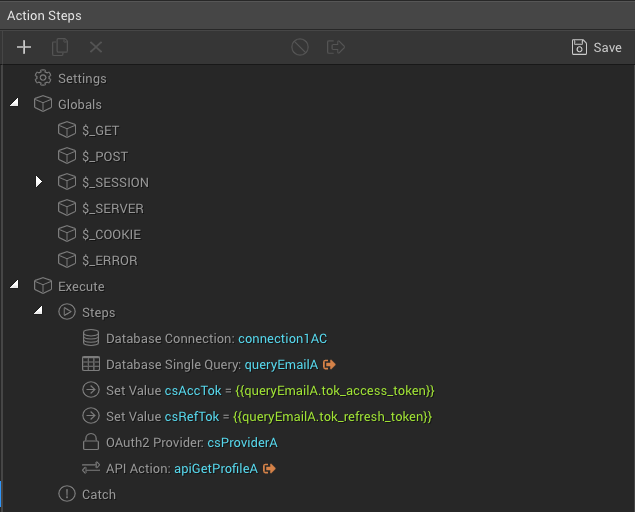
Once I am at my dashboard page, i run a few steps on load, such as displaying some initial data like this


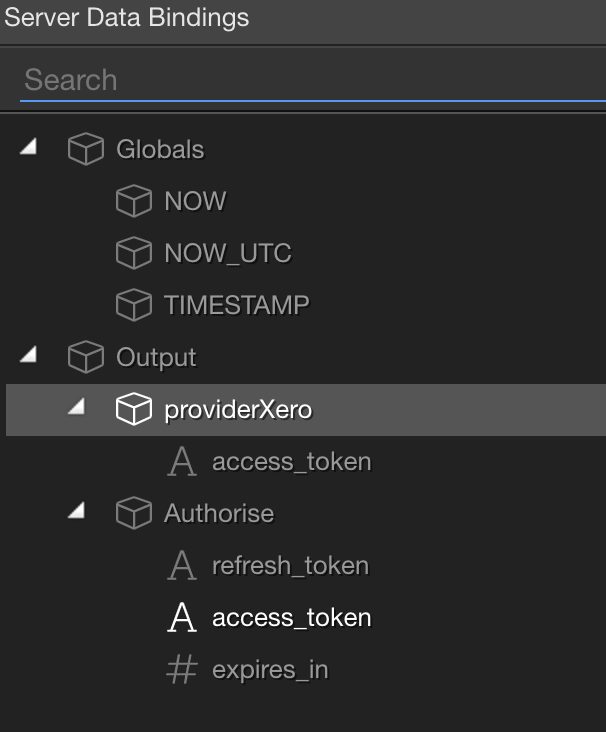
As you can see, there is no new Authorise step, just a single database query that fetches the email address, access token and refresh token.
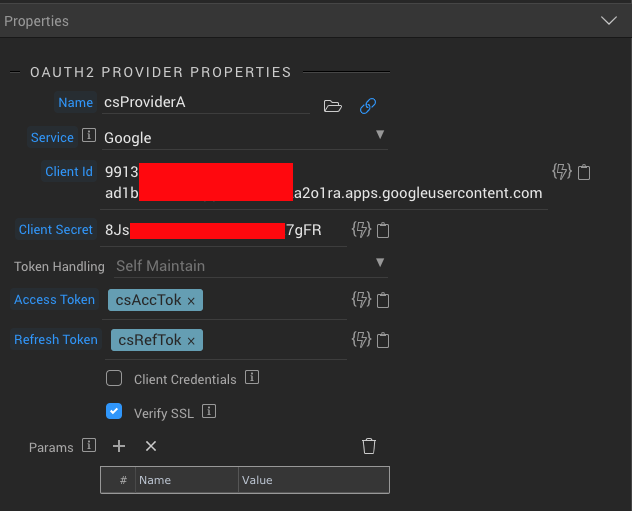
I then put the Access Token and Refresh token inside their own Set Value steps, which is not something you have to do, however it makes it easier as the “linked” OAuth2 Provider can not have different inputs each time for the Access and Refresh Tokens, so this just makes it that I can keep the naming consistent.
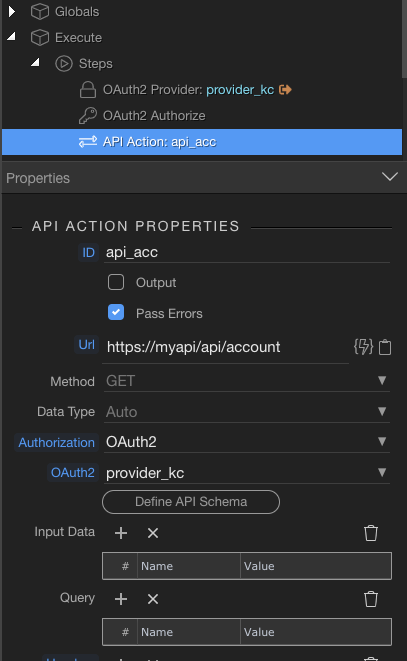
Then I run the Provider with the details from the database like this

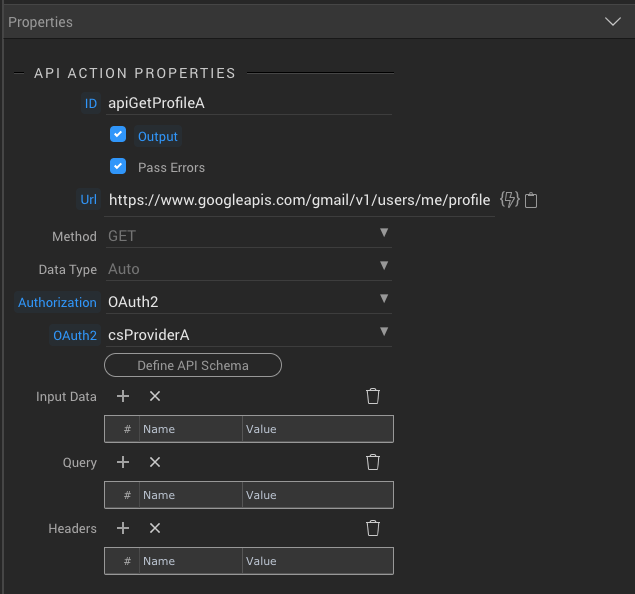
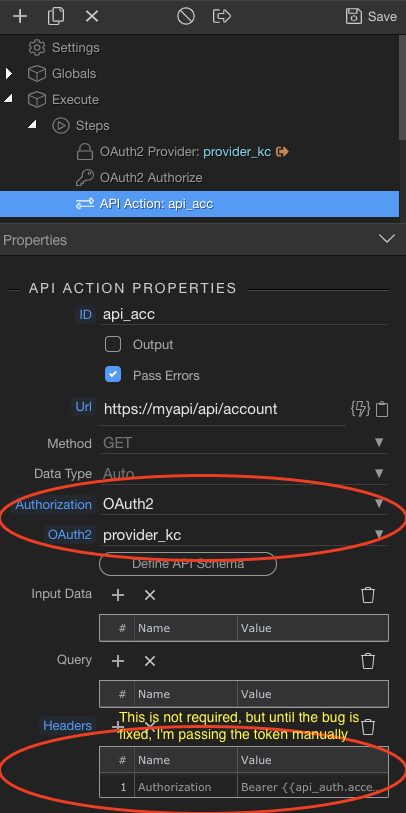
Then I run an API Action to get whatever data I want, in my case it initially just displays some of the users profile data so I have

Note: that in many cases the Define API Schema is not easily fetched on auto so I often times need to click my server action and click run in browser, which then outputs the json data, which i then copy from the browser window.
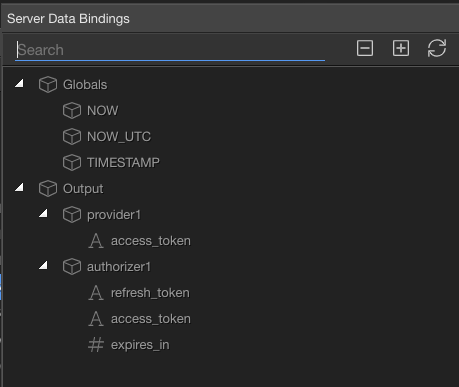
Here is what the output looks like for the API Action in the screenshot above

{"queryEmailA":{"tok_email":"example@gmail.com","tok_access_token":"ya29.a0*****WDg","tok_refresh_token":"1\/\/******dFEuNE"},"apiGetProfileA":{"status":200,"headers":{"0":"HTTP\/2 200","expires":"Sat, 09 May 2020 11:24:46 GMT","date":"Sat, 09 May 2020 11:24:46 GMT","cache-control":"private, max-age=0, must-revalidate, no-transform","etag":"\"hicYA7eHlM******Z45M\"","vary":["Origin","X-Origin"],"content-type":"application\/json; charset=UTF-8","content-encoding":"gzip","x-content-type-options":"nosniff","x-frame-options":"SAMEORIGIN","content-security-policy":"frame-ancestors 'self'","x-xss-protection":"1; mode=block","content-length":"116","server":"GSE","alt-svc":"h3-27=\":443\"; ma=2592000,h3-25=\":443\"; ma=2592000,h3-Q050=\":443\"; ma=2592000,h3-Q049=\":443\"; ma=2592000,h3-Q048=\":443\"; ma=2592000,h3-Q046=\":443\"; ma=2592000,h3-Q043=\":443\"; ma=2592000,quic=\":443\"; ma=2592000; v=\"46,43\""},"data":{"emailAddress":"example@gmail.com","messagesTotal":17098,"threadsTotal":16023,"historyId":"3076859"}}}

I then just copy the data part
{"emailAddress":"example@gmail.com","messagesTotal":17098,"threadsTotal":16023,"historyId":"3076859"}
out and manually paste it into my Define API Schema popup like this.

And thats pretty much the entire process.

A few things to note was obviously for Google Developer Console I needed to add the authorised URL that will be making these calls which in my case was
https://www.example.com/g-manager/dmxConnect/api/g-api-auth-a/token-handling-login.php As that is the only script that calls the entire brand new user app authentication script, i.e. the one that fetches the refresh token for me.

I hope this helps and does not make it even more confusing.

4 Likes

WOW! This looks exactly what I need. Huge thanks @psweb. I will go through it and adjust to my needs and let you know how it goes. You’ve clearly spent a lot of time writing this and I’m extremely grateful.

I’ll let you know very soon :slight_smile:

1 Like

As this guide was mainly centered around using the Google OAuth2 stuff I will note a few things that are specific to the Google OAuth which i struggled to make work, please keep in mind everything i did was using Server Connect, there is not much App Connect work in my app.

Please note the screenshots from the post above show 2 server actions, the first server action token-handling-login uses 2 different OAuth Providers, neither of those are “linked” providers, as they are only used in that one server action initially for login, one “Self Maintain” for existing users and the other “Session” provider for new users.

The second server action uses the “Self Maintain” provider that IS “linked” and used on the rest of the application.

The refresh token can be used to fetch a new access token by using the following URL, obviously I have used * for you to replace with your own Client secret and client id.
https://oauth2.googleapis.com/token?client_secret=8JsK****7gFR&grant_type=refresh_token&refresh_token={{queryIfEmailExists.tok_refresh_token.urlencode()}}&client_id=9913****2o1ra.apps.googleusercontent.com

Here is what it mine looks like, with a lot more stuff than you may need but it shows the API Action itself.

For some reason I could not get the Google OAuth2 to give me the users email address easily, and therefore to save the users email address into the database record which keeps that users tokens I had to call the users profile information which is shown in the first post I did in this thread.

1 Like

Excellent guide @psweb. This is going to be very helpful for anyone dealing with Google OAuth2.

I think the primary difference between our flows is that you don’t deal with “scope” at all which is where “Authorizer” comes into play.

When you have an Authorizer with a defined scope, the access_token & refresh_token are issued during this “login” step.

Yes, quite possibly, as this is my only part that uses scope, and once google hands the refresh token over and it is stored in my database then i do not really have a need for it again.
The scopes are
https://www.googleapis.com/auth/gmail.readonly
https://www.googleapis.com/auth/gmail.modify

So possibly the issue just does not affect my use case.

The easiest way to see the difference is try setting a value and open the data picker, in my case, it shows what’s returned in Provider & Authorizer steps. What do you see?

image

Same as yours, the provider only gives the access_token and not the refresh and expires part, that only shows on the Authorise step as in your screenshot.

I think because I only use the Authorise step once, to insert the data to the database, and then from there I only use it from the database, it has not really impacted what i am doing. But now it makes sense.

1 Like

Unlike you, my token handling is using Sessions, so in the api call, when I choose Authorization as “OAuth2”, the dropdown displays only the provider (circle-1).

In this dropdown, ideally I would have expected the Authorizer to be displayed as it’s the Authorizer that really has the access_toke & refresh_token.

Until this bug is fixed, I’m sending the access_token manually in the header (text in yellow circle-2). The inconvenience is I have to create unnecessary session variables if I had to use the access_token & refresh_token in other server actions.

1 Like

Makes sense, it would make sense to have it available there.

With all your help, I’ve now got an invoice to be read from Xero and display as JSON so can now use it. I think that’s the main hurdle I needed to get over.

@Akayy - it seems to be working for me without needing to add the extra header (your circle 2) so I’m wondering if it might not be a bug after all. I need to do more testing, of course, but my script is pulling in the invoice details without that header.

2 Likes

Awesome, glad it worked for you.

@sitestreet Out of curiosity,

  • when you say set a value and open the data picker, what do you see? Mine below.
  • also, is your token handling using sessions? Are you able to show your API call, does it uses Authorization as OAuth and your provider chosen in the dropdown?
  • if there was an access_token in both your provider & authorizer, are they the same?

image

I see the same as you:

I’m using Sessions, yes. Here’s my Provider settings:

The access tokens must be being handled by Wappler as there are no fields for entering them.

Thanks @sitestreet, I was asking if you had an api call after your provider & authorizer steps? Something like this?

Your input will be helpful to understand how things work between the three steps.