Overview of SCA
As you may know, Europe now has a new law regarding credit card payments known as SCA - Strong Customer Authorisation. While the law has many parts, the key part we need to be aware of is that:
- Customers will increasingly need to provide extra information when they pay online by card
- Apps which take payments need to track more closely the attempts that have been made to purchase items using a card - so that fraud attempts can more easily be traced.
As a result of this, Stripe has put in place a new methodology for taking payments. The old method was based on creating a "Charge"... and the new method is based upon working through a more detailed process which uses a "Payment Intent".
Overview of Payment Intents
-
Create Payment Intent
The idea of a Payment Intent is to start by capturing the moment when an app user goes to the checkout, but before they enter their card details and hit [Pay Now]. At this moment, your app needs to create a Payment Intent item via the Stripe API, specifying at least the amount and currency of the expected payment.
When the Payment Intent is created, you will be returned the "id", "client_secret" and "status" values which you need to save. At this point in time, the status will most likely be [requires_payment_method] - signifying that they haven't yet specified how they will pay. -
Execute [Pay Now]
When you user enters their card and hits the "Pay Now" button, your connection to Stripe will need to pass the "client_secret" value of the Payment Intent you previously created. If the payment is accepted, the Payment Intent's status will change to [succeeded] and the transaction will complete.
If the payment does not go through and the user tries again, the same "client_secret" value should be passed to Stripe, therefore allowing Stripe to track all the attempts at making the purchase.
Making It Work in Wappler
Here come the fun part, and thanks in advance to @sitestreet, @Hyperbytes and @mebeingken for their details in previous posts that helped me to work this all out!
Much of the details here are taken from the following Stripe documentation pages:
Step 1 - SETUP STRIPE ELEMENTS
Stripe Elements is a customisable way of adding the card capture details to your site... so to create something which may looks like this:

If you follow Step (3) on the above link, you will see the details of how to do this in 3 steps:
- Reference the
stripe.jslibrary:
<!-- Stripe elements/js script -->
<script src="https://js.stripe.com/v3/"></script>
- Add the
<form>which will create the card capture fields on your checkout page:
<form id="payment-form">
  <div id="card-element">
    <!-- Elements will create input elements here -->
  </div>

  <!-- We'll put the error messages in this element -->
  <div id="card-errors" role="alert"></div>

  <button id="submit">Pay</button>
</form>
- Add some javascript AFTER the form - i put it in a file called
stripe.jsand have added a few extra comments here just to highlight the three main things going on:
// ========================= Set Public Key ===================================
var stripe = Stripe('pk_test_xxxxxxxxxxxxxxxxxxxxxxxxxxxxxxxxxxx');

// ===================== Set up Stripe Elements ===============================

// Create an instance of Elements.
var elements = stripe.elements();

// Custom styling can be passed to options when creating an Element.
// (Note that this demo uses a wider set of styles than the guide below.)
var style = {
    base: {
        color: '#32325d',
        fontFamily: '"Helvetica Neue", Helvetica, sans-serif',
        fontSmoothing: 'antialiased',
        fontSize: '16px',
        '::placeholder': {
            color: '#aab7c4'
        }
    },
    invalid: {
        color: '#fa755a',
        iconColor: '#fa755a'
    }
};

// Create an instance of the card Element.
var card = elements.create('card', { style: style });

// Add an instance of the card Element into the `card-element` <div>.
card.mount('#card-element');

// Handle real-time validation errors from the card Element.
card.addEventListener('change', function (event) {

    var displayError = document.getElementById('card-errors');
    if (event.error) {
        displayError.textContent = event.error.message;
    } else {
        displayError.textContent = '';
    }
});

// ===================== Pay Now Form Submission ===============================

var form = document.getElementById('payment-form');

form.addEventListener('submit', function (ev) {
    ev.preventDefault();
    stripe.confirmCardPayment(clientSecret, {
        payment_method: {
            card: card,
            billing_details: {
                name: 'Jenny Rosen'
            }
        }
    }).then(function (result) {
        if (result.error) {
            // Show error to your customer (e.g., insufficient funds)
            console.log(result.error.message);
        } else {
            // The payment has been processed!
            if (result.paymentIntent.status === 'succeeded') {
                // Show a success message to your customer
                // There's a risk of the customer closing the window before callback
                // execution. Set up a webhook or plugin to listen for the
                // payment_intent.succeeded event that handles any business critical
                // post-payment actions.
            }
        }
    });
});
Then reference this file at the end of your main html/php design file:
<script src="stripe.js"></script>
This should allow you to view the card capture area on your page.
Step 2 - SERVER ACTION TO CREATE PAYMENT INTENT
This follows Step 2 on the above link to the Stripe documentation. I assume here that you have some familiarlty with creating server action API calls in Wappler.
(The one thing it took me a short while to realise with API calls is that when you've set up all the parameters you need to click on [Define API Schema] and then [Fetch Schema]. This makes a call to the API and tells Wappler what format of response to expect... and allows you to find out if all your parameters and settings are correct, as it will return an error if not!).
Your API Action should look something like this (with temporary values added rather than information for amount, currency, etc passed in through $_GET() or $_POST() )
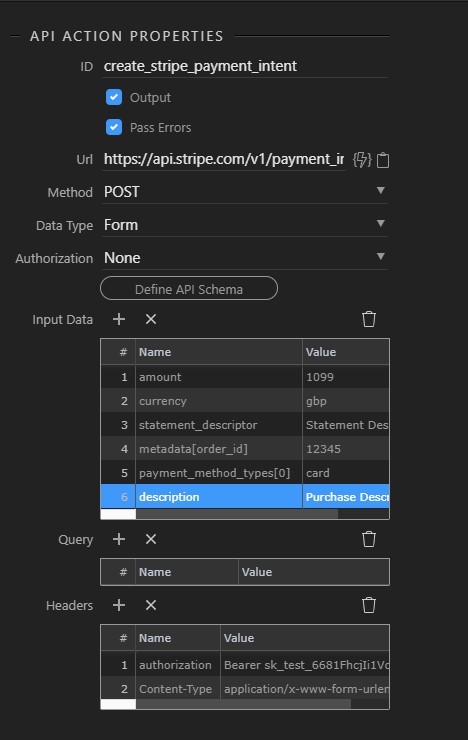
(the Content-Type is application/x-www-form-urlencoded)
See here for all of Stripe's documentation on the options for creating a Payment Intent:
The key piece of information we need back from the Payment Intent is called the client_secret. We need this back on the client side of our app to pass on to Stripe when our user hits the [Pay Now] button.
You can reference this information through the menu system in Wappler on the client side. So if you have:
- Server Connect with id:
create_stripe_payment_intent - Calling a Server Action with API call called:
create_stripe_payment_intent
Then reference to the secret key will be:
{{create_stripe_payment_intent.data.create_stripe_payment_intent.data.client_secret}}
STEP 3 - CREATING THE PAYMENT INTENT
So within the logic of your checkout, you need to call the server action which creates the payment intent as your user passes onto the Checkout page, but before they enter their card details and click on [Pay Now]... so add that call via a Server Connect as required.
For testing purposes, I just added a temporary button to do this on the checkout page.
STEP 4 - SETUP FOR THE [PAY NOW] BUTTON
Here is the background to what is going on with the [Pay Now] button, and the steps you need to take:
-
The [Pay Now] button is the Submit function of the
<form id="payment-form"...that you inserted into your design to display the card capture details in Step 1. -
The last section of code that you placed in the
stripe.jsfile in step 1 defines what happens when that form is submitted. -
In this code, we need to pass in our
client_secretvalue which we obtained when we created the Payment Intent in Step 3. -
The code specified on the Stripe web site has a line like this:
stripe.confirmCardPayment(clientSecret, {
- We need to replace that line with a Wappler based reference - dmx.parse() - that will insert your client_secret obtained from the Stripe Payment Intent that we discussed in Step 2... so insert the reference to your own named server connect and api call here which will look something like this:
stripe.confirmCardPayment(dmx.parse("create_stripe_payment_intent.data.create_stripe_payment_intent.data.client_secret"), {
- Then there is something a bit strange that I don't quite understand... if you leave the form description like this:
<form id="payment-form" method="post">
The the form submission doesn't work and your page is refreshed.
However if you add the is="dmx-serverconnect-form" line to the form, then it all works well... so you need to go and add that:
<form id="payment-form" method="post" is="dmx-serverconnect-form">
Then you should be good to set off and do some basic tests to see if you can take the payment.
STEP 5 - TEST IT ALL OUT!
So as you test it out, keep a watch in the following areas:
-
Chrome Developer Tools - Network/XHR view to see the connections to Stripe and if they succeed.
-
Chrome Developer Tools - Console to see any error messages with the javascript
-
Stripe Dashboard - Payments tab (TEST MODE!) - to see what is created in Stripe.
As you may know, you can use the card number 4242 4242 4242 4242 to test a simple payment that will succeed.
If all goes well, you should find entries in the Payments tab like these:

Where the Incomplete entry is after the Payment Intent has been created but before hitting [Pay Now], and the Succeeded entry is after pressing [Pay Now]
You are probably aware that Stripe has test card numbers you can use... see more in Step 5 of the Stripe documentation link listed above.
![]() GOOD LUCK!
GOOD LUCK! ![]()
WHAT NEXT?
Well there is lots more to do before you have a robust card payment management system...
Take a look at Part 2!
