Hi.
Trying out the new Wappler Extensibility prowess - custom modules - I created and implemented a NodeJS module which accepts an image path and return is base64 encoded string.
This string can be used to store images in DB or just to render it on the client side as src for HTML image tag img.
Its a very simple use case which does not do much in terms of custom code. But this showcases how powerful this feature is.
Package link: https://www.npmjs.com/package/image-to-base64
You can download the module js & module hjson file here: image-to-base64-modules.zip (1001 Bytes)
I’ll try to explain relevant stuff. Rest explanation can be found here and here. Let’s start:
- Install the package. Go to terminal and execute command
npm i -S image-to-base64
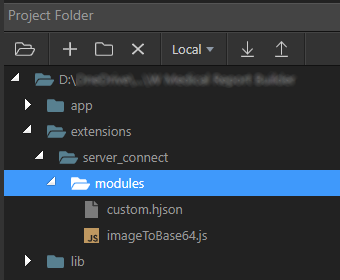
- Create the custom module folder structure as explained in the main post, and add 2 files - js (main module) & hjson (custom definition for module to appear in the Wappler UI).
- In the js, we include the package and a path library available in Wappler.

const imageToBase64 = require('image-to-base64');
const { toSystemPath } = require('../../../lib/core/path');

exports.getValue = function (options) {
    let path = toSystemPath(this.parseRequired(this.parse(options.path), 'string', 'fs.exists: path is required.'))
    return imageToBase64(path);
};
- The Wappler
pathlibrary is needed to convert the file path we will send from server action to our custom module. This is required since module could be in a different folder hierarchy than the image. In my use case, image resides in/public/Uploads/abc.png. Usingpathlibrary returns a ‘parsed’ path which can then be passed to the image-to-base64 package. -
this.parseis server side syntax for accessing objects. This is equivalent todmx.parseyou would have come across in client side. Read more about it here. -
imageToBase64()function returns either base 64 encoded string or an error - using a promise (you can read about it in package docs). Server action will take care of both cases automatically, so we don’t have to handle it here. (Thanks @patrick for helping out here.) - On to the hjson file.
{
  type: 'imageToBase64_getValue',
  module : 'imageToBase64',
  action : 'getValue',
  groupTitle : 'My Modules',
  groupIcon : 'fas fa-lg fa-project-diagram comp-images',
  title : 'Image to Base64',
  icon : 'fas fa-lg fa-file-alt comp-images',
  dataPickObject: true,
  properties : [
    {
      group: 'Source Image',
      variables: [
        { name: 'name', optionName: 'name', title: 'Name', type: 'text', required: true, defaultValue: ''},
        { name: 'path', optionName: 'path', title: 'Path', type: 'text', required: true, defaultValue: '', serverDataBindings: true},
        { name: 'output', optionName: 'output', title: 'Output', type: 'boolean', defaultValue: false }
      ]
    }
  ]
}
- The
nameproperty is required if we want to process any output from the custom module. Its a reserved keyword -optionName: 'name'. - The
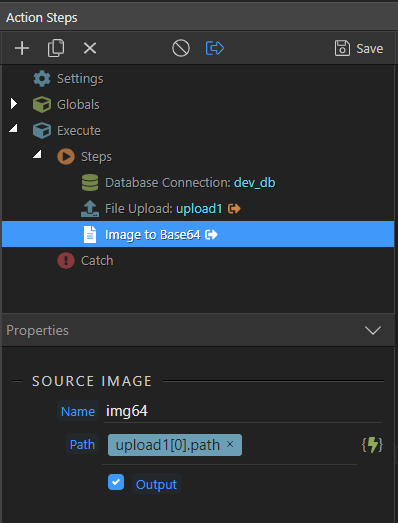
pathproperty expects a file path. In my case, I am passing the path from an upload image step’s path property. - The
optionproperty is also a built-in kind of property which adds the output checkbox to the module properties section. - This module does not return anything other than a string value when runs successfully. Hence I have not configured a
dataSchemefor it in hjson. In case you custom module returns a complex data, you might have to set that up. From my understanding, this works similar to aSet Valueaction step which can be used a simple variable or a complex one with object type and a schema. - Once js & hjson are both saved, just refresh the server action panel and try to add new item to any server action. The image-to-base64 custom module should show up just like other native modules.
- After adding it, you should see the properties for this action step as set in the hjson file.
- You can easily match the various properties and icons and colors etc from hjson in the UI. More details can be found in the main post.
- If all goes ok, running the server action with an image in request should output the base64 encoded string with key as
nameof the step,img64as per screenshots. - The library also works with URLs. So you should also be able to pass that in the
pathinput and get base64 string in response.

Hope this gives some insight into how great this feature is. I am new to NodeJS, so I might have done something wrong. Any improvements and suggestions are welcome.
Sid