Just like we can here on Wappler Community when we’re posting a topic or reply, has anyone ever attempted to upload an image in a Summernote region on image paste, or, even know where to start? Yes, the conventional upload/insert image from the toolbar works and the appropriate SC action has been created. Sometimes it’s much quicker to just paste or drag an image where you want it.
Currently, when you paste or drag an image into Summernote, it converts to a Base64 data image, which is fine and works, but I don’t want to be storing that much information to my database - I’d much rather it in a folder on the server.
Unfortunately that’s not possible with Summernote, and pasting or dragging does exactly this - inserts the image inline in the text as base64.
In order to upload an image there you need to use the provided toolbar and setup a server action, as explained in the tutorial.
Looks promising. There’s a module quill-image-drop-and-paste for Quill with callbacks so I can upload the file through a SC API. I’ll post back when I sort out how I want to save the data. A little more involved than I thought, but very flexible.
I’ve come to a solution. Thanks @Digo, I had literally just been looking at TinyMCE just before your posted. I’ve now decided to implement this instead of QuillJS for ease of implementation AND it’s much easier to store the data as HTML.
I’ve been able to get the image upload working on paste and drag and drop as you can see in the GIF below. (The second time the image goes in is a copy paste situation, and they’re uploading correctly to the specified folder).
Add the TinyMCE script to your layout page: <script src="https://cdn.tiny.cloud/1/no-api-key/tinymce/5/tinymce.min.js" referrerpolicy="origin"></script>
You’ll have to sign up to Tiny to get the API key that you replace no-api-key with in the script above.
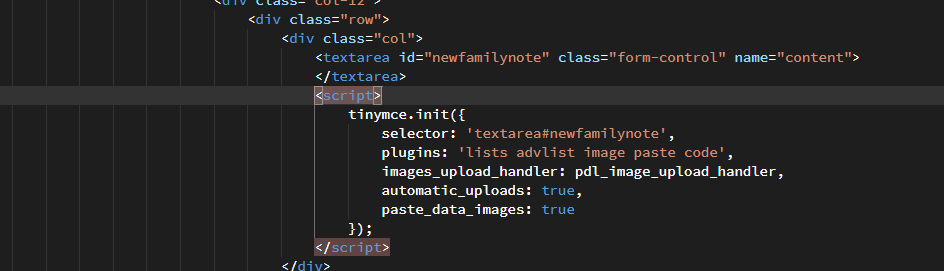
Initialize the textarea you want to use. Take note of the plugins - especially image and paste.
Also ensure automatic_uploads and paste_data_images are set to true.
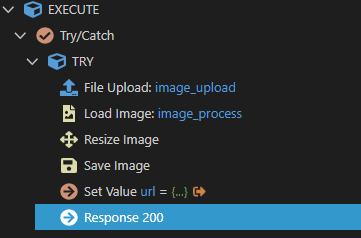
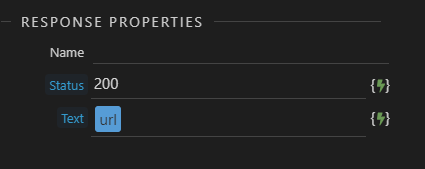
Set up your ServerConnect API. I’m using the following which was auto populated from the Summernote Upload Image module. Just Right Click > Add Action > Search Summernote > Summernote Upload Image.
I’ve added a Set Value and Response module which is needed for the upload handler as you’ll see further down.
Server Connect:
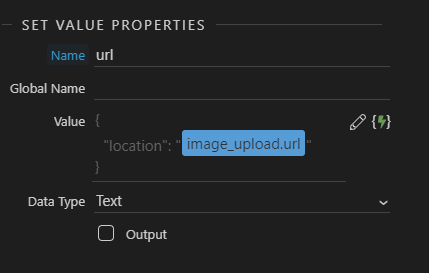
Set Value Details:
Response Details:
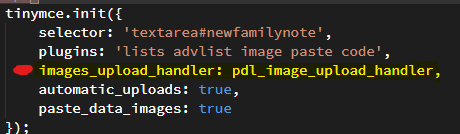
Add a custom JS file in your public folder and add the following code - don’t forget to add this script to your head tags. Most important thing, make sure you change the path to your ServerConnect API you setup above in the xhr.open() function.
function pdl_image_upload_handler (blobInfo, success, failure, progress) {
    var xhr, formData;

    xhr = new XMLHttpRequest();
    xhr.withCredentials = false;

   //************* CHANGE THE PATH TO YOUR API HERE **************************
    xhr.open('POST', 'api/baseActions/summernote/UPLOAD_IMAGE_paste.json');

    xhr.upload.onprogress = function (e) {
      progress(e.loaded / e.total * 100);
    };

    xhr.onload = function() {
      var json;

      if (xhr.status === 403) {
        failure('HTTP Error: ' + xhr.status, { remove: true });
        return;
      }

      if (xhr.status < 200 || xhr.status >= 300) {
        failure('HTTP Error: ' + xhr.status);
        return;
      }

      json = JSON.parse(xhr.responseText);

      if (!json || typeof json.location != 'string') {
        failure('Invalid JSON: ' + xhr.responseText);
        return;
      }
      success(json.location);
    };

    xhr.onerror = function () {
      failure('Image upload failed due to a XHR Transport error. Code: ' + xhr.status);
    };

    formData = new FormData();
    formData.append('file', blobInfo.blob(), blobInfo.filename());

    xhr.send(formData);
  };
Set images_upload_handler to whatever you named the function above. This example, I’ve named it pdl_image_upload_handler.