🦬 Bull Queues for Node Version 2

Hey all,

I’m thrilled to share some powerful new features I’ve been working on for version 2 of the bull queues extension from @mebeingken!

This is an almost full rewrite of the extension with some breaking changes. That’s why it has a different community thread, GitHub repo, and is on npm. Version 1 still remains available at https://github.com/mebeingken/wappler-bull-queues.

You can find Version 2 here:


The installation is fairly easy:

npm install wappler-bull-queues

This will install all the needed packages for you, including the logger and middleware.

Breaking changes compared to V1:

New features in Version 2:

1. Autostart Queues

Queues can now be configured to autostart, meaning they automatically begin processing jobs as soon as your application starts. This provides a much smoother and more hands-off operation of your job queues.

2. Advanced Job Management

I’ve expanded the Add Job functionality. Now, you can:

  • Define the number of completed or failed jobs to keep for review.
  • Add a repeatable job with customizable intervals (cron pattern or fixed interval).
  • Assign priority to jobs, with a lower value indicating higher priority.
  • Set a backoff strategy for job retries, with options for exponential or fixed delays.

3. Improved Job Processor

The job processor no longer relies on API requests. Instead, an app instance is used, passing along headers and sessions to be used inside API jobs. This means Wappler’s security provider now works seamlessly within jobs, and you can access $_SESSION and $_SERVER values.

4. More Job Retry and Autostart Features

Added new functionalities for retrying jobs. These include:

  • Removing repeatable jobs
  • Getting repeated jobs
  • Listing autostart queues
  • Removing autostart queues

Your feedback is always welcome. I hope you find these updates as exciting as I do!

16 Likes

Amazing work Tobias :heart:

1 Like

Thanks @bpj! Comments like yours keep me motivated :slight_smile:

I dont know what is a Bull Queues or how to use it. But knowing your work seems to be very impressive. Thanks for sharing and making this community stronger.

1 Like

Thanks @Chackmool I currently have a pretty bad cold, but I will start recording a few videos and upload them to YouTube to get you started with bull queues as soon as I feel better.

2 Likes

Amazing work!! !@tbvgl

1 Like

Thanks @Roney_Dsilva!

I pushed a few fixes and improvements for this extension. So if you are using it, best update it: npm update.

  • Fixed hjson formatting error
  • Added support for socket events in jobs actions
  • Fixed response actions in job actions throwing error

If you refactor the extension to use Wappler UI to install users will get notification in the Project updater that there is a new release.

@george project updater needs a way to show release notes for each new version pushed to NPM. Maybe reading CHANGELOG.md and some convention rules?

It would also be nice for core files.

People can use Wapplers UI already to install the extension. I worked with George on the extension installer for server connect extensions :slight_smile: @JonL

Why the need for npm update then?

Just for people who don’t install it via Wappler

1 Like

Ah, that’s the part that got me confused.

Actually we already have npm update integrated on the bottom publishing toolbar as “update node packages”

So that should do it all @tbvgl

1 Like

New update:

Initialize a queue in the main application thread

CleanShot 2023-06-03 at 16.52.46

By default, queues are initialized in a sandboxed process. This allows utilizing multiple CPU cores when processing jobs, and they can’t block the main thread. So this is great for long-running jobs or CPU-intensive tasks.

I added the option to create queues that run jobs in the main application thread. This is, for example, useful if you want to emit socket events.

Since you can schedule jobs inside other jobs here is a great use case:

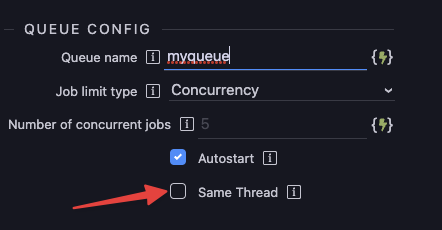
  1. Create a queue that runs in the same thread. Let’s call the queue socket. Tick the Autostart and Same Thread checkboxes when creating the queue
  2. Next, create a queue that runs in a sandboxed process. Let’s call it long_job.
  3. Now, you can add a socket emit to the first queue and a long-running job to the second queue. At the end of the long-running job in the second queue, schedule a job in the first queue.

That lets you pass data to the main thread. So you have the benefits of nonblocking sandboxed processing while running a quick emit in the main thread when the job is done.

Autostarting Queues

Autostarting queues were initialized automatically inside your routes. Since the sandboxed jobs always create a new app instance in a separate thread, this lead to the queues being initialized again whenever a sandboxed job is processed. So the middleware had to be moved into server.js. There is currently no way to do this via extension, but if you need autostarting queues, then here is how I do that:

  1. Create a folder scripts in the root of the project. Add the file startQueues.js inside the folder.

Add the following content to the file:

const App = require("../lib/core/app");
const ioredis = require("ioredis");
const bullQueuesModule = require("../extensions/server_connect/modules/bull_queues");
const { logMessage } = require("../extensions/server_connect/modules/advanced-logger");

function getRedisInstance() {
    return new ioredis({
        port: process.env.REDIS_PORT || (global.redisClient ? global.redisClient.options.port : 6379),
        host: process.env.REDIS_HOST || (global.redisClient ? global.redisClient.options.host : 'localhost'),
        db: process.env.REDIS_BULL_QUEUE_DB || 3,
        password: process.env.REDIS_PASSWORD || (global.redisClient ? global.redisClient.options.password : undefined),
        username: process.env.REDIS_USER || (global.redisClient ? global.redisClient.options.user : undefined),
        tls: process.env.REDIS_TLS || (global.redisClient ? global.redisClient.options.tls : undefined),
    });
}


const startQueues = async() => {
    const redis = getRedisInstance();
    const appInstance = new App();

    try {
        const queueKeys = await redis.keys("autostartqueues:*");
        if (queueKeys.length) {
            for (let queueKey of queueKeys) {
                const optionsString = await redis.get(queueKey);
                if (optionsString) {
                    const options = JSON.parse(optionsString);
                    await bullQueuesModule.create_queue.bind(appInstance)(options);
                }
            }
            await logMessage({
                message: "Queues successfully initialized on server start",
                log_level: "info",
            });
        }
    } catch (error) {
        await logMessage({
            message: `Failed to initialize queues on server start: ${error.message}`,
            log_level: "error",
            details: error,
        });
    }
};

module.exports = startQueues;
  1. Next edit the file lib/server.js

Right after

global.io = io;

and before

module.exports = {

add

//Start queues
const startQueues = require('../scripts/startQueues');

After

start: function(port) {

add

//startQueues
startQueues();

It should look like this:

const server = http.createServer(app);
const io = sockets(server, session);

// Make sockets global available
global.io = io;

//Start queues
const startQueues = require('../scripts/startQueues');
module.exports = {
    server,
    app,
    io,
    start: function(port) {

        //startQueues
        startQueues();

        // We add the 404 and 500 routes as last
        app.use((req, res) => {
            res.status(404).json({
                status: '404',
                message: `${req.url} not found.`
            });
        });

        app.use((err, req, res, next) => {
            debug(`Got error? %O`, err);
            res.status(500).json({
                status: '500',
                code: config.debug ? err.code : undefined,
                message: config.debug ? err.message || err : 'A server error occured, to see the error enable the DEBUG flag.',
                stack: config.debug ? err.stack : undefined,
            });
        });

        cron.start();

        server.listen(port || config.port, () => {
            console.log(`App listening at http://localhost:${config.port}`);
        });
    }
};

@George It would be great if I could do that via extensions so that the setup becomes easier for the community.

Is there a reason why it has to start in the start method?

What happens if you place the startQueues.js file in extensions/server_connect/routes and replace module.exports = startQueues; with exports.after = startQueues;.

Thanks, Patrick!

I had Wappler 5.6 before updating to 5.8. In 5.6, exports.before and exports.after got triggered whenever I started a new app instance in a sandboxed thread.

I just tried that again, and it now works without any issues, and jobs in sandboxed threads don’t trigger the before and after hooks any more.

@tbvgl We want to upgrade to your version.
Is it compatible with 5.8? I see the latest changes on git are 3 days ago, your comment is 1 day ago so I’m assuming it still needs a patch?

Sorry just read it properly. Just the install instructions need to be updated I think :smiley: ?

@karh I will upload a new version tonight or tmr. Best wait for that version. It will install everything automatically and properly releases db connections if you use a sandboxed thread.

1 Like