BEFORE! you install Wappler it is advised to install the following in order.
Lets install some tools we’ll need to get things done, and carry out one or two other things prior to getting things ready.
Update System:
Open a terminal session.
sudo apt update
sudo apt upgrade
sudo apt-get install build-essential
Install Curl:
Open a terminal session.
sudo apt install -y curl
Install GIT:
Open a terminal session.
sudo apt install git -y
Install Homebrew:
Open a terminal session.
Grab the script;
/bin/bash -c "$(curl -fsSL https://raw.githubusercontent.com/Homebrew/install/HEAD/install.sh)"
Add Homebrew to your path:
eval "$(/home/linuxbrew/.linuxbrew/bin/brew shellenv)"
Check Brew is installed correctly:
brew doctor
Install JAVA RE:
Open a terminal session.
sudo sudo apt install openjdk-8-jre
Install JAVA JDK:
Open a terminal session.
sudo apt install openjdk-8-jdk
Set JAVA Home Path:
export JAVA_HOME=/usr/lib/jvm/java-8-openjdk-amd64
Add JAVA Bin to Path:
export PATH=$PATH:$JAVA_HOME/bin
Test JAVA:
java -version
You should see your new JAVA paths displayed.
Install Node JS:
Open a terminal session.
curl -fsSL https://deb.nodesource.com/setup_17.x | sudo -E bash -
sudo apt install -y nodejs
Now check that Node is installed by running the following in the terminal:
node –version
Update System once more:
Open a terminal session.
sudo apt update
Install Gradle:
We are going to install Gradle 6.5.1 as the most recent version (7.3) is not recognised for some reason?
Open a terminal session.
VERSION=6.5.1
wget https://services.gradle.org/distributions/gradle-${VERSION}-bin.zip
-P /tmp
sudo unzip -d /opt/gradle /tmp/gradle-${VERSION}-bin.zip
sudo ln -s /opt/gradle/gradle-${VERSION} /opt/gradle/latest
Set-up environmental variables (open up your text editor):
sudo nano /etc/profile.d/gradle.sh
And paste in the following to the bottom of the file and save:
export GRADLE_HOME=/opt/gradle/latest
export PATH=${GRADLE_HOME}/bin:${PATH}
Remember to save the file (CNTRL and O, then press Enter).
Make the script executable:
sudo chmod +x /etc/profile.d/gradle.sh
Load the variables in to the current Terminal Session:
source /etc/profile.d/gradle.sh
And verify the Gradle installation:
gradle -v
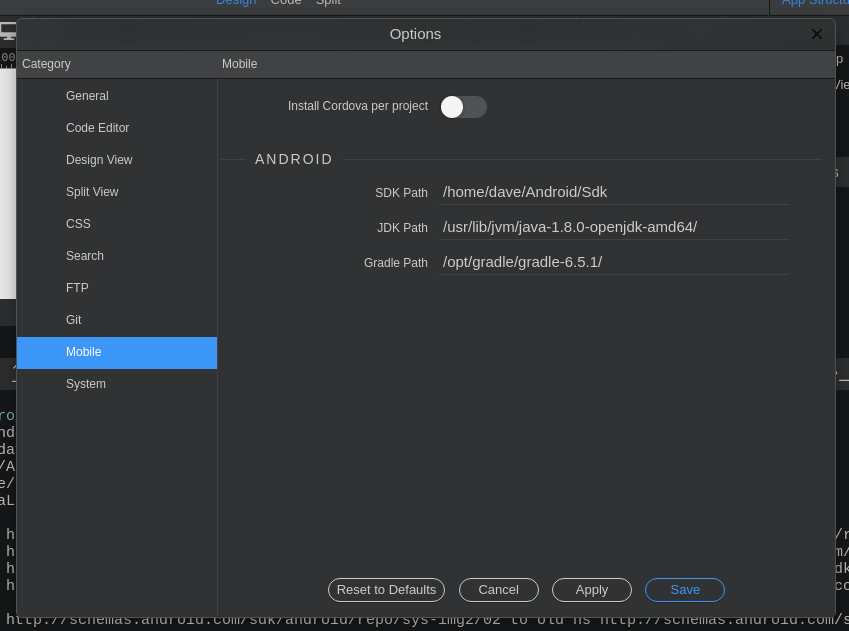
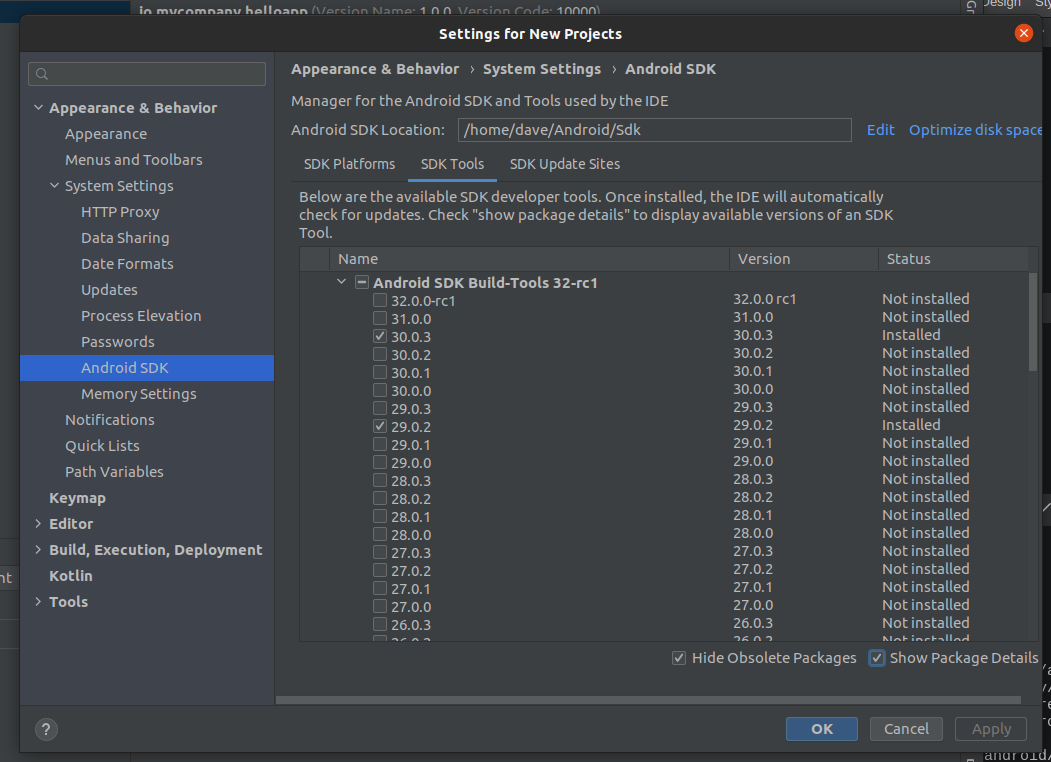
Install Android Studio/SDK:
Download Android Studio for Linux from the official Android Studio website (there are several other ways of doing this, including via the repository using the terminal, your choice).
Open Downloads directory.
Unzip the download.
Open the newly created directory and copy the android-studio directory in to your Home directory.
Browse to the bin directory within the android-studio directory and right click, open in terminal.
In the terminal enter:
./studio.sh
Follow the on-screen instructions to install Android Studio.
Install the SDK Build tools and SDK.
Create a desktop shortcut for Android Studio if one is not available:
Please see this link for instructions on how to do this:
Install Cordova:
Open a terminal session.
sudo npm install -g cordova
Install Wappler:
YAY! The moment has come to install Wappler.
Download Wappler for Linux and install.
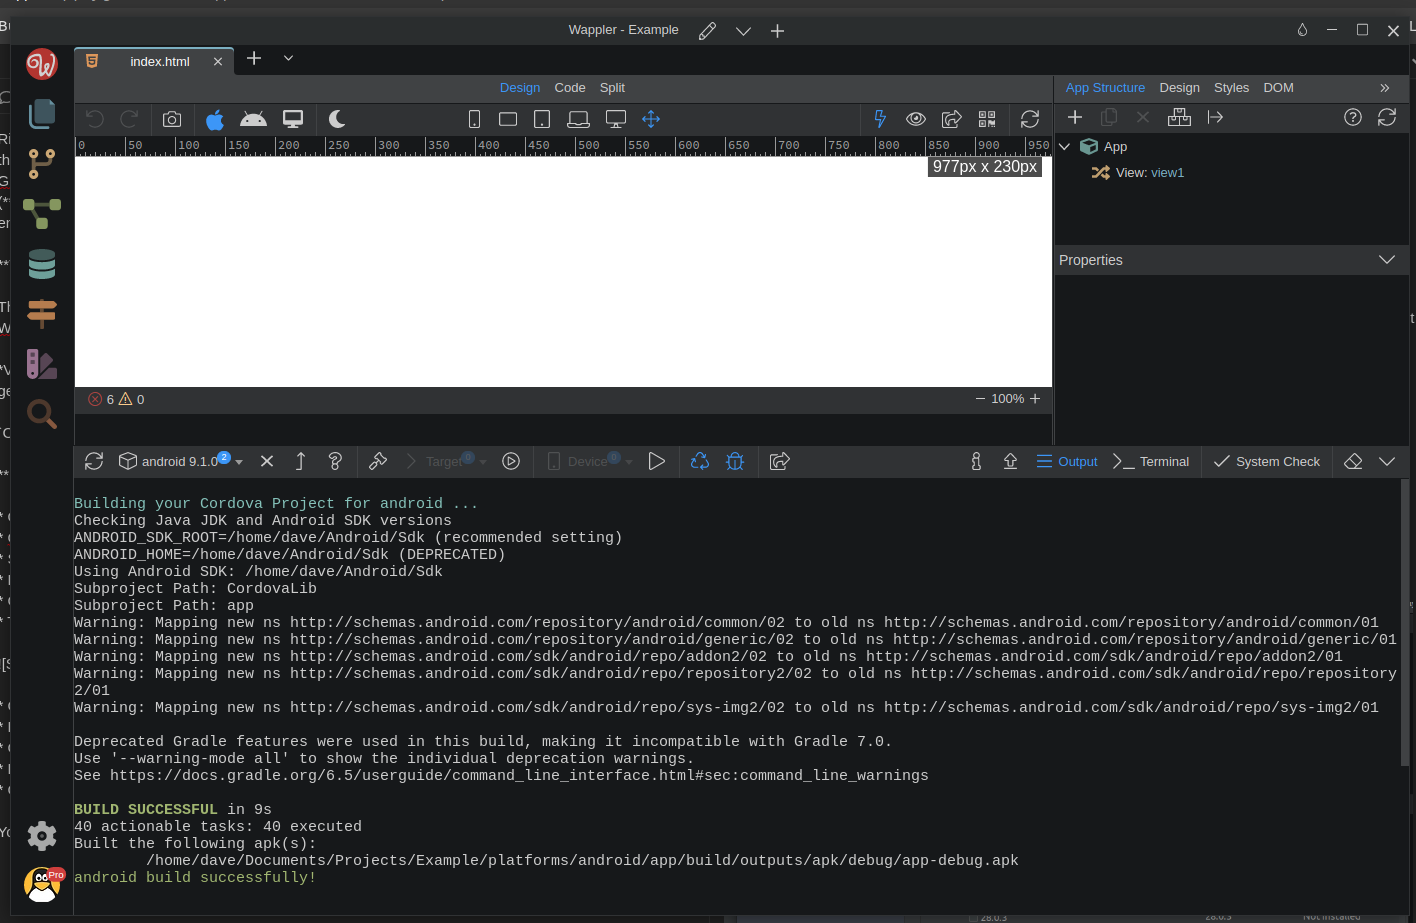
Run the System Check.
If everything went well you should see no issues, everything should report back correctly:
Checking NodeJS installation and version…
v17.1.0
NodeJS is correctly installed.
Checking Cordova installation and version…
10.0.0 (cordova-lib@10.1.0)
Cordova is correctly installed.
Checking for Android Studio installation…
Android Studio is correctly installed.
Checking Java SE JDK installation and version…
javac 1.8.0_292
Java SE JDK is correctly installed.
Checking Gradle installation and version…
Gradle 4.4.1
Build time: 2012-12-21 00:00:00 UTC
Revision: none
Groovy: 2.4.17
Ant: Apache Ant™ version 1.10.7 compiled on October 24 2019
JVM: 1.8.0_292 (Private Build 25.292-b10)
OS: Linux 5.11.0-40-generic amd64
Gradle is correctly installed.
Checking for Android SDK …
Android SDK is correctly installed.
System check successful!
If you are experiencing some build errors please make sure to check the Cordova Platform Guide for android:
http://cordova.apache.org/docs/en/latest/guide_platforms_android_index.md.html
You may get an error with regards to the following (building your Project in Wappler, Android Studio is fine):
Building your Cordova Project for android …
Checking Java JDK and Android SDK versions
ANDROID_SDK_ROOT=undefined\Android\sdk (recommended setting)
ANDROID_HOME=undefined\Android\sdk (DEPRECATED)
‘ANDROID_SDK_ROOT’ environment variable is set to non-existent path: undefined\Android\sdk
Try update it manually to point to valid SDK directory.
Error building your Cordova Project for android!
So let us try and set those paths manually…
Open a terminal session.
export ANDROID_HOME=$HOME/Android/Sdk

export PATH=$PATH:$ANDROID_HOME/tools

export PATH=$PATH:$ANDROID_HOME/platform-tools
Restart your system so these changes take effect.
Issues/Warnings/Notes:
Android Studio may overwrite some of the configurations made using this guide, it may downgrade Gradle for instance.
If you are required to do this go back to the Gradle installation guide above.
Wappler may still display the error building your Project.
I believe this is a BUG and hopefully it will be resolved in the next update (this guide was written using 4.4.1).
If prompted to update your Project in Android-studio DO NOT DO IT, it will break your Project (only update Gradle if prompted, DO NOT update anything else in Android Studio), YOU HAVE BEEN WARNED (if you do, please BACKUP your Project Directory first!).